Compute Tools
Tap the Compute icon ![]() to access the distance, angle, area/volume, and down/out features. The Compute mode is designed to assist you by providing easy access to basic tools to compute geometry information from existing points.
to access the distance, angle, area/volume, and down/out features. The Compute mode is designed to assist you by providing easy access to basic tools to compute geometry information from existing points.
Compute Distance
-
Tap the Compute icon
 in the upper left corner.
 -
Tap on the Distance icon.
-
Tap on the first point you need a measurement from. The first point you select is the starting point (indicated by a solid blue circle).
-
Tap on the second point for the measurement. The second point you select is the end point (indicated by an open blue circle).
-
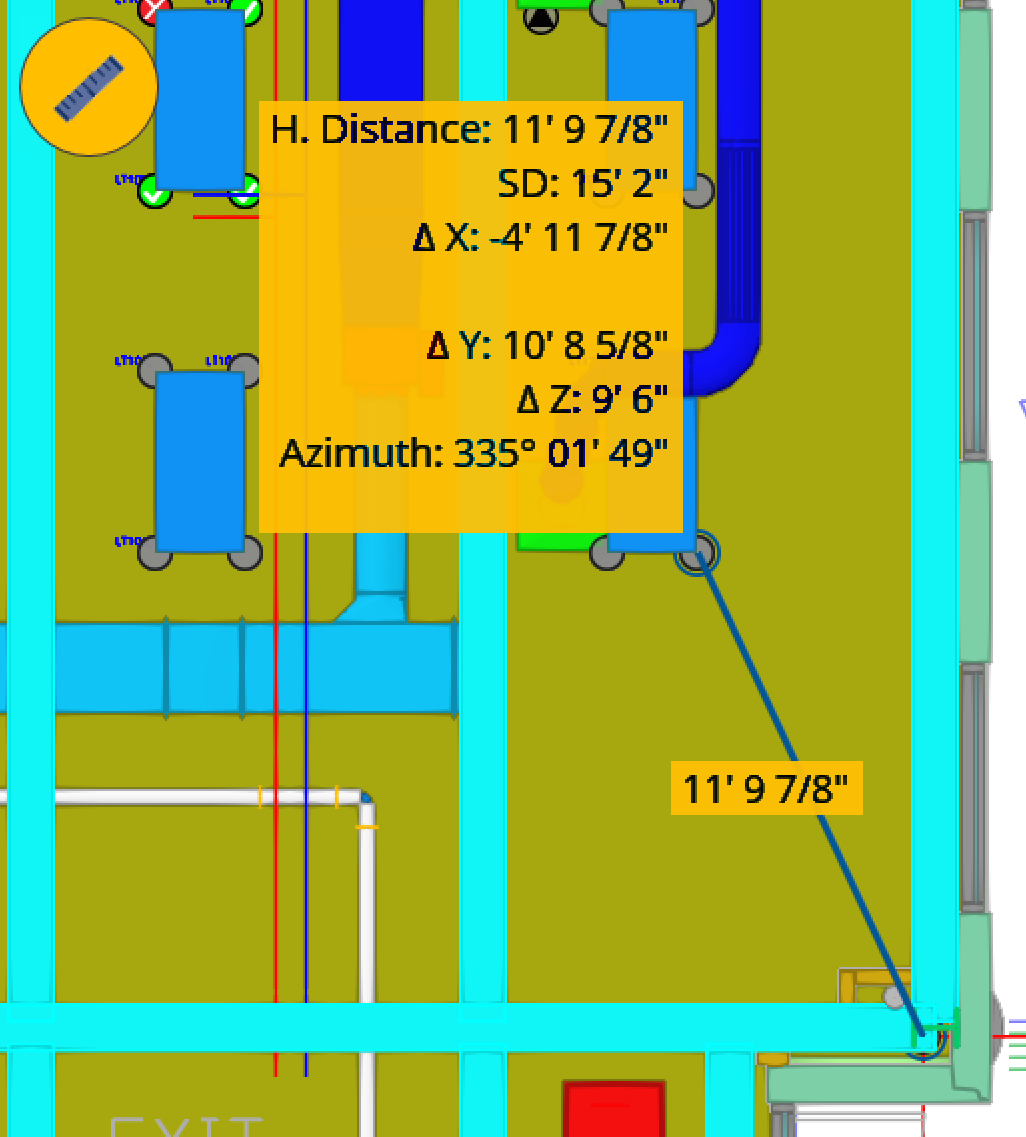
The measurement details between the two points are displayed in a yellow text box.
-
Select another endpoint. The original start point remains.

-
To measure between two new points or to measure a new line segment distance, tap the Clear icon.
-
To measure continuous line segments, you can select a third point and more after to obtain individual and total line distances.
-
Individual and total line segments information will be displayed as follows:
Single Line Segment
-
H. Distance
-
SD
-
ΔX
-
ΔY
-
ΔZ
-
Azimuth
Multiple Line Segments
-
Total H. Distance
-
Total Slope SD
-
ΔX
-
ΔY
-
ΔZ
Compute Angle
- Tap the Compute icon in the upper left corner.
- Tap the Angle icon.
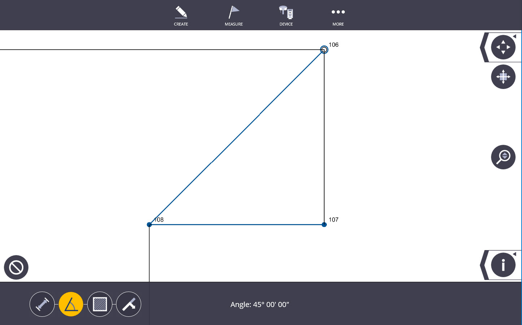
- Tap the first point you need an angle measurement from. The first point you select is the starting point (indicated by a solid blue circle).
- Tap the second point for the measurement. The second point you select is the angle point (indicated by a solid blue circle).
-
Tap the third point for the angle measurement. The third point you select is the end point (indicated by an open blue circle).
The angle measurement between the three points appears in the lower message bar.
- Select another endpoint. The original start point and angle point remains.
- To measure between three new points, tap the Clear icon.
Compute Area & Volume
- Tap the Compute icon in the upper left corner.
- Tap the Area icon.
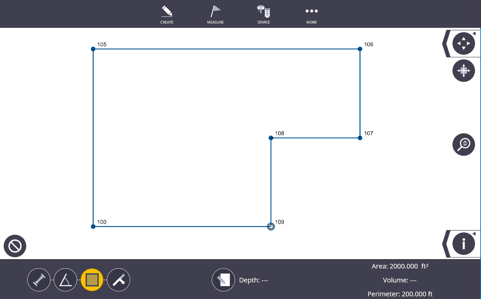
- Tap the first point to outline the area you want to compute.
- Tap the second point to outline the area you want to compute.
- Tap the third point to outline the area you want to compute. The third point you select causes a dotted blue line to be created between the start point and the third point and defines an area. Once a three-point boundary has been established, the area and perimeter is shown in the lower message bar.
- Continue to tap on the additional points to outline the area you want to compute. Each point you select causes a dotted blue line to be created between the start point and the last point selected.
- If you accidentally select a point, tap on the point again to deselect the point. The last selected point appears as an open blue circle. You can deselect as many points as necessary.
-
Tap the Input Form icon
 and enter a depth dimension.
 -
The Area, Volume and Perimeter calculations are shown in the lower message bar.
- To start a new area calculation, tap the Clear icon.
Down and Out Calculation
- Tap the Compute icon in the upper left corner.
- Tap the Down & Out icon.
- Tap the first point of the line you need a measurement from. The first point you select is the starting point of the line, and down measurement.
- Tap the second point of the line you need a measurement from. The second point you select defines the line for the out measurement.
- Tap the third point to calculate the down and out measurement. The third point is indicated by an open blue circle and attached to the main line with a perpendicular line.
- If you accidentally select a point, tap on the point again to deselect the point. The last selected point appears as an open blue circle. You can deselect as many points as necessary.
- The down and out measurement between the three points appears in the lower message bar.
- Select another point. The original line start point and end point remain.
- To measure between three new points, tap the Clear icon.
