Connection
Before you can collect or lay out data, you must first connect a Robotic Total Station or GNSS Receiver, make sure the prism and instrument settings are correct, and then set up the instrument for its position on the project. The instrument and prism tasks are all accomplished in the Device Mode.
Robotic Total Stations (RTS)
To connect to the instrument, make sure the RTS is turned on with a fully charged battery.
- Tap the Device
 icon.
icon. - The connection window opens. Make sure to select the RTS icon from the row of instrument types.
- Place the battery into the RTS with the battery indicator down and the charging ports facing the inside of the RTS.
- Press the power button on the RTS.
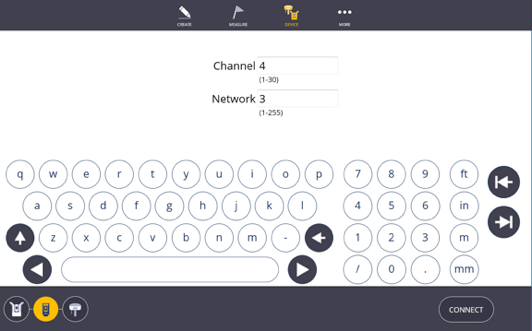
- Enter the Channel and Network ID that matches those in the Face 2 display on the RTS.
- Tap Connect.
- Once completed with the layout or collection process, tap the Disconnect icon in the connection window before turning off the RTS. Tapping the Disconnect icon helps ensure a proper shutdown and later reconnection.
Trimble TDL2.4 Data Link Radio
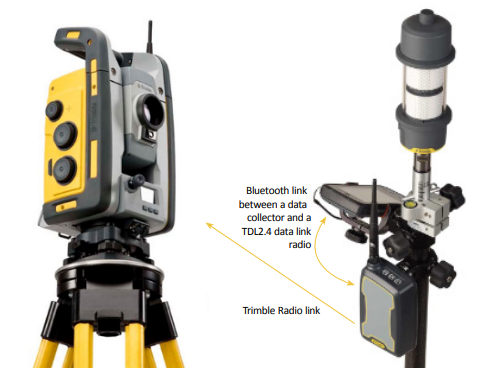
NOTE – When connecting to an RTS using a Trimble Data Link Radio, the radio must be paired before first use.
Pairing Instructions
While in the Connection window, after setting the correct Channel and ID, press and hold the “radio” button on the Trimble Data Link radio before pressing the Connect button in the Connection window.
Once the Trimble Data Link Radio is successfully paired, the radio's Bluetooth name is shown in the FieldLink workslate.
Trimble Ri
Upon powering on the instrument, the Ri automatically performs a tilt detection and a field calibration. The instrument rotates horizontally during tilt calibration. It is important to know that the instrument even if not physically leveled. Instead the instrument calculates the tilt plane and during measurements applies a correction based on the amount of tilt.
During field calibration, the instrument moves side-to-side and up and down. Field calibration focuses the mirrors, calibrates the instrument to infinity, and adjusts the instrument to environmental conditions. Thanks to the self-calibration of the instrument, it does not have to be sent in for service annually like other total stations need to.
Avoid touching the instrument during its calibration process. The Ri is gear-driven and interfering with its movements is not advised.
The full autostart process takes around three minutes. After the instrument is calibrated to its environment, it can connect to a data controller. A connection cannot be made while the instrument is still in calibration mode. Note that level detection and tilt compensation is performed during the calibration and connection stage, so there is no need to auto-level again.
Once the instrument has performed the calibration, you can select the Vibration Sensitivity to be High, Low, or Off. Vibration sensitivity does not actually detect vibrations, rather it measures changes in its surroundings. High considers all environmental factors, and low considers all except for changes in temperature and timeout. Setting it to Off is only appropriate for demonstrations in extreme conditions such as set up on a meeting room table as this ignores all environmental factors, except for the instrument being off level by more than 5 degrees.
To connect to the Ri
- Select the correct Ri serial number from the list of available instruments or press the Find button if your device is not shown.
- Tap Connect.
- Once completed with the layout or collection process, tap the Disconnect icon in the Connection window before turning off the Ri. Tapping the Disconnect icon helps ensure a proper shutdown and later reconnection.
To change the WiFi Band
- Tap Device and then tap Settings.
- Click on the Wi-Fi Band arrow.
- Select Band Automatic, Automatic24GHzOnly or Automatic5GHzOnly.
- Reboot of Ri is required for the new Band to be in effect.
Global Navigation Satellite System (GNSS)
-
Tap the Device
icon. -
The connection window opens. Make sure to select the GNSS icon from the row of instrument types.
-
Place the battery into the GNSS receiver with the charging ports facing the inside of the GNSS receiver mating charging ports.
-
Press the power button on the GNSS receiver.
-
Enter the Channel and Network ID that matches those in the Face 2 display on the RTS.
-
Tap Connect.
-
Once completed with the layout or collection process, tap the Disconnect icon in the Connection window before turning off the RTS. Tapping the Disconnect icon helps ensure a proper shutdown and later reconnection.
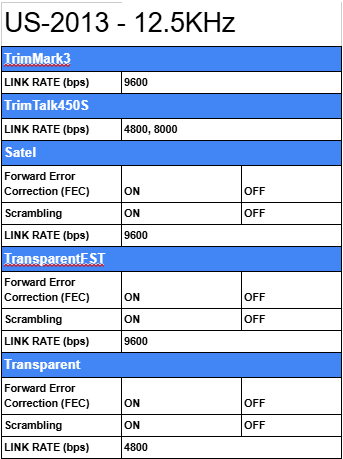
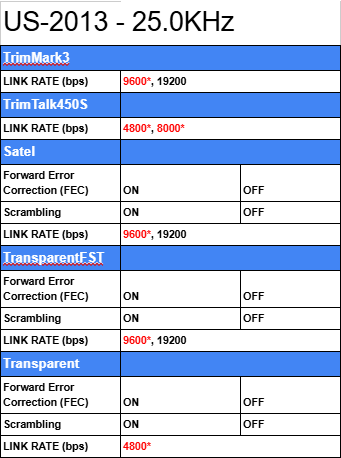
WARNING – Link rates marked with an asterisk (*) indicate a wireless mode that is illegal within the US as of January 1, 2013 (https://www.fcc.gov/narrowbanding-overview)
