Pointwork
In Pointwork mode, you can view point information, add, edit or delete points, or specify select points as control points. You also can create points along a line or arc, or offset points along a line or arc to either or both sides of the line or arc.
In Pointwork mode, you can:
Input Point
- Tap the Create icon
 .
. - Select Point Manager.
- Tap the Input Form icon
 .
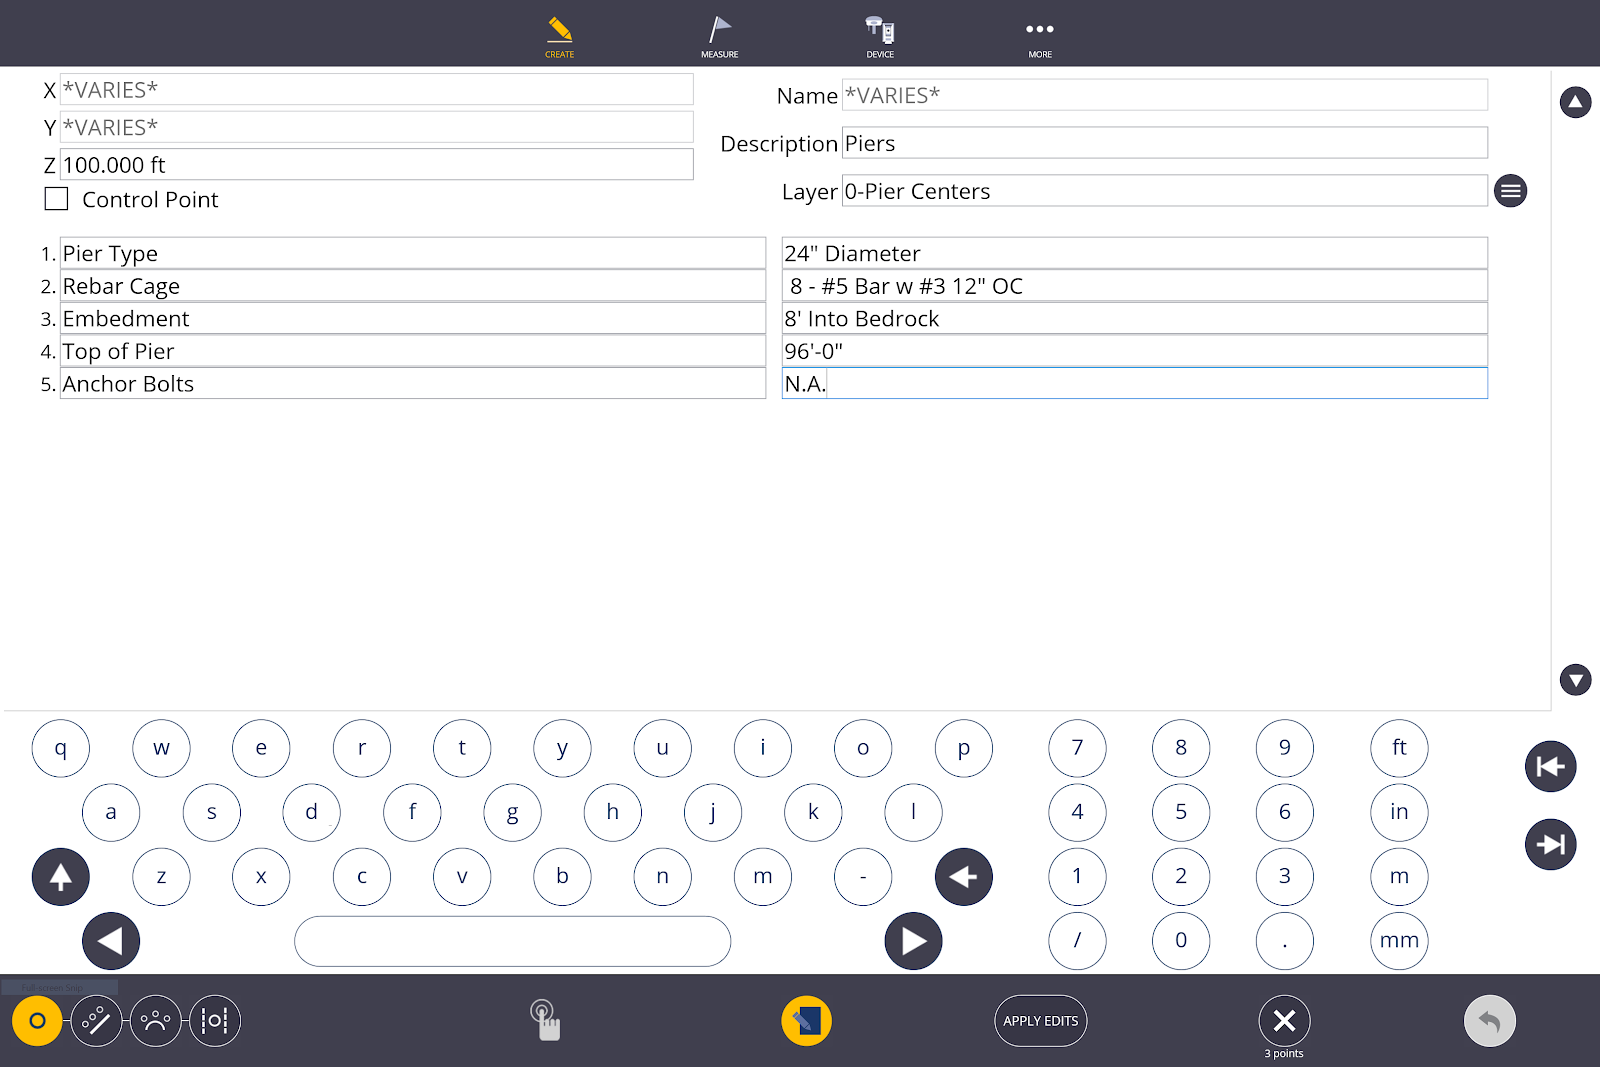
. - Input the Name, Description, Layer, X (Easting), Y (Northing), and Z (Elevation) of the point that will be created. Place the points on a specific layer by tapping the Layer drop-down menu, or type in a new Layer to create a new layer name.
- Checking the box next to Control Point will mark the point with a triangle in the middle of the point to signify it is a Control Point.
- Tap the Create icon
 .
.
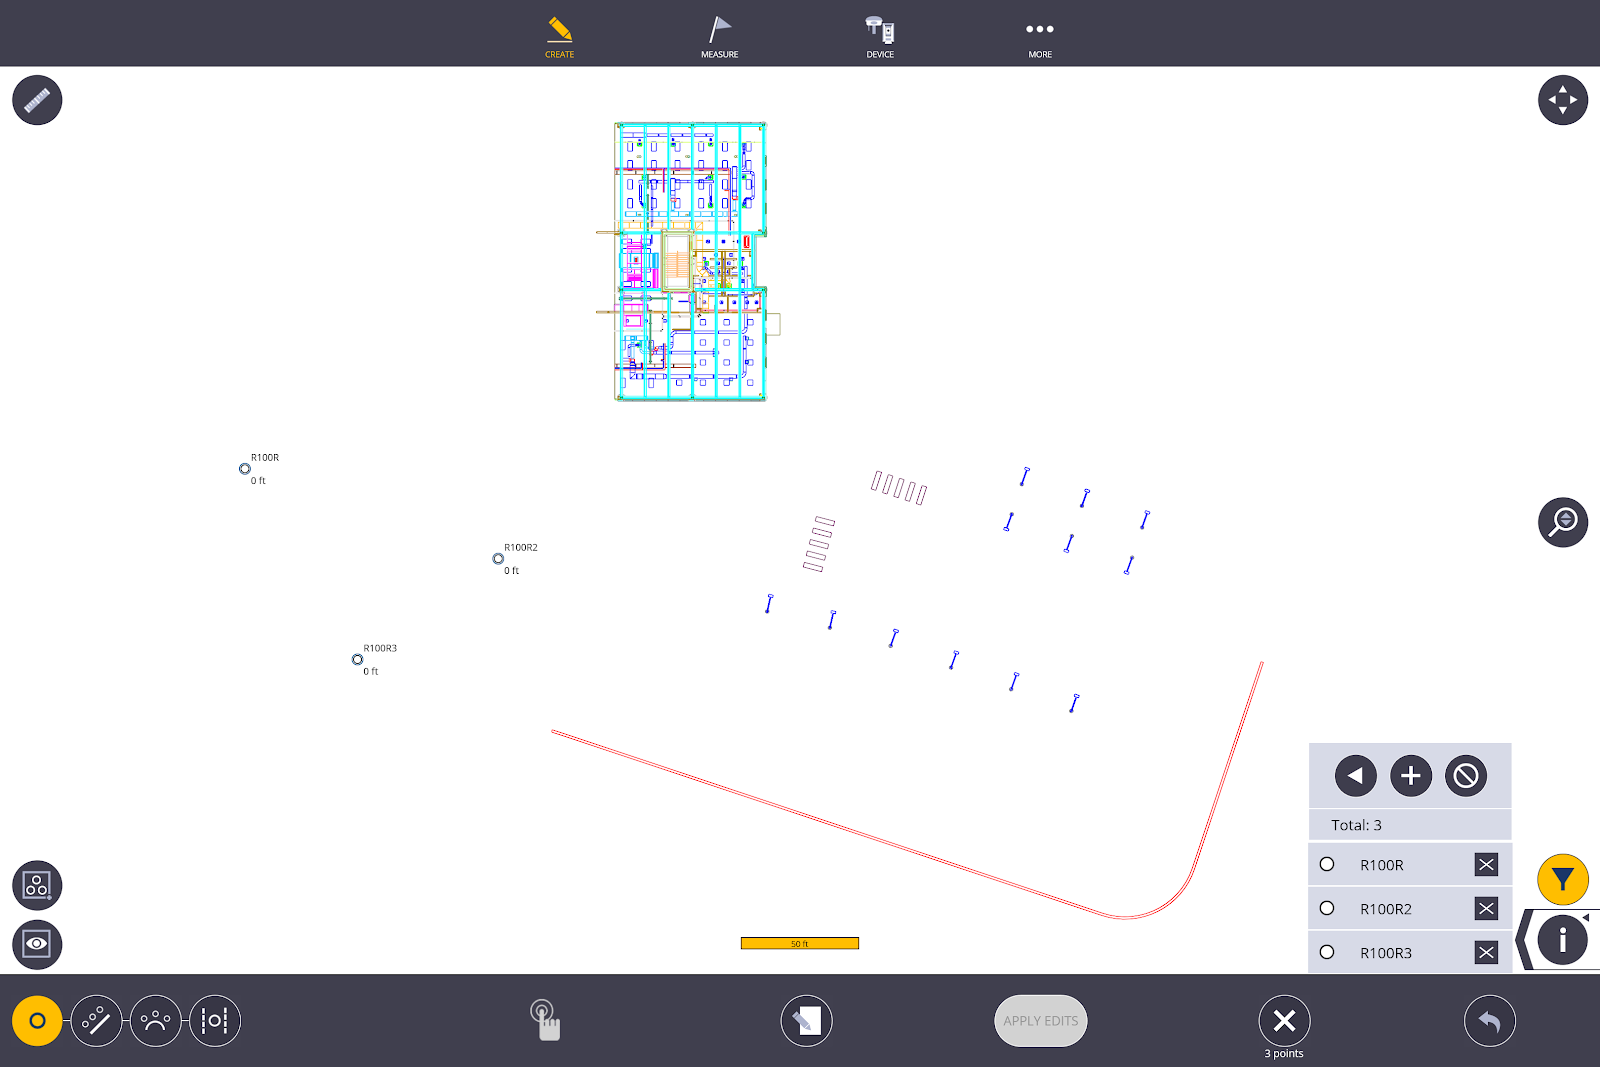
- To edit a single point or multiple points, tap on one of the existing points to highlight it in blue or use the Window Selection tool.
- Use the Map Tools to zoom in on an area, zoom extents, turn on/off layers, or otherwise define a single or group of points to edit simultaneously.
- Unselect the point by tapping it again or tap the Clear All icon to unselect all points.
- Tap the Input Form icon. You can change the Description, Layer, Z(Elevation), or make them Control Points. You can change the X(Easting), Y(Northing) only for single points at a time.
- If you edit the Name of an existing point, the Name reverts to the next number available in the sequence and the position values, layer and description are the same as the selected point. This process is similar to a “Save As” function.
- Tap the Apply Edits icon.
- You can delete single or multiple points by selecting the point and tapping the Delete icon.
- To undo the last creation, edit or delete process, tap the Undo Arrow
Create Point Anywhere
- Tap the Create Point Anywhere icon
 and then tap the screen where you want to place the point. You should only use this option when no background option will work or for temporary points.
 - You can then edit this point using the Input Form .

TIP – Use the Create Point Anywhere tool along with the scanning module to create layout points along building corners, wall lines or other recognizable scanned objects.
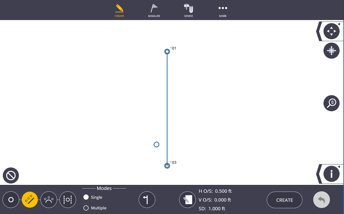
Single Point Offset
- Tap the Line Offset Point icon and select the start and end point of the line you want to offset or create points along.
- Select the Single Mode option.
- Select two points to define the direction.
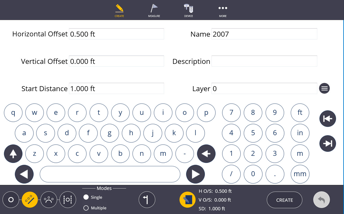
- Tap the Input Form icon and enter values for Horizontal Offset, Vertical Offset, Start Distance, Name, Description and Select or Enter Layer. Tap the Input Form icon to return to map to check the location of point that will be created.
- Tap Create.
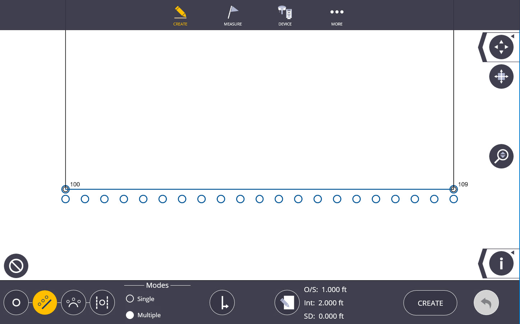
Create Multiple Offset Points - Line
- Tap the Line Offset Point icon and select the start and end point of the line you want to offset or create points along.
- Select the Multiple Mode option.
- Tap the Input Form icon . Input the Name, Description, Layer, Offset Distance (Can be “0” if you want points along the line), Interval (Distance between points along the line), and Start Distance (First point off the first point you selected). The elevation of the offset points will be determined by the Z(Elevation) of the points selected for the start and end points of the line. Place the points on a specific layer by tapping the Layer drop-down menu, or type in a new Layer to create a new layer name.
- Tap the Offset Direction icon to toggle from right, left or both sides of the line before creating points.
- Tap Create.
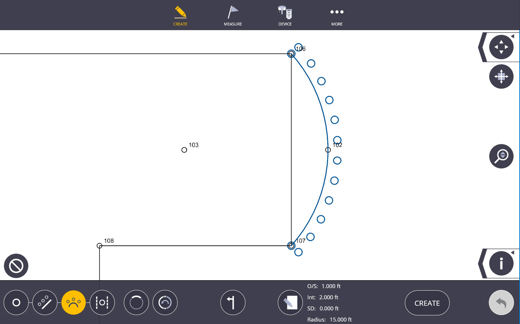
Create Multiple Offset Points - Arc
- Tap the Arc Offset Point icon and select the start and end point of the arc you want to offset or create points along.
- Tap the Input Form icon. Input the Name, Description, Layer, Offset Distance (Can be “0” if you want points along the arc), Interval (Distance between points along the arc), and Start Distance (First point off the first point you selected). The elevation of the offset points will be determined by the Z(Elevation) of the points selected for the start and end points of the arc. Place the points on a specific layer by tapping the Layer drop-down menu, or type in a new Layer to create a new layer name.
- Tap the Short Arc/Long Arc icon to switch the new arc from the short arc solution to the long arc solution.
- Tap the Flip Arc icon to switch the direction of the arc.
- Tap the Offset Direction icon to toggle from right, left or both sides of the line before creating points.
- Tap Create.
- To undo the last creation, edit or delete process, tap the Undo Arrow
-
Create Point - In Wall
- Tap the Create Point in Wall icon.
- Select the two lines that define the wall.
- Tap the location between the lines where you want to create the point.
- Tap the Input Form icon . Input the Name, Description, Layer (Place the points on a specific layer by tapping the Layer drop-down menu, or type in a new Layer to create a new layer name).
-
Tap Create.

Point Manager
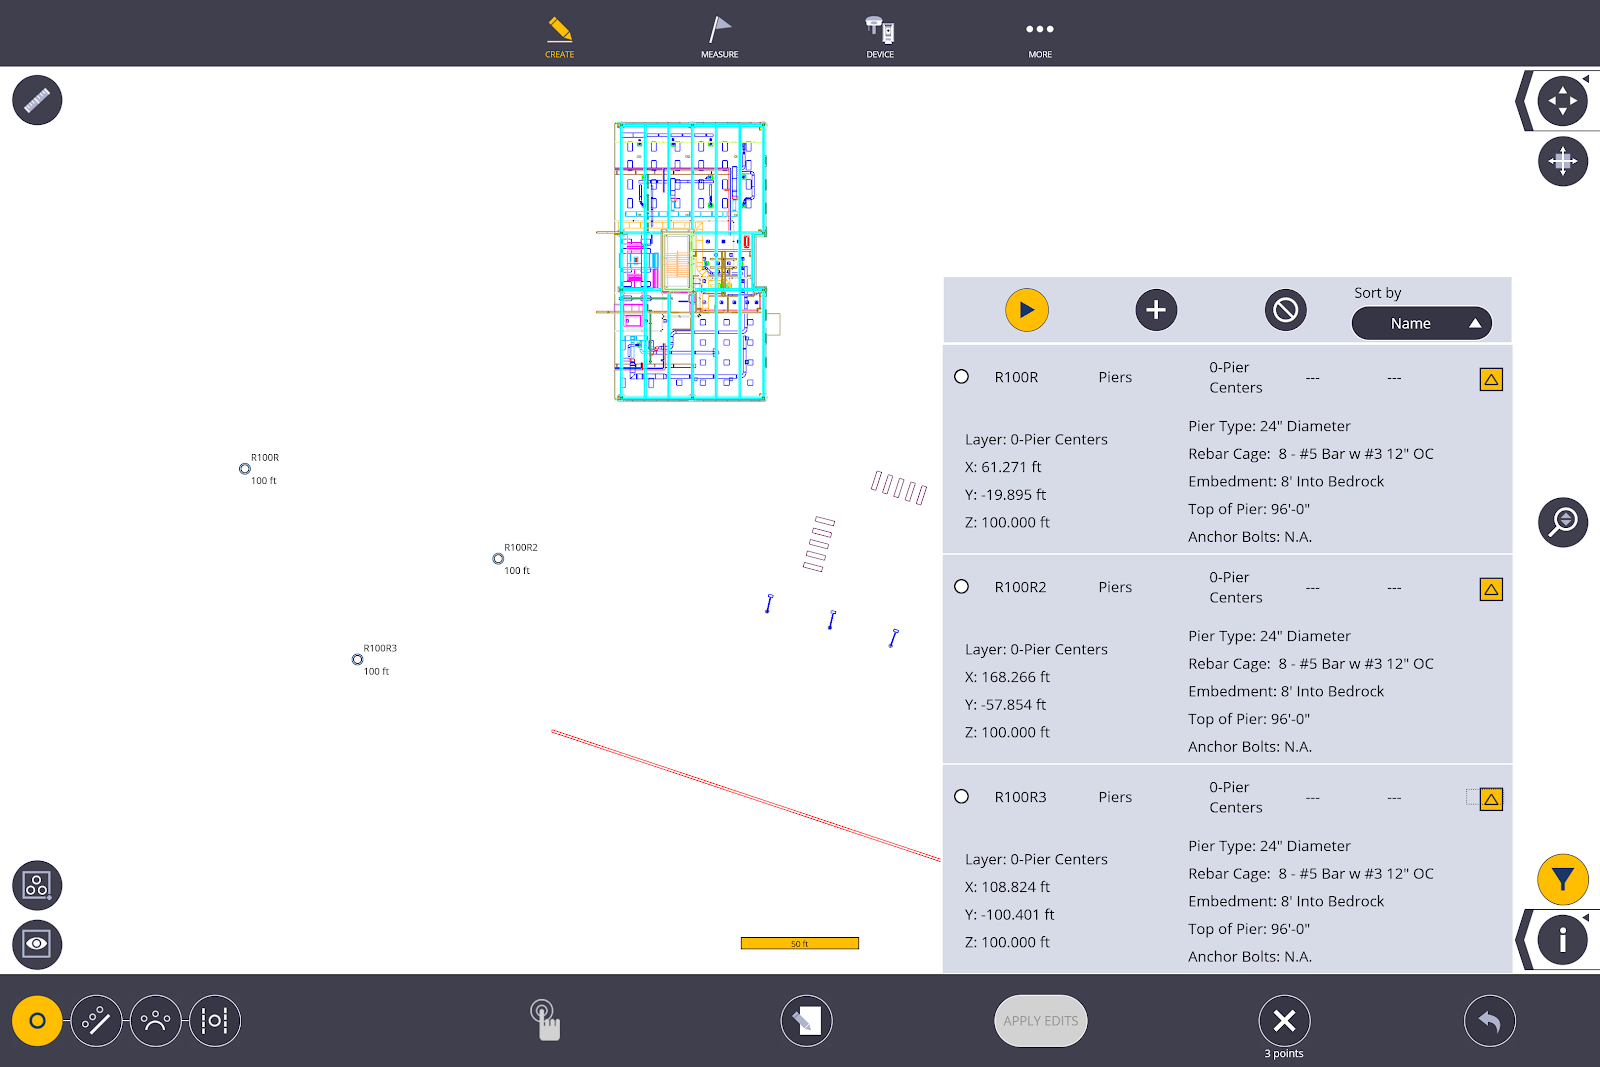
For location, review and editing of point data, the FieldLink Point Manager enables you to create a list based on map selection or by specific filter fields. A selected point in list is highlighted in the map view.
- Tap the Point Filter icon.
- To populate the list either select points individually on the map area, multi-select points using the multi-select tool, or tap on the plus icon to populate the list by a filter selection (name, description, layer, design points, control points).
- To review details of a point, tap on the left face arrow to expand the list.
- You can arrange the order of the list by selecting the Sort By drop-down. Sort by name, description, layer, delta H and delta V.
- To review the details of a point, tap the down arrow.
- You can make edits to points by using the Enter Form. If you want to change a point name, you need to select the point, enter the new name, then tap Create. FieldLink will keep the original point, or you can delete it if no longer needed.
- If you select a point in the list, it is highlighted in the map area.
- To clear the list, tap the Clear icon.
NOTE – If you have more than a single point in the list or selected on the screen, then edits are made to all the selected points. When editing multiple points, you can only change the elevation, description, layer, and attributes.