X7/X9 Scan Settings
Before taking any laser scans, ensure the scanner is using the correct settings for the type of scan you wish to capture. You have the option to choose how many points you want to collect, if you want to collect photos, and if the points need to be colorized or not. You may not want to collect photos or have the scans colorized automatically as this slows the scanning and processing time. You can collect panoramas and complete the process of colorizing the scans at a later time once complete with the project or at the end of the day.
X7 Scan Settings
- Tap the Scan
 icon.
icon. - Select Collect.
- Tap the Scanner Settings
 icon in the lower portion of the screen.
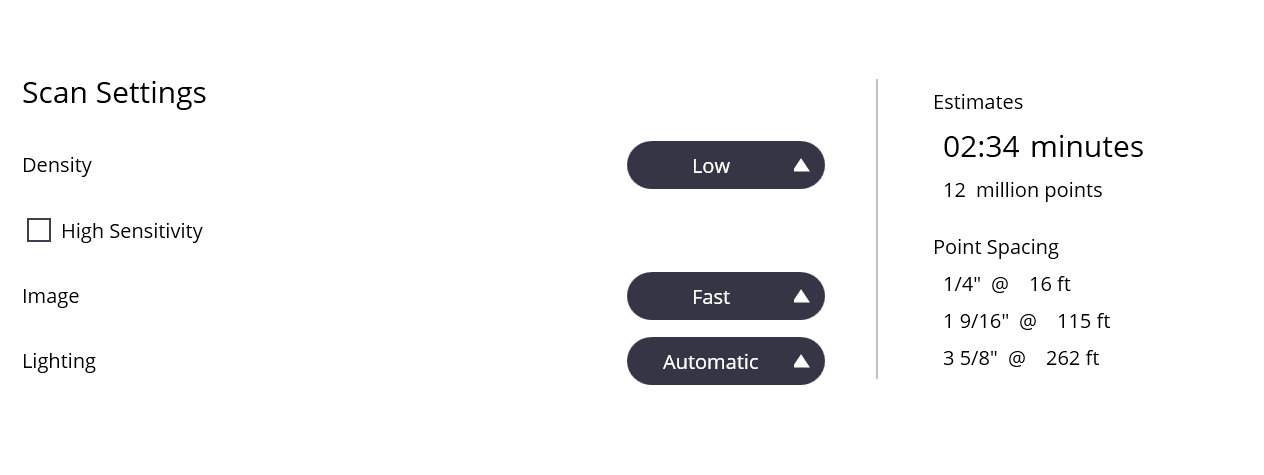
 - You can change the scan density, sensitivity, image capture settings, turn off auto-level and set the lighting options using each drop-down next to each option. You can also view how each option will affect the scan time, number of points captured, and the point cloud spacing with the display on the right side of the screen.
- Tap the Scanner Settings icon again to close the screen and return to the Collect screen.
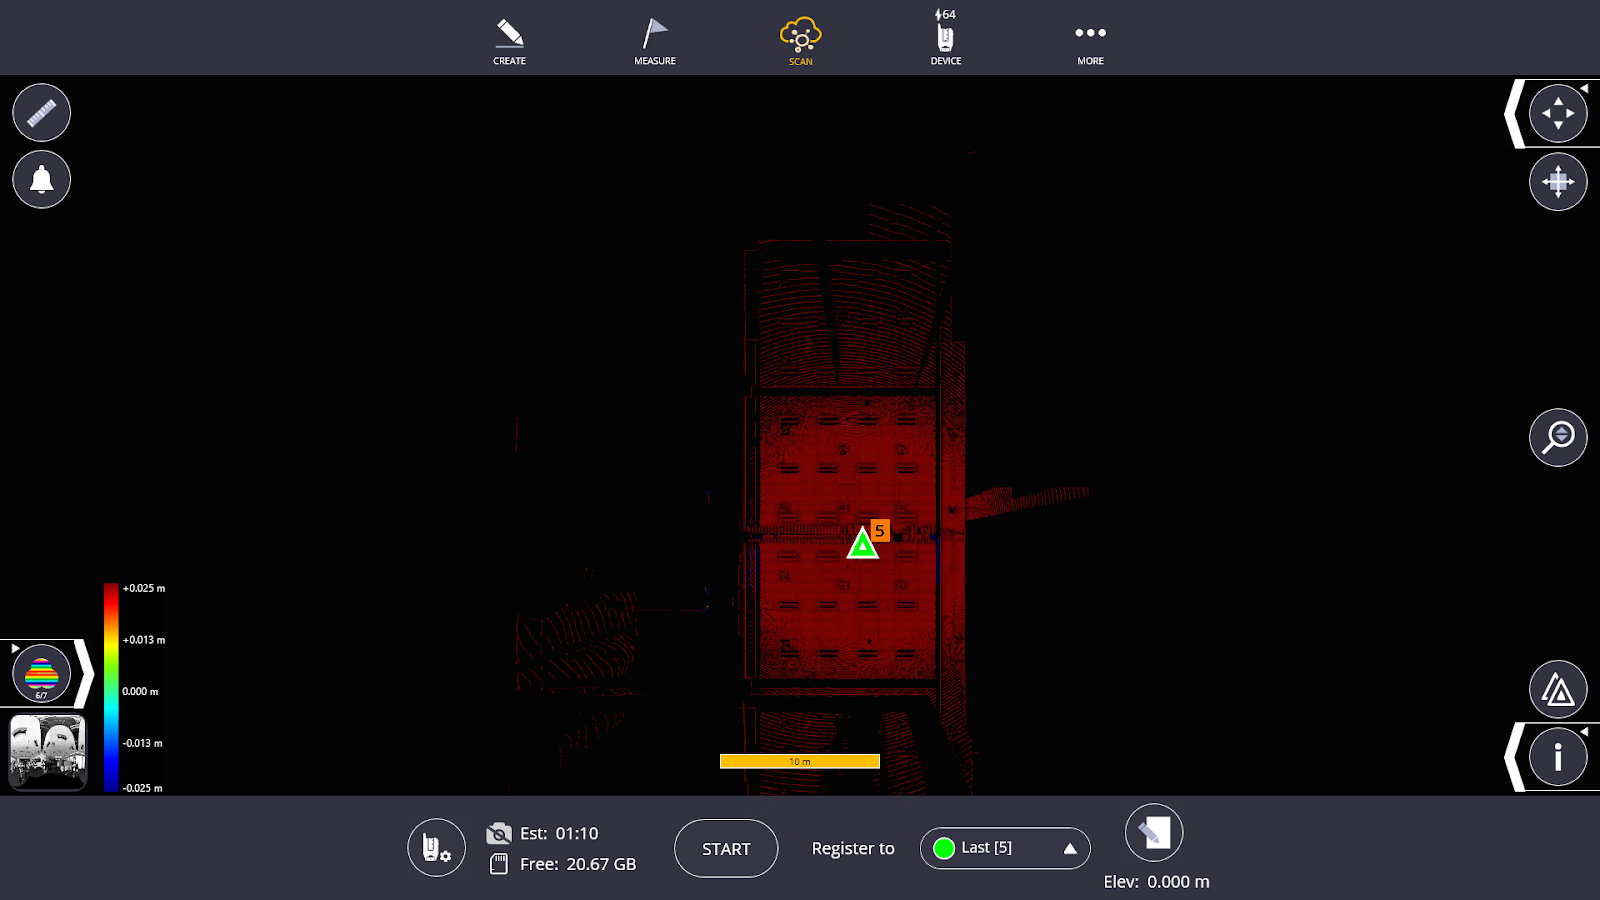
To begin the scan process, tap the Start button . You can also quickly press the power button on the scanner to start the scan process as well.
-
A blue message bar shows that a pre-scan calibration has begun. You can cancel if needed.
-
A message shows the percentage complete. This message also gives you the option to pause or cancel the scan.
-
If you have not already established the X7 location, you are given the option to manually place the scan once it is complete and loaded onto the tablet.
Fast Capture Mode
Fast Capture Mode allows you to capture scans without having the X7/X9 instrument self calibrate every time. This saves an average of 60 seconds per scan. To initiate this setting:
- Tap Scan and then tap Collect.
- Tap Scan Settings.
- In Scan Settings, select Low in the density field and select the Low Range Fast Capture option.
NOTE – There are many caveats to using this mode, including:
- The range is no longer 80 meters but limited to 30 meters
- You must have the latest firmware version on the X7/X9 for this mode to properly function (reference the release notes for the latest version of FieldLink for firmware version required)
- The scanner must run a calibration routine every 60 minutes. It will do this automatically.
- If the instrument detects a temperature change of greater than 15°C it will run a full calibration routine
- The accuracy of registration may deteriorate the further you get from the leveled and calibrated scan so please adapt your scanning methods to accommodate for this.
- This mode disables touch to turn functionality inside of X7/X9 vision


X9 Scan Settings
- Tap the Scan icon.
- Select Collect.
- Tap the Scanner Settings icon in the lower portion of the screen.
- You can change the scan density, speed (standard = 500k pts/s, high = 1M pts/s), sensitivity, image capture settings and set the lighting options using each drop-down next to each option. You can also view how each option will affect the scan time, number of points captured, and the point cloud spacing with the display on the right side of the screen.

- Tap the Scanner Settings icon again to close the screen and return to the Collect screen.
-
Tap the Start button to begin the scan process. You can also quickly press the power button on the scanner to start the scan process as well.
-
A blue message bar shows that a pre-scan calibration has begun. You will have the option to cancel. For more information on the need to run a calibration routine see Atmospheric Corrections - X9.
-
A message shows the percentage complete. This message also gives you the option to pause or cancel the scan.
-
-
If you have not already established the X9 location, you can manually place the scan once it is complete and loaded onto the tablet.
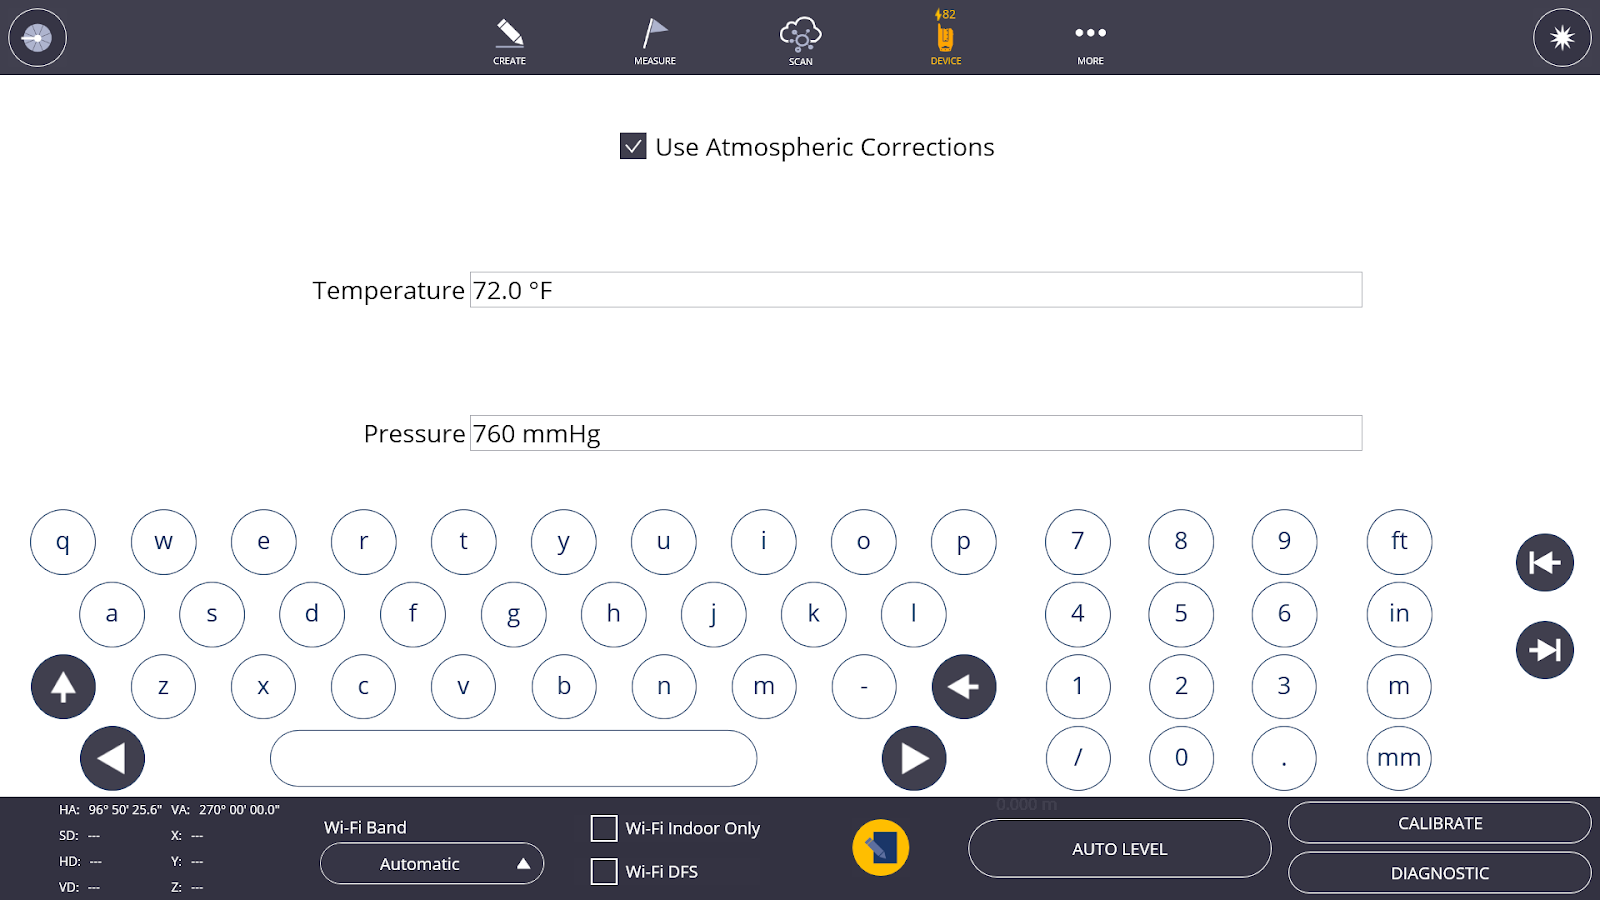
Atmospheric Corrections - X9
The X9 laser scanner is a powerful instrument with the ability to capture 1 million points per second, an extended range of 150 meters and an angular accuracy of 16”. Atmospheric corrections settings allow the software to account for atmospheric effects of the captured points in a point cloud ensuring that point clouds are as accurate as possible. These settings are particularly useful when using the maximum range of the X9. The X9 automatically adjusts these corrections over time so manual inputs are not necessary. However, if you choose to manually change these settings based on the capture environment, you can access these settings by tapping Device ![]() and then tapping Settings.
and then tapping Settings.
Auto Calibration and Self-Leveling
Both the X7 and X9 have built-in self leveling and auto calibration capabilities.
X7: At the start of each scan the X7 runs a calibration routine and then will automatically self-level adjust (the instrument itself won’t move as this change is all internally). The instrument lights will flash blue indicating that it is working on these routines. The X7 will then begin slowly rotating which means it is scanning. The lights will then turn white (only if images are turned on) and this means that the X7 is taking photos. Once the instrument lights turn green, only then can you move the instrument.
X9: At the start of the first few scans the X9 runs a calibration routine and then will automatically self-level adjust. Once the X9 reaches its optimal internal operating temperature, it no longer runs the calibration routine. Typically the X9 reaches its optimum internal operating temperature after several scans (it may need 3 or it may need 7 - it really depends on the environment). After that the X9 runs a calibration routine every 30 minutes or when the internal temperature changes by 2°. This features saves up to 30 seconds per scan as this routine typically takes around that time to properly calibrate.
The X7/X9 has lights on the side of the instrument. When the instrument is on and is being moved into position, you may see the lights changing colors rapidly between blue, red, and green. The X7/X9 (when not scanning) have these lights flashing to show if the instrument is level or not and even shows which side of the instrument is high or low.
The diagram below explains these lights and what the difference colors indicate:
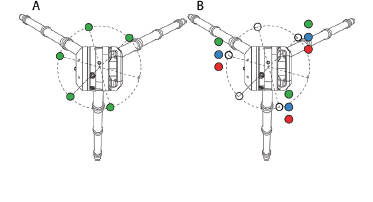
Fig A: All five LED's are green, the instrument is properly leveled.
Fig B: Three LED's are flashing, the instrument is not leveled.
- Green flashing = tripod leg near the LED does not need adjusting.
- Blue flashing = tripod leg near the LED is too low.
- Red flashing = tripod leg near the LED is too high.
Camera Settings
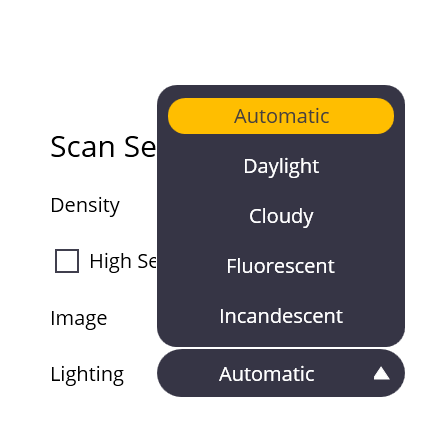
When selecting camera settings to capture images while scanning, the dropdown menu provides several options depending on your environment. While Automatic is recommended for most situations, if you are exposed to direct sunlight and notice the instrument is in a direct stream of light, switching to Daylight may assist the instrument in correcting the image settings to the situation.
If the environment is too dark, an error message may appear indicating that image collection may take longer than usual due to the instrument being in a dark environment.
High Quality vs Fast: selecting High Quality image capture will cause the collection process to be longer because the instrument will be taking more photos than during the Fast capture process.
HDR: Allows the instrument to collect HDR (high dynamic range) images which will assist in bringing out the highlights and contrasts in the photo. This process increases the amount of time it takes to capture images.
Auto Zero Floor Elevation
When you collect a first scan or an unregistered scan, you can default to the extracted scanned floor as zero elevation. This means that any point clouds above the floor have positive elevation and any points below the floor have negative elevations. If you are unhappy with the extracted floor elevation, you can select another point anywhere on the point cloud and define this point as the zero elevation. Therefore, the elevation heat map and inspection reports will reference the elevation point defined in the steps above.
If you decide not to use the extracted floor as zero elevation, then the instrument will be the zero elevation and any point clouds above the scanners have positive elevation and point clouds below the scanner have negative elevation.
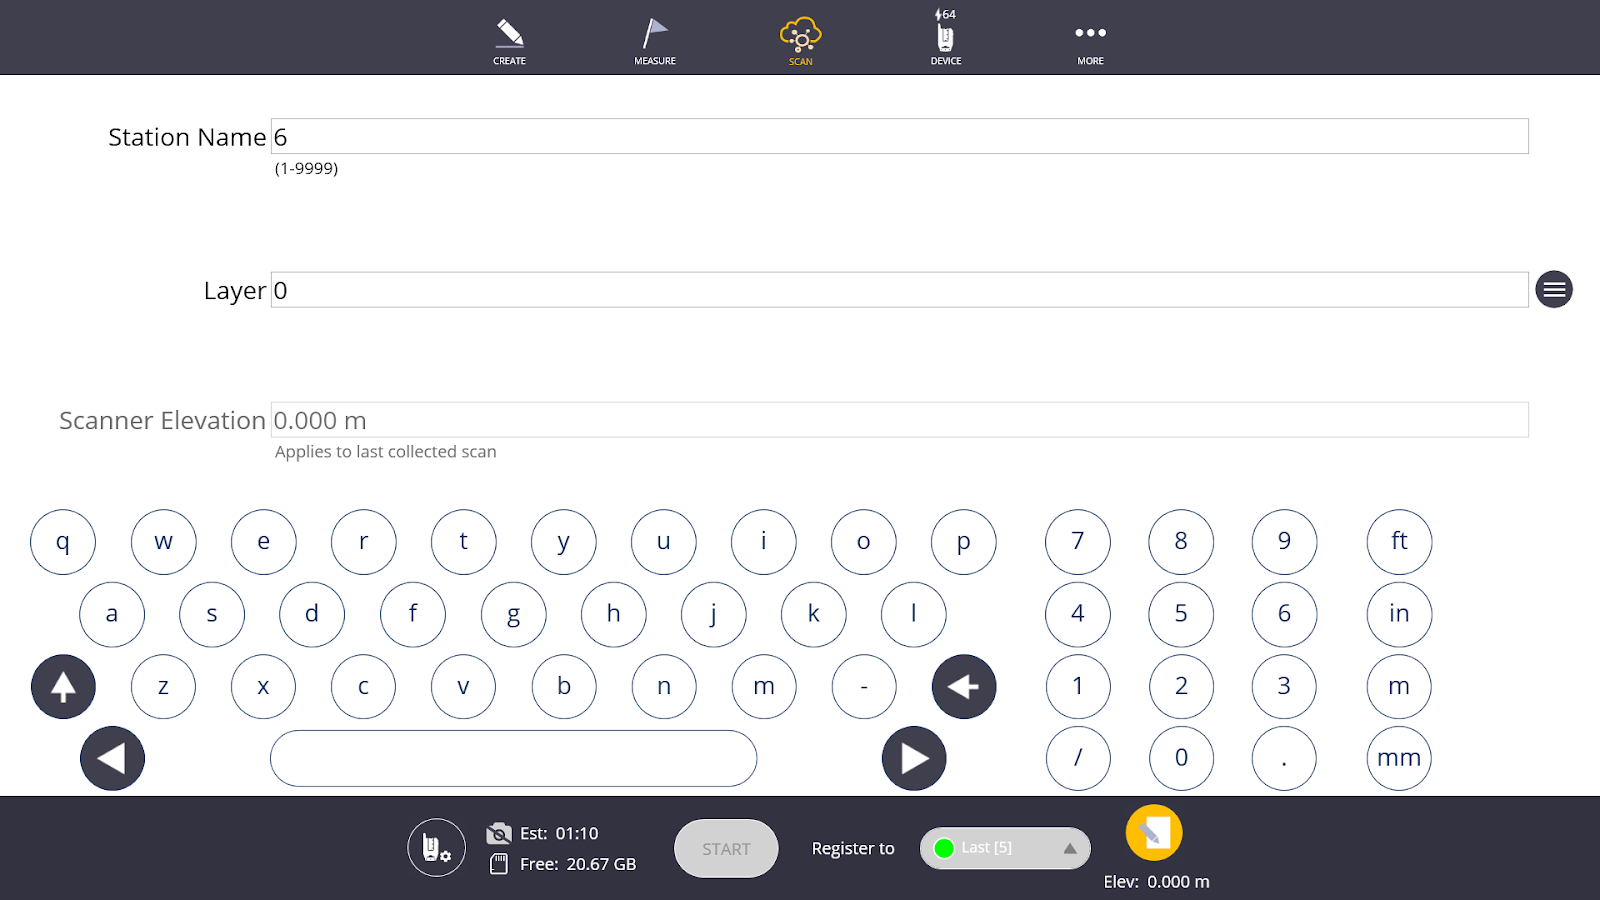
Station Numbering
When collecting scans, you can set scan station numbers at the start of the collection and the number for the scan will auto increment going forward.
Once an instrument is connected, you can navigate to the Collect tab for scanning and select the Edit tab.

Within the edit menu, you can set a scan station. Now the scan station can only be numeric from 1-1000 and will automatically increment upward with each scan.
For greater organization, every scan job can start at a new scan station number. Within the same scan job, you can increase or decrease the scan station number using the edit form. Once the number is changed within the same scan job, all scans collected after the change will begin incrementing upward from the newly changed value.
TIP – To avoid confusion, ensure the scan station numbers are not overlapping while incrementing.