Using the Measure Volumes app 
Measure Volumes is used to measure volumes using one of two volume calculation methods:
-
By first measuring a base perimeter / area and then measuring individual height / depth points for the volume.
-
By first measuring a base perimeter / area and then applying a fixed depth / height offset to create a volume.
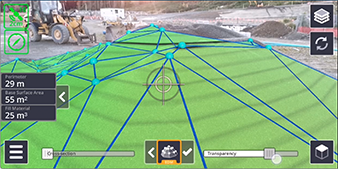
Each measurement shows the Perimeter, Base Surface Area, and Volume of the measured region. Measurements are saved in a .csv file.
You can measure volumes using GNSS ( ), Real World (
 /
/  /
/  ) or Model (
 ) based measurements.
To measure a volume:
-
Measure the first point.
Measured points are shown as blue spheres.
-
Measure the second point. The yellow line is shown between the two points.
The length between the points appears in a panel on the left of the screen, along with the current base surface area defined by the measured points (0 m2 for a straight line).
-
Continue to measure required points for the base of the volume.
As you measure more points, the measurements on the left of the screen show the total measured perimeter length, and also the total base surface area.
TIP –
-
If required, you can delete any point by double-tapping it.
-
If you need to insert a point after any previously measured point, tap the previously measured point to 'activate' it, then measure your new point. The new point is inserted after the 'activated' point.
-
-
Tap
 to move to the next step.
 -
You can now do either of the following:
-
Measure various height points within the base surface. This will create a triangulated surface in real time and is best for measuring irregular shapes such as stockpiles.
-
Tap the Depth panel on the left side of the screen and manually key in a depth. This will project the base surface vertically and compute the volume. This is best for road subgrade or foundations.
NOTE –When keying in a Depth value, use a positive value to create the volume below the base surface area; use a negative value to create a volume above the base surface area.
The measurements on the left of the screen then display the calculated volume:
-
Fill Material for volume above the base surface
-
Cut Material for volume below the base surface
-
-
When you have measured a volume, tap
 and give the measured volume a name. Tap Finish to save it.
The volume is displayed in dark blue.
TIP –
-
To cancel the entire volume you are measuring, double-tap
 /
/ ; the icon will vary depending on the step of the volume measurement you are in.
 -
In the Volume Details window, you can delete a volume measurement; tap
 in the bottom right corner of the window.
-
-
Tap Sync to sync to Trimble Connect
