Getting started with GIS data
The SiteVision system uses GIS data stored in Trimble Connect Map workspaces. Alternatively you can be connected to a compatible online Web Feature Service.
Trimble Connect Map workspaces
To use GIS data files with the SiteVision system you must first create a Map workspace in your Trimble Connect project.
There are two approaches to working with GIS data files:
-
Uploading data files into a Map Workspace. The data must be in Esri Shapefile or Esri file geodatabase format. This is a good approach when working with data sourced from public databases.
-
Connecting to your ArcGIS database. You can use the Trimble extension to ArcGIS to directly transfer data from your ArcGIS system to Trimble Connect for use by SiteVision. This approach can streamline internal company workflows by avoiding handling of files.
 Supported file formats
The Map Viewer can import data from Shapefile and Esri File Geodatabase formats.
-
Shapefiles must be zipped before uploading to the Map Viewer and must contain files with SHP, SHX, DBF, and PRJ file extensions.
-
Multiple shapefiles can be uploaded in a single zip file.
-
File Geodatabases must be zipped before being uploaded to the Map Viewer.
-
Only a single file geodatabase can be included in a single zip file
-
Multiple feature classes can be contained in the fgdb
-
The importer does not support Feature Data set hierarchy
-
NOTE –Trimble recommends not exceeding 40 MB for import files.
Uploading to the Map Viewer
Uploading files to the Map Viewer is completed through your web browser in the Connect Map Workspace.
-
Go to connect.trimble.com and sign in.
-
Browse to your Project folder and open your Map Workspace.
-
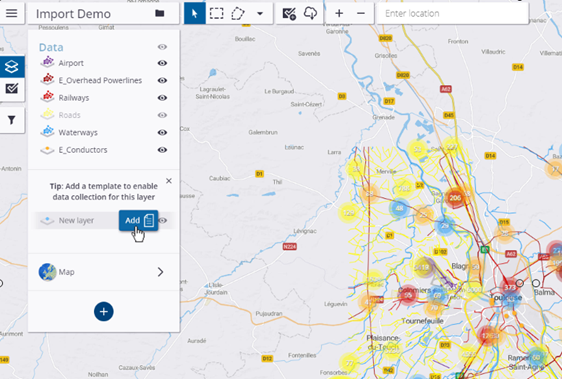
At the bottom of the Data menu, click
 then from the menu select Import from file.
 -
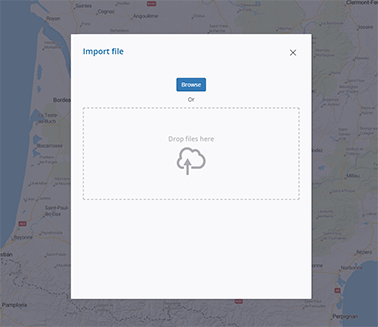
In the Import file window, you can either drag-drop, or browse to the file that you want to import.
The file goes through a 3 stage upload process—first uploading the file to the Connect environment, then processing the data, and finally creating layers. Follow any on-screen prompts.
-
Data upload is as fast as your data connection allows.
-
Data processing takes longer and is based on the complexity and size of the dataset.
NOTE –When the first Data upload stage is complete you can close the map page and the file will continue to process. Larger files may take some time to completely process and display so this is advised.
-
Once the file has been uploaded, the data processed, and layers created, the data will appear in the Data list as layers in your Map Workspace.
Connecting to your ArcGIS database
Go to https://geospatial.trimble.com/en/products/software/trimble-terra-office for information on and access to the plug-in for your ArcGIS system.
Once the Terra Office has been configured, data can be made available through the Map Workspace and accessed by the SiteVision system similar to data sourced from files as described above.
Web Feature Service connections
SiteVision supports loading of GIS data from supported online vector feature services. The following online feature service interfaces are supported:
-
Esri Feature Service
-
Open Geospatial Consortium (OGC) Web Feature Service (WFS)
-
OGC WFS v1.1.0
-
OGC WFS v2.0.0
-
The SiteVision Manager companion application is used to setup and configure the feature service. Once configured this is stored as a .WFS file, which is uploaded to Trimble Connect. To view the data in SiteVision this .WFS file is loaded from Trimble Connect in the same way as any other model.
NOTE –Visualization rules are compatible with feature service data, and can be combined for a rich visualization experience.
Configuring your Feature Service Connection
Use the SiteVision Manager companion application to create and manage your Feature Service connections.
To install the SiteVision Manager, download it from the SiteVision website and install it on your office computer.
-
Click the SiteVision Manager icon on your desktop to launch the SiteVision Manager.
-
Select File / New / Feature Service.
-
In the Server Details section input the service URL, and select the appropriate Server Type.
NOTE –SiteVision supports both Esri Feature Service and OGC WFS. The automatic detection setting will parse the URL and identify either server type if available.
-
In the Account section input the account login details if required. For detailed information on configuring the authentication and account details for your Feature Service connection, see Configuring a GIS feature service connection.
-
In the Feature Classes section, select Fetch. This will connect to the server and return a list of available feature classes.
NOTE –Each Feature Class displays in SiteVision as a separate layer. SiteVision requires all Feature Classes to share a common coordinate system. If multiple Feature Classes with differing coordinate systems are included in a single Feature Service connection, SiteVision displays an error message to warn you.
-
Use the checkboxes to select which feature layers to include in the Feature Service connection. Once configured, select File / Save As…. You are prompted to save the Feature Service connection as a .wfs file.
-
Upload this .wfs file to Trimble Connect or copy directly to your device, and load from within SiteVision like you would any other model.
-
When you select the .wfs file to load, you are prompted to select a position—either Current or a Custom coordinate.
NOTE –The Custom option is designed to allow you to preload data at a specific location prior to leaving the office.
-
SiteVision downloads the specified features within a 1km square bounding box. If you travel beyond the extents of the data, reload the .wfs file to reset the box around your current location.
NOTE –You must have an internet connection to be able to load and view .wfs data in SiteVision.
