Placing a model: component placement
Component Placement is specifically designed for use by fabricators in a workshop environment. This feature includes a search to quickly isolate a specific assembly or spool, along with a placement workflow to easily align the model with the physical component regardless of its orientation.
Due to the specialized nature of this workflow, this placement option is disabled by default in a fresh installation of SiteVision and must be enabled via the Display Settings.
-
When you have loaded the required model (see Loading a model), tap
 /
/  Place Model /
  Component to start the Component Placement process.
 -
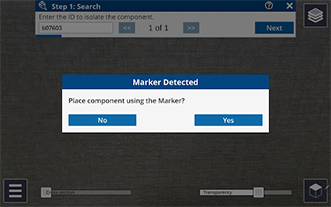
Search for and isolate the component you want to place by entering the associated assembly or spool ID. If more than one result is found, use the arrows to move through the different components to review the results. Tap Next to confirm your component selection.
NOTE –SiteVision will search all the associated attribute data in the model and provide autocomplete options in a dropdown menu. These options require an exact character match, but are not case sensitive.
Once you have isolated a component from the rest of the model, SiteVision will show the component as an individual layer (see below). Use the visibility icon
 to make the model visible again as needed.
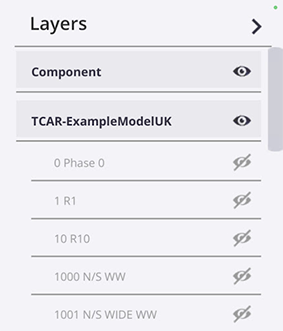
NOTE –Search uses the Trimble Connect Assembly Mode. This is applied to the highest level assemblies within your model’s data structure and will group objects based on a universal assembly property. If you experience difficulty isolating components, it is likely because this assembly level information is not present in your model data. Modeling applications and formats can behave quite differently. For example, Trimble has found that Autodesk Advance Steel requires IFCs to be exported using the MVD EM.11 schema in order to capture this assembly level information.
-
If the isolated component includes a Marker within its bounds, this is detected and you are asked if you want to place the component using the Marker.
-
If you tap Yes, you are prompted to scan the Marker; see Placing a model: marker placement for instructions on how to scan a Marker.
-
If you tap No, you are prompted to orient the model to match the physical component.
-
Drag two fingers on the screen to make large adjustments, and one finger to make small, fine adjustments to the model placement
-
Use the adjustment tools on the right of the screen to align the model correctly with the real world:
-
 Vertical
 -
 Horizontal
 -
 Rotate
-
-
To change the orientation of the model, double-tap on the face of the bounding box. This will roll the component by 90°, towards the ground.
You can deselect a face at any time by tapping outside of the bounding box.
-
-
-
Do one of the following:
-
If you are satisfied with the placement, tap
 to exit the workflow.
 -
If you are not satisfied with the placement, tap Next to perform a Three Point Alignment, where you will measure three pairs of points, matching the points on the model to the points in the real world.
-
Measure the first point on the real world component; tap the crosshairs or
 to measure the point. You can remeasure the point to ensure you get the correct position. Tap Next to confirm your real world point measurement.
 -
Measure the same point on the model. Your camera feed will switch off during this step and you will only be able to see your model.
TIP – Measurements are the most accurate when taken on a wider plane, for example the face of a beam rather than the edge. This is due to how depth is measured, and is most accurate when there is a significant surface to “see”.
-
Repeat steps a and b for the second and third sets of points, and then tap Finish to complete the placement.
NOTE –You can remeasure real world points after your placement is complete; tap the misaligned red point you want to remeasure.
TIP – For best results, measure the first two pairs of points along the length of the component, and the third pair across the width. Measure real world points on flat surfaces, and look at the point from different angles to confirm your point is in the correct position.
-
-
To remove the placement, tap-hold ![]() in the top left corner of the screen. This will revert the Search feature as well, so your model visibility will return to default.
in the top left corner of the screen. This will revert the Search feature as well, so your model visibility will return to default.
