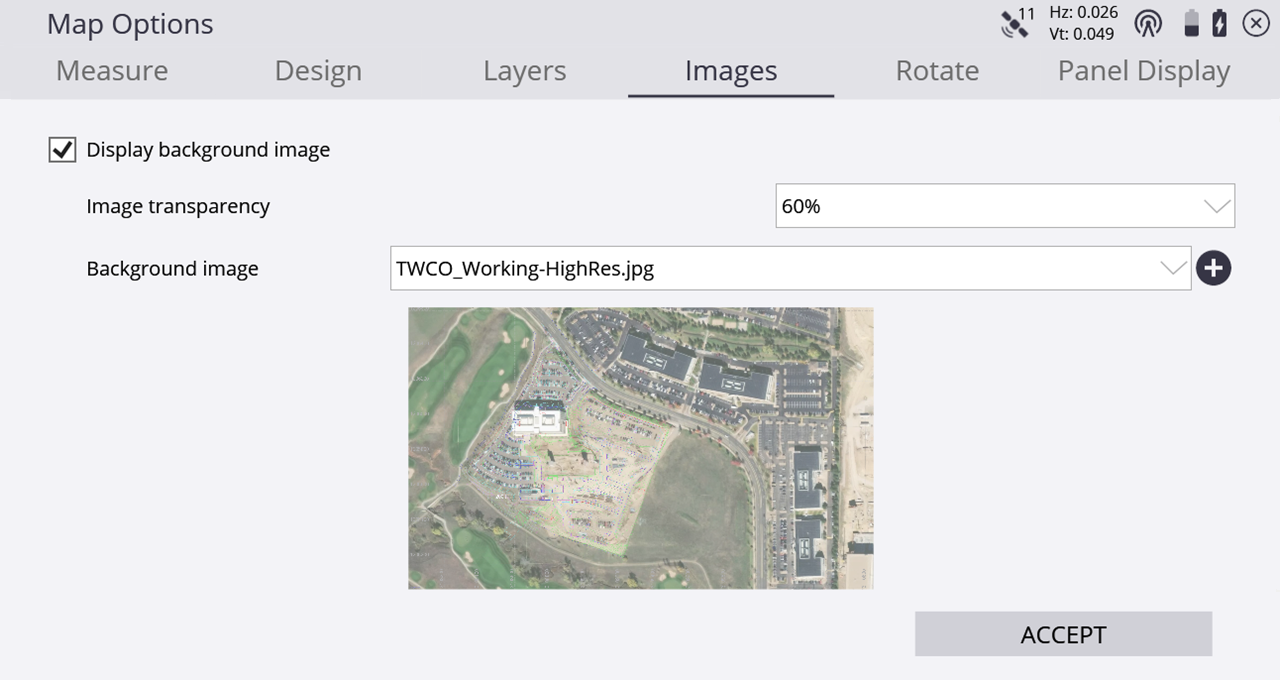
Map Options: Images tab
Use the Images tab to select a raster image to display as a background image beneath the design linework. Supported file formats for images are BMP, JPG, GIF, PNG, and TIFF.
From version 1.70, Siteworks can perform the georeferencing directly within Siteworks. You can also import PDF files to use as the background image. Prior to version 1.70, for background Images/ to be displayed in the correct location required an associated World file created in other software, for example, the Trimble Business Center software.
A World file is an associated text file that provides georeferencing information for the image file. The World file contains the northing and easting of the upper left pixel in the current project’s coordinate system along with horizontal and vertical pixel dimensions, and rotation parameters. The World file must have the exact same file name as the image file, with the appropriate file type suffix. The format for the World file suffix is the first and last letters of the raster image suffix, plus the letter “w”. For example, a JPG image has a world file suffix of JGW, a TIF file would be TFW, and a BMP would be BPW.
Toggle on and off the display of the selected image in the main map view and set the transparency in the Images tab:
To select a new image to load, tap ![]() and navigate to the image to select it.
and navigate to the image to select it.
If the image does not have an associated World file, then you can georeferenced it by tapping the Georeferencing icon: ![]() . Tapping the icon will enter the Georeference Image screen. The Siteworks georeferencing process involves selecting two control and/or measured points in the currently open work order, and then selecting the corresponding points on the raster image. It is also possible to select vertices along CAD lines in the currently open design as the source points. After selecting the two source and image points, the image is scaled and rotated into position and a World file containing the georeferencing information will be created.
. Tapping the icon will enter the Georeference Image screen. The Siteworks georeferencing process involves selecting two control and/or measured points in the currently open work order, and then selecting the corresponding points on the raster image. It is also possible to select vertices along CAD lines in the currently open design as the source points. After selecting the two source and image points, the image is scaled and rotated into position and a World file containing the georeferencing information will be created.
Any control or measured points must already be measured before entering the georeferencing workflow; you cannot measure or add points from within the workflow.
In the Georeference Image screen, tap a control or measured point, or a vertex of a CAD line in the left window to place a red dot at the reference point. You can also select the point from a point list by tapping ![]() . Then tap on the corresponding pixel location on the image in the right panel. Select the reference point two in the left panel and then the corresponding image point two in the right panel. The second set of reference points will be blue. When all the appropriate points have been selected, tap Accept to write the World file and return to the main map screen with the newly referenced image displayed.
. Then tap on the corresponding pixel location on the image in the right panel. Select the reference point two in the left panel and then the corresponding image point two in the right panel. The second set of reference points will be blue. When all the appropriate points have been selected, tap Accept to write the World file and return to the main map screen with the newly referenced image displayed.

Siteworks will rasterize both raster and vector type PDFs and convert them into a BMP format raster image. Vector-based PDFs are rasterized and converted to a PNG image. Multi-page PDFs are supported during import by selecting an individual page in a preview window to be imported and converted. Multiple pages from the same PDF are each imported, converted, and manually georeferenced individually.
To import a PDF, select it as a new background image in the Map Settings / Images tab by tapping ![]() , and navigating to the PDF image on the data collector. This will open the PDF preview window where the resolution of the converted image is selected. For multi-page PDFs the desired PDF page is selected by either typing in a page number or tapping the arrow keys to find and then choose the page. After tapping Import, Siteworks will convert the PDF to BMP format, save the BMP to the Project’s Background image folder and then prompt if you want to perform a georeferencing operation. The georeferencing process for converted PDFs is the same as described above for any non-referenced raster image.
, and navigating to the PDF image on the data collector. This will open the PDF preview window where the resolution of the converted image is selected. For multi-page PDFs the desired PDF page is selected by either typing in a page number or tapping the arrow keys to find and then choose the page. After tapping Import, Siteworks will convert the PDF to BMP format, save the BMP to the Project’s Background image folder and then prompt if you want to perform a georeferencing operation. The georeferencing process for converted PDFs is the same as described above for any non-referenced raster image.
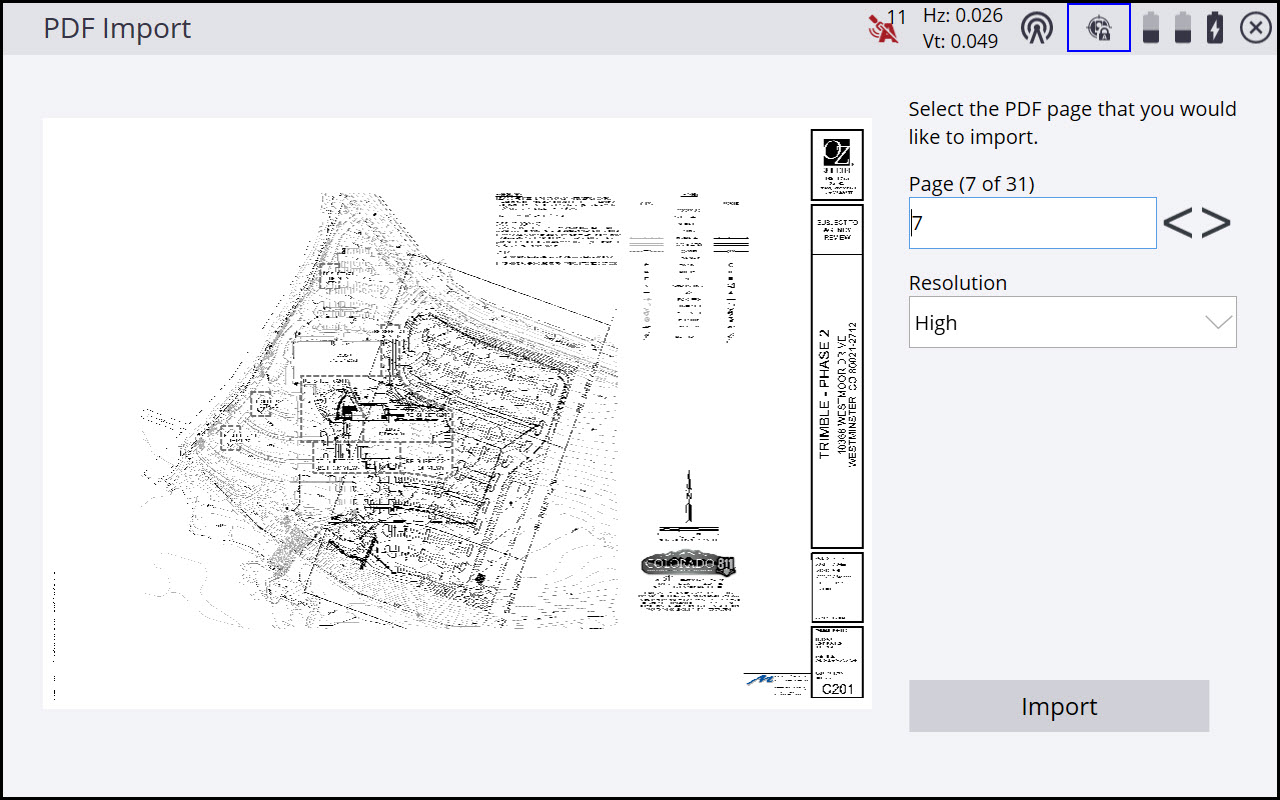
There are selectable options for the resolution of the converted PDF to be used. These settings are hard-coded such that HIGH will produce a converted BMP image that is a maximum of 5200 × 5200 pixels, MEDIUM will produce a maximum resolution of 3200 × 3200, and LOW will yield a max resolution of 1920 × 1920. Siteworks will import the PDF, determine its page size and convert accordingly such that the largest (longest) dimension of the converted image will not exceed the above pixel values. These resolutions are all under the Siteworks maximum of 8192 × 8192 pixels for an image size, therefore using HIGH should not significantly impact performance, as the resulting image file size should be under 1 MB. Users wanting higher resolution converted PDF imagery, then 5200 × 5200 will need to modify the PDF file in external software by cropping it to individual areas of interest.
