Catch point staking
Catch point staking from the Corridor menu operates in an almost identical way to the catch point staking associated with the side slope function. The only difference is that the tie slopes are defined in the corridor model itself and are automatically displayed. In a typical corridor model, there are at least two tie slopes; one for the right and one for the left side of the road. In the case of a divided highway, it is common to find four tie slopes, one for the left and right of each of the two traveled ways.
-
From the Measurement screen, tap the Home menu and then tap Stake.
-
Select a corridor using the list at the top right of the screen and then select an alignment in the Alignment tab. Alternatively, select the corridor alignment directly from the map or by tapping and holding and selecting a corridor from the pop-up menu. If there is more than one object available in this area, a list of different objects will appear where you can specify a selection.
-
Select a stake method catch point and click ACCEPT.
-
Enter a station or select one from the map at which to stake out the corridor feature. A cross section of the corridor appears unless no tie slopes were defined for this cross section. You can then choose to extend the outer segments of the corridor and use them as tie slope instead. Other options include defining a tie slope or choosing another station with tie slopes.
-
Select if you want to stake the tie slope of left or the right side of the corridor by tapping on the tie slope itself or using down arrow on the top right. The selected tie slopes as defined in the corridor model (a cut slope shows in red and a fill slope shows in blue) will be highlighted.
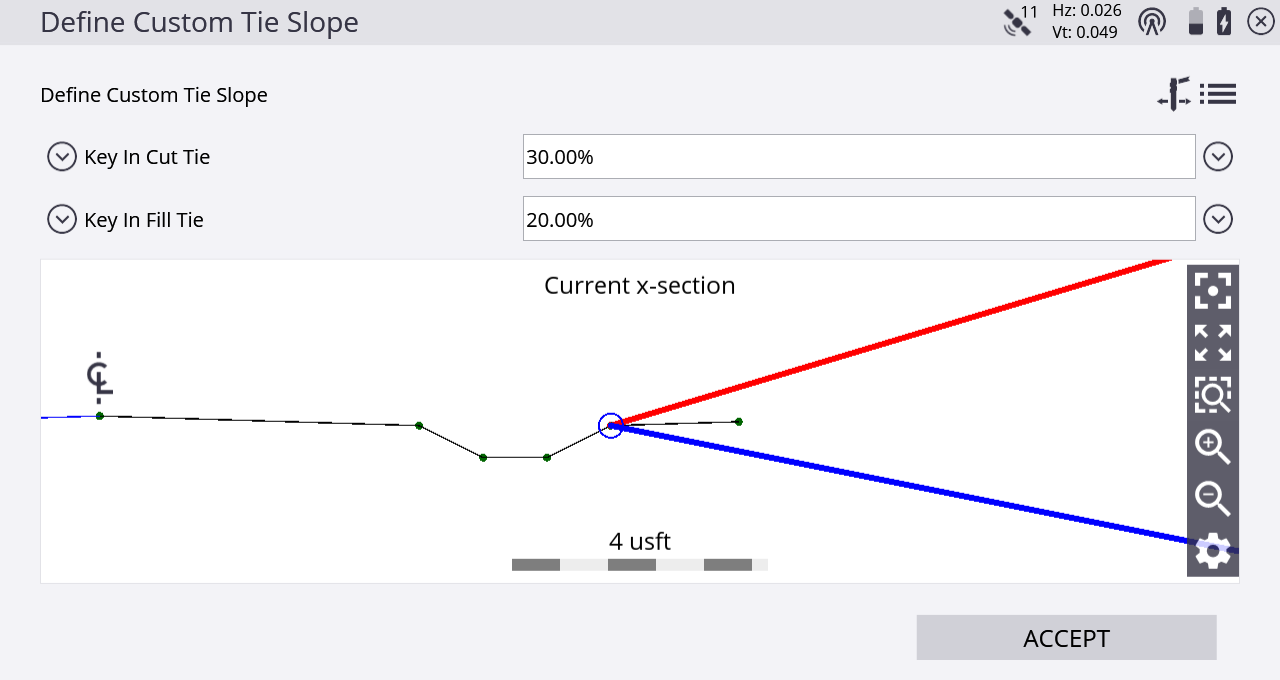
In the top line of the display, the corridor that the tie slope is associated with is displayed. In the example above, there is only one corridor in the selected corridor job, and that was not named—hence Roadway 0 is displayed.
You can redefine the current tie slope while you are staking out. For example, the design may specify a 1:3 cut, but when you stake it out you find that the point is outside the site limits, so you change the tie slope to a 1:2.5 cut. You can also project the tie slope from any node on the cross section.
From the list, select one of the following options:
-
Original cut/full
-
Key-in cut/fill (%) – Enter the new value and then select the node to apply it from
-
Key-in cut/fill (rise:run) – Enter the new value and then select the node to apply it from
-
Key-in cut/fill (run:rise) – Enter the new value and then select the node to apply it from
-
No cut/fill tie – If you select this option, the tie slopes disappear
It is also possible to offset the hinge point by clicking the Stake icon on the top right of the screen.
-
-
Navigate to the correct station using the Ahead/Backward values in the info bar. Then toggle the cross section view using the bottom icon in the map control bar and walk toward the tie-slope you are going to stake.
-
The software calculates the intersection between this recreated surface and the tie-slope and provides you with guidance to this point by extending this surface toward the slope. This point is dynamic and changes depending on the way you walk and how the terrain is formed. Use inward/outward to find the actual catch point, but also keep an eye on the station.
Once you are in proximity of the point where the tie-slope intersects with the existing ground, tap the Measure icon.
The software creates a Stake Marker report. A graphical diagram shows how to put an elevation mark on the stake. Depending on the settings for catch point marking in the Home menu / Settings / Catch Point Marking, you will get guidance to one or two more stakes which mark the point. Single Stake, Dual Stake, and Batter Rail methods are available. The placement and marking of these stakes is completely guided. The software remembers which tab of the stakeout report was last viewed and opens the same tab after staking the next point.
-
Instead of staking a certain station you can also stake a line at random stations using these buttons on the bottom right in the status bar:
Tap…
to…

stake at fixed intervals starting at a certain station

stake at random intervals somewhere along the line
