Configuring your SPS986 GNSS smart antenna
Before you can use your SPS GNSS receiver, it must be loaded with its configuration that your Trimble dealer has set up:
- Activating your SPS GNSS Smart Antenna (to start the one year warranty)
- Operating modes (for example, Base or Rover)
- Options (for example, GLONASS)
- Optional extended warranties
- Optional 450 MHZ radio transmit frequencies and Country Code
The Trimble dealer will usually do this entire task. If you need to do it yourself, you will still need your dealer to assign all the purchased items to the given SPS986 serial number.
To then load the configuration or updates to the receiver, you need to run Trimble Installation Manager on your computer.
Using the Trimble Installation Manager
Online method
The most common way to configure the receiver is to use the online method:
-
Download the online version on the Trimble Installation Manager from install.trimble.com.
This program requires the use a virtual serial (COM) port.
-
Download the USB driver to allow the USB interface to operate as a virtual COM port.
-
Go to trimble.com/en/support (search for your receiver and select Support & Downloads / Downloads).
-
Connect the receiver to the computer using the supplied LEMO to USB cable.
-
-
Turn on the receiver.
-
Run the Trimble Installation Manager. This application is used to check the receiver to load the latest firmware if the receiver is under Warranty and it also allows receiver configurations to be loaded.
Offline methods
Another way to load a configuration into the receiver is the offline method. There are two ways to do this.
Offline method 1
-
Download the Offline version from install.trimble.com.
-
Run the Offline version.
-
Enter the serial number of the receiver.
-
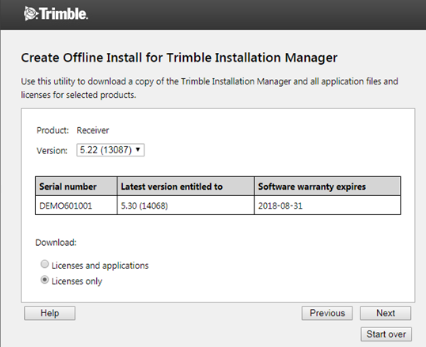
Select Licences Only if you just require the receiver configuration/options updates:
-
Copy the resultant file (package) to your computer. This program requires the use a virtual serial (COM) port.
-
Download the USB driver from trimble.com/en/support (search for your receiver and select Support & Downloads / Downloads). Connect the receiver to the computer using the supplied LEMO to USB cable.
-
Turn on the receiver.
-
Run the file Trimble Installation Manager Offline.exe.
Offline method 2
-
Unzip the package that was generated from the Installation Manager Offline program.
-
For a specific receiver serial number there is a file called Licence.xml. Open that file using an XML editor and copy the compositeoptionkey as shown in black text in this example:

-
Insert that option key into the web interface of the receiver under Receiver Options.
-
Click Next.
-
Restart the receiver.
Using the WinFlash utility
This utility can still be used with the SPS986. It is possible to load a 450MHz SET file from your Trimble dealer after any of the above methods have been used restart the receiver.
Hold the Power button down for 15 seconds or use the web interface and select Receiver Configuration / Reset. Select Clear all receiver settings.
