Common ways to set up a base station
You can set up a base station in different ways depending on the application, coverage area, degree of permanence versus mobility, and available infrastructure. Before you set up a base station, please see Base station operation guidelines.
Setting up a base station for permanent or semi-permanent installation
For construction applications, where machine and site positioning operations using GNSS will be carried out over a long time (weeks, months, or years), ensure that you carefully choose the base station location.
A semi-permanent or permanent base station helps to eliminate the types of error that can result from repeated daily setups, and ensures that you always use the GNSS antenna at the exact original location. The requirement for a permanent base station setup increases as more receivers that use the base station as a source of corrections, increases the cost of any base station downtime.
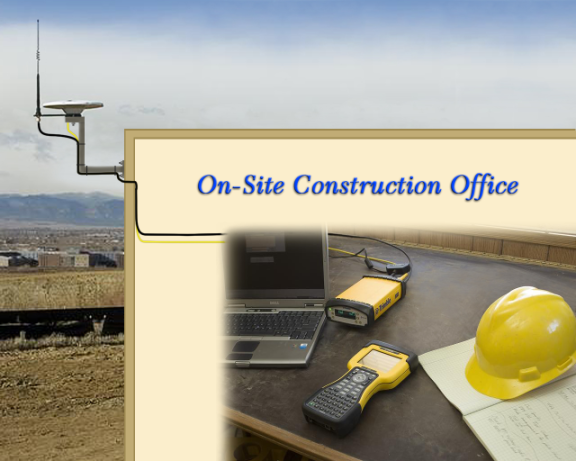
On the largest jobsites, and on those that remain operational for the longest time, a permanent or semi-permanent installation is a popular solution. A receiver is typically used as the base station, located in a site office or trailer where it is easy to access (to check or configure), and where it is secure from theft and the weather. The GNSS and radio antennas are normally mounted on a permanent structure on the roof of the building, where they are high and clear from obstructions and where the radio antenna can provide the maximum range of operation.
Trimble recommends that you use the Trimble Zephyr 3 Base antenna. This antenna has a large ground plane that reduces multipath, providing the best GNSS performance at the base location. The antennas are connected to the receiver by high quality RF cables.
The receiver is connected to a permanent power supply (mains or generator power). The internal battery of the receiver is always being charged, and acts as an uninterruptible power supply if there is a power failure. In some cases, the receiver may also be connected by an Ethernet cable to the Internet (either through the
The following figure shows a
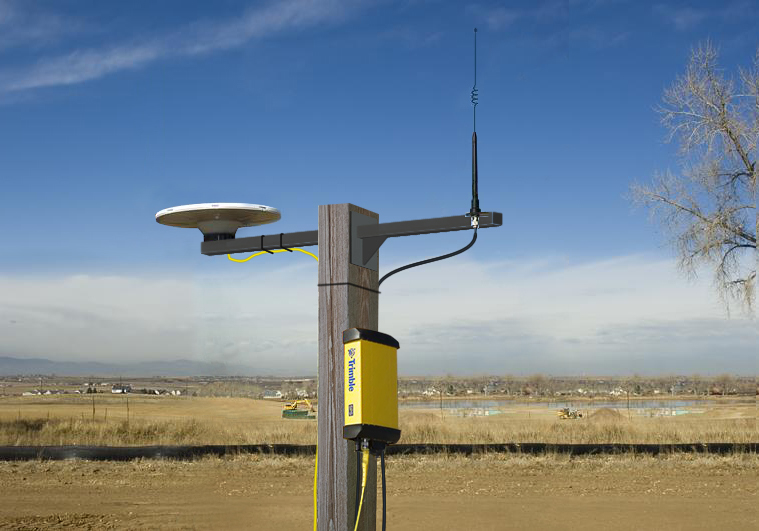
Setting up a base station for daily site use: T-Bar
For construction applications where a daily setup and takedown of equipment is required for security reasons, Trimble recommends that you use a T-Bar setup.
The T-Bar consists of a post mounted in concrete (so it cannot move), which has a solid metal T-Bar mounted to it to provide lateral and vertical separation between the GNSS antenna and radio antenna. The T piece of the T-Bar has a vertical rod at each end. Each end terminates in a 5/8"×11 thread to which the antennas can be mounted. Trimble recommends that one end is clearly marked GNSS and the other end is clearly marked Radio so that at each daily setup, the GNSS and radio antennas are mounted at the same location. Switching antennas by mistake introduces a position error in all resulting measurements. You can buy the parts you need to make a T-Bar from any reputable hardware store. Make certain that the T-Bar cannot rotate after construction. Rotation of the T-Bar can introduce a position error into all subsequent measurements.
On the upright post, mount either a bracket (to which the GNSS receiver can be mounted), or a well-ventilated lockbox (in which the GNSS receiver itself can be secured).
Each day, mount the GNSS antenna on the GNSS end of the T-Bar and the radio antenna on the radio end of the T-Bar. Connect the antennas to the receiver using the appropriate cables. The receiver uses its own integrated battery, or an external 12 V battery through the 12 V crocodile clips cable that are provided with the receiver. If you choose to use AC power, remember that the heat generated by the charging process and the radio transmitter increases the need for good ventilation around the receiver.
Advantages
Use of a T-Bar setup ensures that the base station is set up with exactly the same position and height every day. This helps eliminate the errors typically associated with daily tripod setup. For example, wrong antenna height, base not set up over the point, base set up in the wrong location.
The following figure shows a system set up on a T-bar showing an external radio antenna to gain longer range. GPS antenna is on the left, radio antenna on the right:
Setting up a mobile base station: Tripod and fixed height tripod
If you are repeatedly moving between jobsites, or if you are visiting a jobsite for the first time before a T-Bar or similar setup can be established, Trimble recommends that you use either a tripod and tribrach setup, or a fixed height tripod.
The fixed height tripod is quicker and easier to set up over a control point. The fixed height tripod also allows you to re-establish the antenna height exactly so that the receiver can be set up faster without using the Siteworks
Take great care to ensure that the GNSS antenna is set up accurately over the control point, and that the GNSS antenna height is measured accurately, in the right way (vertical or slope height) to the right location on the antenna (base of antenna or to a specified location on the antenna) or height extension pole with measurement lever. When you start the rover receiver, it is extremely important to check in, at one or more known locations, to check for possible position or height errors. Checking in at a known location is good practice and can avoid costly errors caused by a bad setup.
Typically, the tripod and fixed height tripod methods do not give significant height clearance above the ground, and can reduce the range of operation caused by radio limitations.
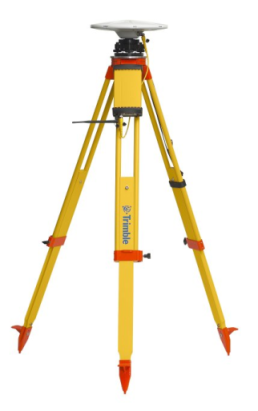
Tripod and tribrach setup
In the tripod setup, the tripod is located over the control point, and the tribrach and tribrach adapter is mounted on the tripod and centered over the point.
-
Mount the GNSS antenna on the tribrach adapter.
SPS98x only: If you are using a GNSS smart antenna, use the 25 cm spacer rod provided with the Base Station Accessory kit. This allows the radio antenna in the receiver to clear the head of the tripod.
-
-
-
If required, connect the GNSS receiver to an external 12 V power supply. Use the crocodile clip cable or the Trimble custom power pack.
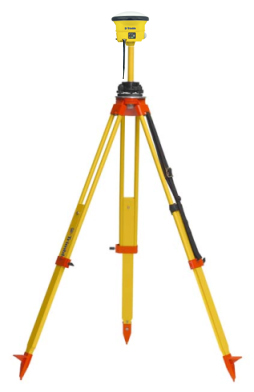
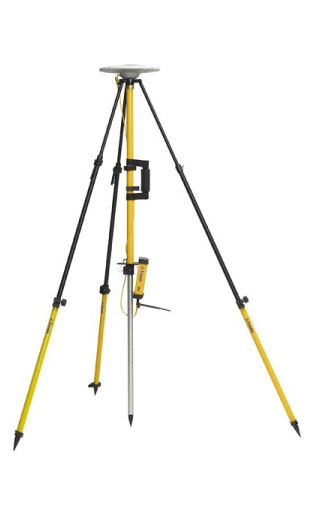
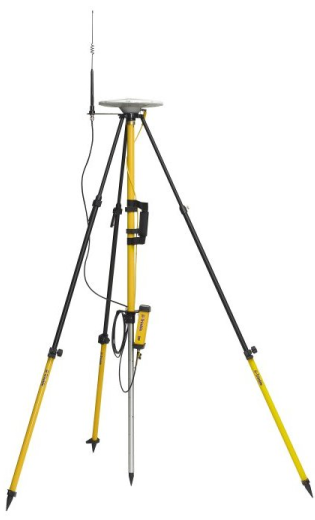
The following figures show a tripod and tribrach setup:
Receiver with a low-grain "rubber duck" antenna
Receiver with an external high-gain antenna
SPS985 with an internal 450 MHz Tx radio
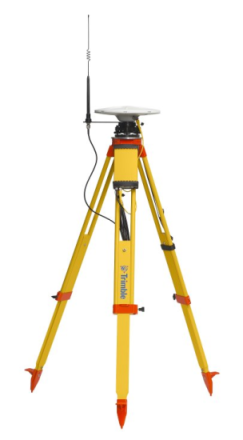
Fixed height tripod setup
A fixed height tripod setup is similar to a tripod setup, but is simplified by the central leg of the tripod, which is placed directly on the control point. If the central leg is leveled accurately, the fixed height tripod is quick and easy to set up, and provides an accurate way to measure the true antenna height.
-
Set up the tripod over the control point.
-
Attach the GNSS antenna to the head of the tripod.
-
If using an external high-gain radio antenna, mount the radio antenna to the radio antenna bracket that is attached to the head of the tripod (beneath the GNSS antenna). See the figure below.
-
-
The following figures show a fixed height tripod setup:
Receiver with a low-grain "rubber duck" antenna
Receiver with an external high-gain antenna
Using an external radio with the receiver
An external radio can be used with the receiver. Using a high-powered UHF radio will increase the radio coverage area.
Adding Internet Base Station Service (IBSS) capability (SNM941)
By adding an SNM941 Connected Site Gateway to the SPS modular base station, the T-Bar or Tripod setup can be used to provide corrections through the internal 900 MHz radio or 450 MHz radio and also through the Internet using the IBSS (Internet Base Station Service).
Setting up an IBSS field base station using the Siteworks software
Equipment:
-
SPS855 receiver
-
SNM941 Connected Site Gateway
-
Antenna mounting bracket (P/N 90452-00)
-
Cables (P/N 86625-02 and P/N 86626-15)
-
Mobile Data service for SNM941
-
Trimble T10 Tablet, Trimble Tablet or Trimble TSC7 controller running the Siteworks software
Procedure:
-
Insert the SIM card into the SNM941 modem, if required, and then reseal the unit.
-
Attach cable P/N 86625-02 to the SNM941 modem and then attach cable P/N 86626-15 to join the 26-pin connector to the SPS855 receiver.
-
Apply DC power to the SAE connector using one of the following methods:
-
Cable with battery clips (P/N 83223-02) connected to a suitable 12 V DC power source.
-
12 Ah Trimble battery pack (P/N 51866-00).
-
-
Set up the base station using either the tripod or T-bar mounting method.
You must use an external radio antenna kit for the internal 450 MHz or 900 MHz radio. To avoid interference between the 900 MHz radio and GPRS transmissions, do not mount the external radio antenna within 1 m (3.3 ft) of the GSM antenna.
-
Search for the SNM941 Wi-Fi network on the Trimble controller. The factory default SSID is Trimble Service (serial number). Connect using the default password “abcdeabcde”.
-
Open the SNM941 web interface in an Internet browser using the default IP address of 192.168.33.1.
-
Select or enter the APN for the cellular service on the APN section of the Cell tab.
-
Check for an Internet connection by using a browser to open a website such as www.trimble.com.
-
Start the Siteworks software and open a site containing the control point for the base setup, if available, or a new site if setting up the base on an arbitrary point. Start a new work order.
-
From the Main Menu, tap Project Setup / Connect Device / GNSS and then:
-
Mode: Base.
-
Connection Type: Bluetooth.
-
Bluetooth device: Scan and select the SPS855.
-
Correction Method: IBSS.
-
Receiver Internet option: Other.
-
-
Enter your Connected Community organization and password.
Since the NTRIP Client in the SPS855 is making the request to IBSS through the SNM941 modem, it is the receiver that must be registered on the Connected Community website, not the SNM941 or the Siteworks controller.
-
Select a control point for the Base Position (the control point name will be used as the base station name) or select unknown position and enter the Base name.
-
Select the Radio channel to transmit on, if required, and the base station Antenna type.
-
Set the Antenna height and Correction type and then tap Accept to finish the setup.
When a base station device connects to IBSS, the base station name is checked against existing managed and unmanaged base stations. If a base station already exists within the organization and is online, then the connection will be refused with the appropriate message sent to the receiver or controller. If it exists as a managed base but is not online, IBSS will connect it if the permissions have been set to allow this. If it does not exist as either a managed or unmanaged base, then IBSS will connect it as an unmanaged base. The default permissions for an unmanaged base allow any device to connect.
Trimble recommends that base stations that are connecting from a portable, daily-use setup are treated as unmanaged base stations and those used for permanent or semi-permanent setups where the receiver will be in the same place for a longer period of time are treated as managed base stations. For example, on a road project where the base is connected to the Internet through a LAN and will be in the same fixed location operating 24 hours a day, seven days a week, with little likelihood of disruption. By default, when a rover receiver is connecting to IBSS, it should try to connect to managed base stations, rather than unmanaged base stations and ones that are closer rather than further away.
-
Check the base station details to ensure that the base radio is indicating it is connected to IBSS through an SNM941 Connected Site Gateway.
Your base station is now up and running. Log into www.myconnectedsite.com to check the status.
Setting up an IBSS field base station using the SCS900 software
Equipment:
-
SPS855 receiver
-
SNM940 Connected Site Gateway (P/N 87940-xx)
-
Antenna mounting bracket (P/N 90452-00)
-
Cables (P/N 86625-02 and P/N 86626-15)
-
Mobile Data service for SNM940
-
Trimble Site Tablet or Trimble TSC3 controller running version 3.0 or later of the SCS900 software
Procedure:
-
Insert the SIM card into the SNM940 modem, if required, and then reseal the unit.
-
Attach cable P/N 86625-02 to the SNM940 modem and then attach cable P/N 86626-15 to join the 26-pin connector to the SPS855 receiver.
-
Apply DC power to the SAE connector using one of the following methods:
-
Cable with battery clips (P/N 83223-02) connected to a suitable 12 V DC power source.
-
12 Ah Trimble battery pack (P/N 51866-00).
-
-
Set up the base station using either the tripod or T-bar mounting method.
You must use an external radio antenna kit for the internal 450 MHz or 900 MHz radio. To avoid interference between the 900 MHz radio and GPRS transmissions, do not mount the external radio antenna within 1 m (3.3 ft) of the GSM antenna.
-
Search for the SNM940 Wi-Fi network on the TSC3 controller. The factory default SSID is Trimble Service (serial number). Connect using the default password “abcdeabcde”.
-
Open the SNM940 web interface in an Internet browser using the default IP address of 192.168.33.1.
-
Select or enter the APN for the cellular service on the APN section of the Cell tab.
-
Check for an Internet connection by using a browser to open a website such as www.trimble.com.
-
Start the SCS900 software and open a site containing the control point for the base setup, if available, or a new site if setting up the base on an arbitrary point. Start a new work order.
-
From the Home menu, tap GPS and then:
-
Mode: Base.
-
Connection Type: Bluetooth.
-
Bluetooth device: Scan and select the SPS855.
-
Correction Method: IBSS.
-
Receiver Internet option: Other.
-
-
Enter your Connected Community organization and password.
Since the NTRIP Client in the SPS855 is making the request to IBSS through the SNM940 modem, it is the SPS855 receiver that must be registered on the Connected Community website, not the SNM940 or the SCS900 device.
-
Select a control point for the Base Position (the control point name will be used as the base station name) or select unknown position and enter the Base name.
-
Select the Radio channel to transmit on, if required, and the base station Antenna type.
-
Set the Antenna height and Correction type and then tap Accept to finish the setup.
When a base station device connects to IBSS, the base station name is checked against existing managed and unmanaged base stations. If a base station already exists within the organization and is online, then the connection will be refused with the appropriate message sent to the receiver or controller. If it exists as a managed base but is not online, IBSS will connect it if the permissions have been set to allow this. If it does not exist as either a managed or unmanaged base, then IBSS will connect it as an unmanaged base. The default permissions for an unmanaged base allow any device to connect.
Trimble recommends that base stations that are connecting from a portable, daily-use setup are treated as unmanaged base stations and those used for permanent or semi-permanent setups where the receiver will be in the same place for a longer period of time are treated as managed base stations. For example, on a road project where the base is connected to the Internet through a LAN and will be in the same fixed location operating 24 hours a day, seven days a week, with little likelihood of disruption. By default, when a rover receiver is connecting to IBSS, it should try to connect to managed base stations, rather than unmanaged base stations and ones that are closer rather than further away.
-
Check the base station details to ensure that the base radio is indicating it is connected to IBSS through an SNM940 Connected Site Gateway.
Your base station is now up and running. Log into www.myconnectedsite.com to check the status.
Status messages
|
IBSS status on the front panel |
IBSS status on the Web interface |
What it means |
|---|---|---|
|
Sending CMR/CMRx/RTCMv2/RTCMv3 |
Up and Connected |
Connected to the IBSS or NTRIP Caster and streaming corrections. |
|
Bad Base or MP |
Invalid Mount Point or Base Name |
Check the Base or Mountpoint name, it may using invalid characters. |
|
Bad Credentials
|
Unknown TCC Device ID, Username or incorrect Password |
Connected Community password is incorrect or the device is not registered on Connected Community. Contact your Connected Community administrator. |
|
Bad Server URL |
Failed to connect to IBSS/NTRIP Caster |
Check that the Connected Community Organization and password are correct. |
|
Failed to resolve URL for IBSS/NTRIP Caster |
A network issue could be stopping access to Connected Community or the NTRIP Caster address entered for VRS is incorrect. |
|
|
Invalid IBSS/NTRIP Caster |
Check the VRS NTRIP Caster address. |
|
|
Data unavailable |
No Response or No GNSS Data from Caster |
The IBSS or VRS server address is valid but the NTRIP Caster is not running. Contact Trimble Support. |
|
Base Name in use |
IBSS/NTRIP Caster reports Base Name/Mountpoint in use |
A base station of the same name already exists in your organization on IBSS. Change the base name. |
|
NTRIP/IBSS no stream |
No output stream is configured |
No output stream has been configured for the NTRIP Server. |
Antenna mounting for best performance
If you are using 900 MHz or 850 MHz GSM from your cellular network provider, there should be at least 1 m separation between the cellular modem and any 900 MHz transmitting antenna. Trimble recommends using an external 900 MHz antenna kit in place of the "rubber duck" antenna fitted to the back of the SPS855 GNSS modular receiver.
Failure to provide the minimum 1 m antenna separation may result in loss of data reception on both the 900 MHz and GSM network, and a reduction in quality or loss of the cellular service.
