Create and Edit an Averaged Point
Create a point in your project whose position is computed by the simple averaging of the 1D, 2D, and 3D coordinates of existing reference points. If the position of one or more of the reference points subsequently changes (for example, due to a network adjustment), the position of the averaged point is automatically recomputed based on the new positions of the reference points.
Prerequisites:
- Points with IDs to average
To access the command:
Do either of the following:
- Select Average Points in CAD > Points.
- Select the points you want to average, right-click, and select Average Points.
To create an averaged point:
- In the Average Points command pane, enter a name for the new point in the Point ID field.
- Optionally, select a different layer in the Layer list on which to create the point, or select <<New Layer>> to create a new layer for the point.
- Optionally, type a feature code in the Feature Code field or click the Browse button to select a feature code to apply to the new point.
If you enter or select a feature code, you can also select to be prompted to enter feature attributes (if applicable) by selecting the Prompt for feature attributes check box.
- Click in the Points to add field, then select the reference points (points to be used to compute the new averaged point) using one or more of the following methods:
- In theProject Exploreror Point Spreadsheet, use Ctrl + click to make your selections.
- In a graphic views, drag the selection box around the points you want to include.
- Click the Options button to select points using one of the available options.
Note that existing averaged points cannot be used as reference points. The total number of objects selected is displayed in the Points to add field.
- Click the Add button to add the selected points to the Reference Points list.
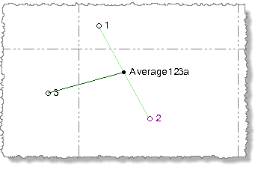
In the Reference Points list, you can select to disable any of the reference points so that it is not used to compute the new point. To remove a point from the Reference Points list, click the Delete icon
 for the point.
- When you are done selecting reference points, click the Compute button to create the new averaged point.
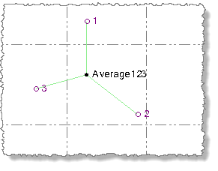
The coordinates for the new averaged point are displayed in the new Point section located at the bottom of the Average Points pane.
Note that observations from any disabled reference points are still displayedin the graphic views, as shown in the following image where the computation was performed with point 3 included in the Reference Points list but disabled.
To view averaged points:
Note the following when working with averaged points:
- To view properties for an averaged point, right-click it in the Project Explorer or tab view and select Properties. In the Properties pane, you can change the point's ID, feature code, description and/or layer.
- To view the status and coordinates for the reference points used to compute an averaged point, right-click the Average Points icon nested beneath the averaged point ID icon in the Project Explorer and select Properties. If necessary, you can select to enable or disable any reference point and recompute the project (press F4) based on the remaining reference points. Note that observations from any disabled reference points are still displayed in the graphic views.
- If the position of an averaged point varies from one of its reference points beyond the tolerance specified in Project Settings > Computations > Point Tolerance, an out-of-tolerance flag is displayed with the point. Select the Flag icon in the Home ribbon tab to view the Flags Pane for more information.
- Right-click an averaged point in the Project Explorer, Point Spreadsheet, or tab view and select Point Derivation Report to view complete information about how the averaged point was computed.
To edit an averaged point:
- In the Project Explorer, Point Spreadsheet, or graphic view, right-click the averaged point you want to edit and select Average Points.
- In the Average Points command pane, make edits as described earlier in this topic..
