Create and Apply Hatching
Use the Create Hatch command to create a hatch pattern and apply it to a region in a sheet view to identify the area as having a specific material on screen and on plotted sheets. Once created, you can explode a hatch object into independent object that can be edited or deleted.
Note: A hatch pattern cannot be applied to an existing block, but you can create a block that includes hatching.
Note: The default hatch pattern file (trimble.pat) is installed at C:\Program Files\Trimble\Trimble Business Center\Support\iv. To use an AutoCAD hatch pattern file (Acad.pat), copy it from C:\Users\<user name>\AppData\Roaming\Autodesk\C3D 2014\enu\Support, and paste it in the location listed above; it will be used instead of the trimble.pat file.

Prerequisites:
- Licensed module; See the Subscription Plans page. For a license matrix by command, see the License page in the TBC Community. Also see View and manage licensed features.
- Closed linework that encompasses a hatchable shape
- Sheet view
To access the command:
- Select Create Hatch in Drafting > Drafting Elements.
To apply a hatch pattern to an area:
- From the Hatch boundaries box, pick one or more closed lines in the Plan View.
- Select the layer on which you want the hatching to reside in the Layer list, or select <<New Layer>> to create a new layer.
- To use one of the dozens of predefined hatch patterns, select the pattern's name in the Pattern list. See hatch properties to see a picture of each pattern. To create your own linear hatch or cross-hatch pattern, skip to step 6.
- In the Scale box, specify the relative scale of the pattern. 1 equals the original scale of the pattern; 2 equals 200% of the original pattern.
- To rotate the pattern, specify an Angle. Positive rotation is clockwise and zero is due north.
- To define your own line-based pattern, click the User-Defined tab.
- In the Line spacing box, specify the distance between parallel lines in the pattern.
- To rotate the lines, specify an Angle. Positive rotation is clockwise. Entering 90° draws horizontal lines; zero is due north/0° draws vertical lines.
- To add cross-hatch lines, check the Draw second line box and specify the spacing and angle of the crossing lines.
- Click Preview to see the hatching on your shape. When you are satisfied with the results, click Apply and Close.
Scenarios:
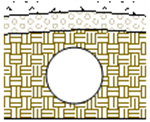
- Hole and island region logic applies to hatching. If you select two concentric boundaries and apply hatching, the pattern is only drawn between the boundaries.
Dependencies:
- None; once created, each hatch pattern is an independent object.
