Edit and Rebuild an As-Built Tunnel Mesh
Use the Add/Remove As-Built Tunnel Mesh Members command to add or remove members (typically scanned or surveyed points) that define the shape of an as-built tunnel mesh. This can be useful if there are missing or unnecessary points in the mesh, resulting in an inaccurate shape.
Note: When you edit an as-built tunnel mesh that has the Rebuild method: By user option selected in it's Properties pane (see step 1 below), the mesh is not rebuilt to reflect your edits until you right-click its node in the Project Explorer and select Rebuild.
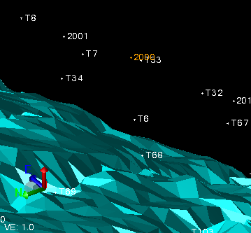
Following is an example of an errant as-built tunnel mesh member before and after its removal from the mesh.

Note: In versions of TBC prior to v5.60, the relationship of as-built tunnel mesh and the members used to form it was not persisted after the mesh was created, as it is in v5.70 and later. Therefore, if your as-built tunnel mesh was created in a version of TBC prior to v5.70 and you want to remove any of its members to modify its shape, you must first re-associate those members with the mesh by selecting and adding them back to it as described below. Then you can remove any of them as necessary.
Prerequisites:
Licensed feature. See the Subscription Plans page. For a license matrix by command, see the License page in the TBC Community. Also see View and manage licensed features.
To edit and rebuild an as-built tunnel mesh:
- Before you edit an as-built tunnel mesh, you should specify when the mesh will be rebuilt to reflect the changes:
- In the Project Explorer, select the as-built tunnel mesh you want to edit, right-click, and select Properties.
- In the As-built tunnel mesh Properties pane, select the appropriate Rebuild method:
- Auto - The mesh is rebuilt to reflect a member change immediately when you make it, as described below.
- By user - The mesh is not rebuilt to reflect a member change immediately when you make it. Instead, it is rebuilt only when you right-click the mesh node in the Project Explorer and select Rebuild.
- Select Add/Remove As-Built Tunnel Mesh Members in Tunnels > View to display the Add/Remove As-Built Tunnel Mesh Members command pane.
- Select the As-built tunnel mesh you want edit.
- Click in the Members to add or remove field. Then, use the Project Explorer or a graphic view to select the mesh members you want to add to, or remove from, the mesh.
You can select one or more surveyed tunnel points or one or more point cloud regions to add or remove
- Click the Add or Remove button.
Note the following:
- If the Rebuild method: Auto option is selected in the mesh's Properties pane, the mesh is rebuilt to reflect your change immediately after you make it.
- If the Rebuild method: By user option is selected in the mesh's Properties pane, the mesh is not rebuilt to reflect your change until you right-click the mesh in the Project Explorer and select Rebuild.
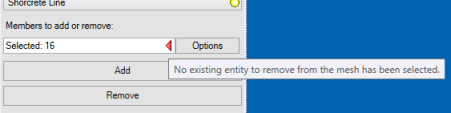
Note: If a red error indicator displays in the the Members to add or remove field when you click the Remove button as shown here, it is possible that you have selected members for a mesh created prior to TBC v5.70. See the note preceding this procedure for instructions.
If you clicked Add to add back (re-associate) mesh members to an as-built tunnel mesh created in a TBC version prior to v5.70, (see the note preceding this procedure), you can now select any of the re-associated members and click Remove to remove them from the mesh, thus altering its shape.
