Publish Mobile Mapping Point Cloud Data, Trajectories, and Images to Trimble Connect
Trimble Connect is a web-based application designed for accessing, viewing, and collaborating on project information directly from your web browser. The Trimble Reality Capture Platform Service (TRCPS) is an extension of Trimble Connect that allows you to integrate reality capture data, such as 3D scans and photos, into your Trimble Connect projects.
The Publish to TRCPS command allows you to upload point cloud data, trajectories, and images from your TBC project to a Trimble Connect project. This process is supported by the Trimble Desktop Utility (TDU), a separate application installed on your computer when you install TBC.
Note: To use the Publish to TRCPS command, you must have a Trimble ID. Otherwise, visit connect.trimble.com to create one.
To publish mobile mapping point cloud data, trajectories, and images to Trimble Connect:
- Open (or create) a VCE project, and import the mobile mapping data.
- Select Publish to TRCPS in Home > Data Exchange to display the Publish to TRCPS command pane.
- In the Publication Name field, enter a name for the dataset to be published that will display in your project in Trimble Connect.
- In the Trimble Connect Project drop-down list, select an existing project in Trimble Connect to which you want the data to be published and stored.
Note: Your storage on Trimble Connect depends on your license. The uploaded data uses your storage quota. An error will appear if your account quota is exceeded.
- Click on the Mobile Mapping tab if it is not already selected.
- In the Project Explorer, select an individual run, multiple runs (by using Shift + Click or Ctrl + Click), or the entire mission (by selecting the mission or Ctrl + A).
Note: Ensure the selected mission or run includes scan data. If it is missing, use the Generate Scans command to create it.
- Select a publishing option:
Note: By default, mobile mapping point cloud and trajectories will be automatically exported.
- Publish panoramic Images
- Publish side Images
- Publish back-facing images
- Blur people
- Blur vehicles
Note: By default, the Blur people and Blur vehicles options are grayed-out; they will become enabled once you select one of the publish images options.
- Click the Publish button.
Note: If blurring options are selected, a prompt appears to choose between using your GPU (if compatible) or CPU for the process.
TBC processes the data for upload, and it displays a dialog showing the progress. If needed, you can cancel the process.
As TBC uploads the data, you can view the progress on the Process View tab. If needed, you can cancel the process. A message is displayed once the upload is complete.
- When the process is complete, click the View in Connect button on the Process View tab to view the published data in Trimble Connect.
Trimble Connect Web is a web application available at: https://web.connect.trimble.com. If you are not connected to Trimble Connect, a connection prompt appears. Sign in with your Trimble ID. After signing in, the Trimble Connect web page displays with the Reality Capture tab active and the project you exported to (Trimble Connect's project) selected by default.
Note: The Trimble Reality Capture Platform Service (TRCPS) extension application is embedded within the Trimble Connect Web application. If the extension is not enabled, you can enable it by going to Settings > Extensions, and toggling the Reality Capture extension switch to on.
- In the Reality Capture Data panel, click the All Project Data pull-down arrow and select the exported project (TBC's project).
Note: Depending on the size of the published data, it may take a bit of time before it can be viewed in Trimble Connect. During this time, a "Not ready for viewing" message displays in the Reality Capture pane.
- Click the View in 3D+ button. The 3D+ View opens, use the following options:
 3D to visualize the scan data. Trajectories and camera markers can be included or hidden as needed.
 Map to visualize the georeferenced background map.
  Image to visualize side images and back-facing images. Scan data can be included or hidden as needed.
 Panorama to visualize panoramic images (with or without blurring option). Scan data, trajectories and camera markers can be included or hidden as needed.
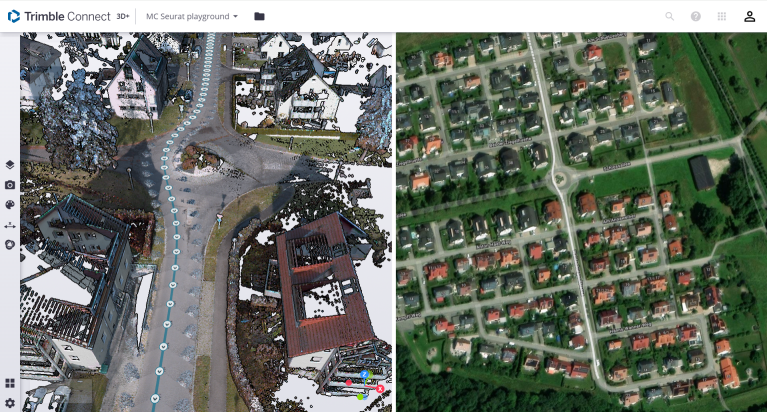
Following is an example of the published data: on the left view, a colorized point cloud with trajectory and camera markers; on the right, the georeferenced background map with trajectory and camera markers.
Note: See the Trimble Connect Help for additional instructions.
