Create a Cut/Fill Label for a Spot Elevation
Use the Create Spot Cut/Fill Label command to create a user-defined cut/fill smart text label to add dynamically updating text that shows either the cut or fill value at a specific location based on a cut/fill map. This command automates creating a smart text label for a spot elevation.
Prerequisites:
- Cut/fill map
To access the command:
- Select Create Spot Cut/Fill Label in Surfaces > Edit.
To create a custom cut/fill elevation label:
- Select the map you want to label elevations for in the Cut/fill map list.
- In the Layer list, select the layer on which you want the labels to reside, or select New layer to create a layer.
- In the Text style list, select a style that controls the text font, font style, justification, and size for the alignment labels.
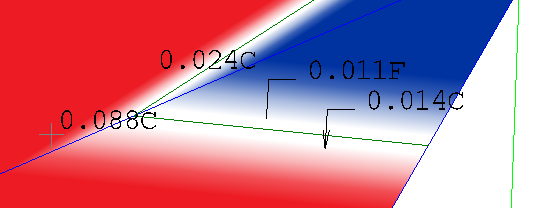
- From the Leader list, select an option (each shown in the image above):
- No leader - The label and the selected elevation are not connected by a line.
- Line - Connect the label and the elevation by a line with no arrowhead.
- Line with arrow - Connect the label and the elevation by a line with an arrowhead and the spot location..
- Pick a point from the Label location box to create an individual label at that location.
Tip: You can click repeatedly at multiple locations to create additional spot elevation labels.
or
select multiple points from the Points box in the Place at Points group to create a label at each of those points. Then click the Create labels button.
CAD multi-line smart text labels are created based on the elevation of the cut/fill map.
- Click OK.
- Select any elevation label or leader line to move it, as needed. The elevation value will update when you move the label or leader line.
Dependencies:
- The label values are dependent on the cut/fill map; rebuilding the map retains the custom labels, but any changes to the surfaces that the map depends on will affect both it and the spot elevations.
