Attribute Editor
 The Attribute Editor command allows you to edit, add, or delete feature attributes and 12d attributes on existing objects in TBC. This a flexible way to change the current attributes on a collection of objects and add 12d attributes to new objects.
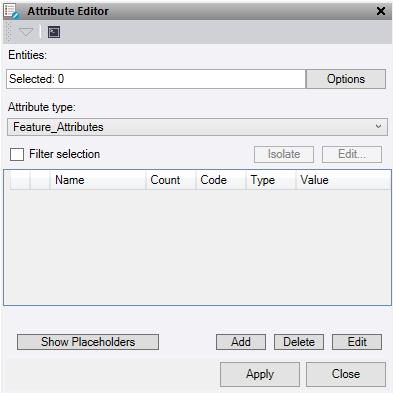
- Click in the Entities selection field, then in a graphic view select the objects which you want to edit the attributes of. Click Options for additional selection options.
- Check the Filter selection to apply a custom filter to the selected objects. Use Edit to change values during the process. Isolate deselects all objects except those that match the filter settings. The popout opens.
- In the Code/Name mask field, enter all or part (using the wildcard asterisk "*") of the name/ID or feature code of the object you want to filter.
For example, if you enter *Fence* (preceded and followed by an asterisk), all objects with Fence in their name will be filtered. This would include, for example, FrontFence1, FrontFence2, and RearFence1.
- Apply Filter attributes to the mask as a secondary filter option. This works on both Feature attributes and 12d attributes.
Select the attribute type and enter the Attribute name and Value to search (enter * in the value to select all values for that name). Optionally, add another Attribute name and Value to refine the filter. Once the filter finds a mask true, it checks the attributes and if they are found true it selects those objects.
Note: Filtered attributes are decimal point sensitive. If there are multiple 12d attributes with the same name on an imported object, only the first one in the list is read.
- In the Code/Name mask field, enter all or part (using the wildcard asterisk "*") of the name/ID or feature code of the object you want to filter.
- Under Attribute type, select 12D Attributes or Filter Attributes. 12D Attributes can be assigned to any of the following objects:
- Points
- CAD Points
- Linestrings
- Pipes
- Alignments
- Polygons
- Surfaces
- 3d Shells
- IFC Meshes
- Text
- CAD Line
- CAD 3d polyline
- Based on your selection, the attributes of the objects selected are displayed in the panel. Feature attributes include Name, Count, Code, Type, and Value, while 12d attributes are displayed by Name, Count, Type, and Value.
- Editing attributes – Any current attributes in the panel can have their values edited. Once a value is changed, the attribute name changes to blue and remains that way until it is applied to the object.
- Adding attributes – Add a new attribute to an object by clicking Add. In the pop-up window, select the attribute type and give it a new name. The new attributes in the panel are green and remain that way until they are applied to the object, or the feature definition is edited.
Note: When adding a Feature attribute to a feature, once you press Apply the new attributes are also added to the current FXL file in the TBC project. This does not add the new attribute to other objects with the same Feature in the project, unless they were selected at the same time.
- Deleting attributes – Delete attributes in the list by selecting them and clicking Delete. Attributes that have been deleted are red and remain that way until they are applied to the object.
Note: When deleting a Feature attribute from a feature, once you click Apply, the deleted attributes will be removed from the current FXL file in TBC and from any other object using that feature within that TBC project.
If you select attributes with the same name but varying values, the rows these occur on turn yellow.
- To edit the attribute definition for feature attributes, select the row in the table and click Edit, or double click the attribute name. This opens a definition box for the attribute, which can be edited. If the attribute is new and has not been applied, it is automatically applied at this stage. You can also edit these properties after they are applied within the FXL file in the Project explorer. Edit 12d attributes names in the same way.
- Click Apply to apply the changes and keep the Attribute Editor command pane open. The number of attribute edits, deletions, and additions are noted at the bottom of the panel.
Part of the operation of this command allows you to add and delete feature attributes from objects within the TBC project and the FXL file in the project. Be aware that this works the same as when adding or deleting feature attributes manually from an FXL file.
- An updated FXL should be exported from the project to be used for future surveys, as if you had updated the FXL manually.
- If you copy the data via a VCL file to another TBC project, then the updated FXL file also needs to be in that project for it to import.
- If importing and processing JXL or JOB data that was recorded using the prior FXL, the newly-added feature attributes are added to this data but have blank values, and any deleted feature attributes are removed.
- Do not reprocess feature codes after modifying the feature attributes, as you may be left with duplicate points and lines.
Placeholders:
To add a placeholder in the attribute value, use one of the Placeholder options.
