Create X Lines
 The Create X Lines command enables you to select a control line and create perpendicular lines at nominated intervals and user defined locations. Nominate the width of the X line either side of the control line, or use secondary lines to control the width. Create points and lines at defined positions along the X lines.
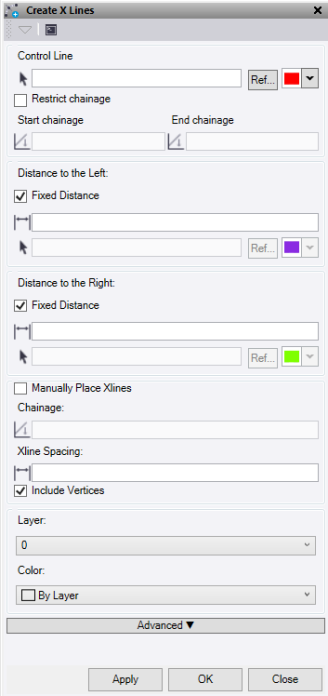
- Select a string to use as the Control Line for the X lines. Option to change the selection highlight colour and to select a line from Reference files.
- Check the Restrict Chainage box to limit the start and end chainages where X Lines will be drawn along the control line.
- Under Distance to the Left, enter a Fixed Distance value to draw the X line to the left of control, or select a line to the left of control to extend the X lines to.
- Under Distance to the Right, enter a Fixed Distance value to draw the X line to the right of control, or select a line to the right of control to extend the X lines to.
- Check the Manually Place Xlines box to pick the chainage locations along the control line that you require Xlines.
Note: If you use the manual method, you cannot use the Advanced option.
- If Manually Place Xlines is not checked, enter an Xline Spacing value to be used to draw new Xlines.
- Check the Include Vertices box to automatically draw X lines at each node along the linestring or each HZ TP along Alignments used for the control.
- Select or create a Layer for the X lines and "advanced" lines and points to be placed.
- Select a Color for the X lines.
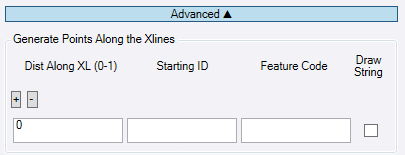
- Optional: Use the Advanced drop down option to draw points and lines based on the X lines created.
- Press
 to add or remove an instruction row. You can have multiple rows.
 - Under Dist Along XL, enter a value for the percentage (0 to 1) of the distance along the X line with 0 being at the start and 1 being at the end. For example, 0.5 would be in the middle.
- Starting ID is the starting point ID. If this is not filled out, then no points will be created.
- Enter a Feature code to be assigned to each point. These can be processed against an FXL.
- – If the Draw String box is checked, a line is drawn through the positions calculated on the X lines.
- Press
- Click Apply to create lines and keep the Create XLines command pane open, or click OK to create lines and close the Create X Lines command pane.
