To stake out a skew offset
Use this stakeout method to stake out a position that is not defined at a right angle to the horizontal alignment, for example when staking culverts or bridge abutments.
To customize the stations available for stakeout, tap  next to the Station field to view the Select station screen. See Stations available for stakeout.
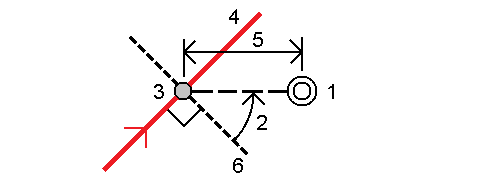
Example skew offset
The diagram below shows a point defined by skew forward and offset to the right. The point to stake (1) is defined from the station (3) by an offset (5) along the skew (2). The skew can be defined by a forward or backward delta angle to a line (6) at right angles to the road being staked (4) or, alternatively, the skew can be defined by an azimuth.
To stake out a position at a skew offset
-
In the Stake field, select Skew offset and then in the map, tap the station on the alignment that the skew offset will be applied from. Alternatively, tap
 to select the station from the list.
To stake out a skewed offset relative to a nominal station value (where the station does not have to coincide with a cross section), enter a nominal station value.
- To define the skew offset:
Enter the Offset and Skew values. Tap
 to change the offset or skew direction.
- To define the elevation for the point, select:
Slope from string to compute the elevation by a slope from the elevation on the string at the selected station
- Delta from string to compute the elevation by a delta from the elevation on the string at the selected station.
Key in to key in the elevation.
If the road only has a horizontal alignment, you must key in the elevation.
Tap Accept.
-
To stake points offset from the road, leaving the roadway clear for construction, define a construction offset.
See RXL, LandXML, & 12da road construction offsets and GENIO road construction offsets.
- Tap Start.
- Use the plan view to navigate to the point. See Stakeout navigation.
-
When the point is within tolerance, tap Measure to measure the point.
When using a Trimble SX12 scanning total station in TRK mode with the laser pointer enabled, the Stakeout screen shows the Mark point softkey instead of the Measure softkey. Tap Mark point to put the instrument into STD mode. The laser pointer stops flashing and moves to position itself at the EDM location. When you tap Accept to store the point, the instrument automatically returns to TRK mode and the laser pointer resumes flashing. To remeasure and update the stakeout deltas, tap Measure after you tap Mark point and before you tap Accept.
-
Tap Store.
The software returns to the navigation screen.
You can then:
-
Continue measuring points along the road. To select the previous station, tap the Sta‑ softkey. To select the next station, tap the Sta+ softkey.
Alternatively, tap
next to the Station field to open the Select station screen and then from the Auto increment field select Sta- or Sta+ to automate the selection of the previous or next station. - Tap Esc to exit this stakeout method.
- Change stakeout methods. To stake:
- To the road, double-tap an empty part of the map.
- To a string, tap the string in the map.
- A Station on a string, tap the station on a string in the map.
-
