To auto stake a gradeline
Automatically stake out a gradeline along all surfaces of the mine. You can start and stop auto stakeout at any point in the stakeout workflow.
- To define the gradeline and auto stake sequence:
- Start by doing one of the following:
- In the map, select the line and then tap Auto stake / Gradeline.
Tap
 and select Auto stake / Gradeline and select the Start point and the End point.
When selecting points, select them from the map or tap
 for other selection methods.
Define an Interval for staking the line.
Select the Start surface from which to begin the auto stake routine and then define the Sequence in which the auto stake routine will stake each surface.
The Start surface options are: left side, front face, right side, rear face. By default the stakeout will begin at the left side, and continue in the following order: front face, right side, rear face.
To reverse the sequence, tap the Reverse softkey. This setting is remembered if you repeat the stakeout of the line.
If required, define a Vertical offset, which can be applied above or below the gradeline.
The offset is used to adjust the design positions.
- By default, the stakeout will begin at the left side, and continue in this order: front face, right side, rear face. To reverse the stakeout order, tap the Reverse softkey. This setting is remembered if you repeat the stakeout of the line.
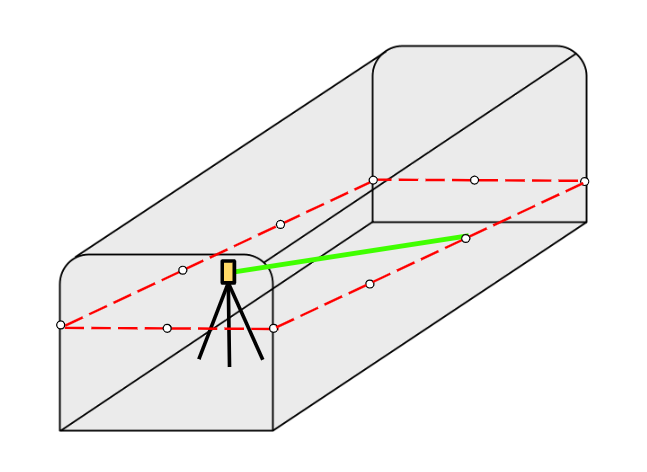
TIP – In both the map and camera views, the defined centerline appears as a black dashed line. A yellow arrow highlights the active surface and indicates the staking direction.
- Start by doing one of the following:
- Tap Next.
-
Tap the Options softkey to enter values for the Point details, Position tolerance, and Settings or accept the default values. See Auto stake settings. Tap Next.
NOTE – Position tolerance values refer to the tolerance when searching for the next position on the mine surface. Position tolerance in this context does not refer to the precision or accuracy of the measured point.
Before the auto stake routine can start, you must measure the existing mine surfaces as well as the defined start point. This allows the software to accurately project the design gradeline onto each mine face and determine the intersection points for marking. Measuring to the start point helps with efficiency and avoids rework.
-
Measure the mine faces and the auto stake start position:
NOTE – Measuring close to the center of the mine surface will provide the best results.
-
Aim to the front face and tap Measure.
-
Aim to the left side and tap Measure.
-
Aim to the right side and tap Measure.
-
Aim to the rear face and tap Measure.
To remove the rear face from the measurement workflow, tap the Skip softkey when prompted to measure the rear face.
-
Aim to the start point and tap Measure. To start the auto-stakeout from the start point of the defined gradeline, tap Skip.
The autostake routine automatically begins after you have measured to the mine surfaces and the autostake start position.
-
If you measured an auto stake start point, the auto stakeout begins at that point and proceeds in the sequence you defined in step 1.
-
If you skipped measuring the start position, the auto stakeout proceeds from the start of the defined gradeline and proceeds in the default stakeout order.
During auto stakeout:
-
When a position is found within tolerance, the Mark point event sounds and:
- If the instrument has a tracklight, the laser pointer and the tracklight flash for the period defined in the Mark delay field.
- If the instrument is a Trimble SX12 scanning total station, the instrument changes to STD mode and the laser pointer stops flashing and moves to position itself at the EDM location. The laser pointer changes to solid while the Target Illumination light (TIL) flashes for the period defined in the Mark delay field. When the point is stored the instrument automatically returns to TRK mode and the laser pointer resumes flashing.
-
If a change in grade is detected, the Grade Change event sounds and is displayed in the status bar. The controller will also vibrate to indicate a grade change.
At the end of the Mark delay period the instrument auto stakes the next point. Tap Pause to temporarily halt the auto stake process. Use the Prev and Next softkeys to skip to the previous or next point.
-
During the iteration process, the stakeout deltas are displayed, indicating the direction the instrument EDM needs to go to reach the target. A value shown in red indicates the deltas are out of tolerance. Tap Pause to temporarily halt the iteration. The software switches the instrument to tracking mode, allowing you to use the arrow keys on the controller or the video screen to move the instrument EDM closer to the target. Once the delta values are shown in black, tap Store to store the record, restart the auto stakeout sequence, and move to the mark point step.
-
If a point within tolerance cannot be found, the point is skipped.
TIP – To stop the stakeout at any point, tap the Esc softkey. The stakeout stops and the software displays a message asking if you want to abandon the measurement. Tap Yes to stop the stakeout and display the Results screen. If you wish to continue, tap No to resume the stakeout.
-
-
When auto stake gradeline is complete, the Results screen shows the number of points staked and the number of points skipped.
If any points were skipped, tap the Retry softkey to retry auto staking the skipped points. Tap the Tolerance softkey to change the tolerance settings, if required.
