To auto stake wall lasers
Automatically stake out wall lasers for enhanced precision in guiding drilling equipment.
This workflow allows you to position wall lasers two ways:
-
A manual solution is calculated by aiming the instrument laser at a specific mount point and a desired location on the rock face.
-
An optimised solution finds the best possible wall laser line based on the initial mount point, centerline and wall design, wall clearance and grade.
Both of these methods use your manual input to provide a precise reference for guiding drilling at the working face.
- To calculate where to position the wall laser:
- Start by doing one of the following:
- In the map, select the mine centerline and then tap Auto stakeout / Wall laser.
Tap
 and select Auto stakeout / Wall laser.
Confirm or select the mine centerline from the design in the map and tap Next.
Select the wall design linework from the design in the map and tap Next.
Aim the instrument laser at the desired mount point, then choose how the laser grade will be calculated. You can either select Height Above Centerline to use the automatically calculated value or select Grade to manually enter a specific value. Tap the arrow next to the grade input field and select Down to indicate a decline and Up to indicate an incline. Tap Next.
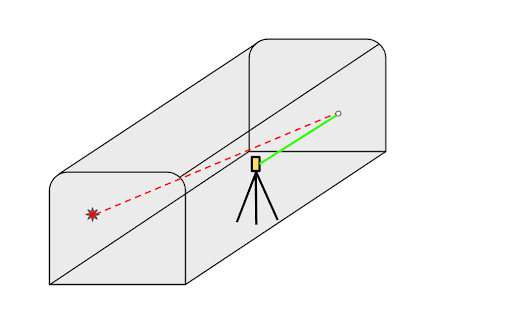
Aim the laser at the rock face where you want the laser line to go.
TIP – At any point in the workflow you can move the instrument or go back to change the solution and then the software will recalculate.
The software calculates a manual solution, based on where the surveyor pointed the instrument at the rock face. The manual solution is shown as a dashed green line on the map and the results are shown in the Laser solution box.
- Start by doing one of the following:
- To calculate an optimized solution:
- If required, tap Options to adjust the Wall clearance value in the Best solution search parameters group box. Tap Accept to return to the wall laser workflow.
- Tap the Snap to best softkey to calculate the optimized solution, based on the selected mount point and the Wall clearance value.
The software calculates the optimized solution, based on the mount point, centerline and wall design, and grade. The optimized solution is shown as a solid green line on the map and the results are shown in the Laser solution (Best) box.
-
When you are ready to install the wall laser, use the Turn to mount and Turn to rock face softkeys for assistance during installation.
-
Once the wall laser is installed:
-
Tap Next.
-
Enter the name and code of the final laser mount point and tap Measure to store.
-
Enter the name and code of the final rock face point and tap Measure to store.
-
Enter the name and code of the projected end point of the wall laser line and tap Next.
The results of the laser solution, mount point, rock face point and end point are displayed.
-
Tap Store.
-
