Jobs, tallies and joint maps
To maximize the benefits of the streamlined data entry capabilities of the Pipelines software, it helps to understand the relationship between the following files.
 Job file
When you measure points along the as-built pipeline, the points are stored in the job (.job) file, along with any attribute information you enter for the point.
Each point measured along the pipeline represents a feature, such as a weld, bend, or valve. When you measure the point, you select the appropriate feature code so that you can fill out the attribute fields for that feature type. The attribute fields associated with a feature code are determined by the feature library (FXL) file. Create the feature library using the Feature Definition Manager in Trimble Business Center.
To measure a weld feature on the as-built pipeline, the feature library file must contain a code for the weld feature, for example, "WLD". In addition, the FXL file should list the attribute names for the WLD feature. The WLD code needs the first three attributes; additional attributes can also be included:
- Weld or x-ray number
- Joint ahead
- Joint back
- Other information such as welder ID, additional comments etc.
- Could also include cover and station if you would like this recorded as an attribute
Traditionally, many surveyors would have included additional attributes to describe the joint ahead and possibly the joint back, such as the joint ID, the heat number, and length, so that you could update these if required when you measure the weld. However, in the Pipelines software only the IDs of the joint ahead and joint back are recorded as attributes. The details about the joints are copied from the tally file and are available for review and editing before they are stored as details for the measured weld in the job. This means that the joint attributes do not need to be defined as attributes of the weld in the FXL file.
Some survey companies only record the joint ahead details with a weld. However, with Pipelines the recording of the joint ahead as well as the joint behind means that the software can check that the computed distance between measured welds is the same as the joint length from the tally. In addition, you can easily produce a field report detailing the joint ahead and joint behind details associated with each weld.
Tally file
The tally (.csv) file contains the details for each joint, such as the ID, heat number, and length. The details for a joint are copied to the measured pipeline point by referencing the joint ID(s) as an attribute of the feature being measured. As described in the previous section, the joint details no longer need to be attributes of the weld or valve code. However, it is still useful to be able to control the collection and validation of tally details through the use of the feature code library. This is done using matching attribute names in the tally file and the FXL file. The easiest way to achieve this is to create a code in the FXL file called “Tally” – this “Tally” code should contain all the attributes with the appropriate properties that you use today, such as whether it is a text or numeric field, minimum and maximum values, and the contents of pick-lists such as pipe diameters or pipe manufacturers.
TIP – You don’t have to use a code called “Tally”. Pipelines uses the “Tally” code in preference, but will search the FXL file for matching attribute names if they are not found in one called “Tally”.
Recording the joint details in a separate file provides the following advantages:
- The feature library file contains only one set of joint attribute names, associated with a "tally" code. You don't need to create the same attributes for each of your pipeline feature codes that need to record joint details.
- If you need to make changes to the joint attribute names you can change them in just one place in the feature library file.
- You can easily record the attributes of both the joint ahead and the joint behind with one given code that has joint ahead and joint behind attributes.
Associating the weld feature with specific joints used in the pipeline is done by joint mapping.
Joint map file
The joint map (.map) file contains three key attributes, which are collected during joint mapping:
- Weld ID
- Joint ID of the joint ahead
- Joint ID of the joint behind
In addition, you can collect a timestamp and position and, if required, a note.
Using a joint map means that when measuring the position of the weld during the as-built survey, you can enter just the weld ID and the software attaches the following information to the measured weld:
- the joint IDs recorded with that weld ID in the joint map file
- all of the attributes for the associated joints from the tally file
Performing joint mapping as a separate task when the pipe is welded together but not yet lowered into the trench makes it easier to record the weld and joint IDs and speeds up surveying of the as‑built pipeline later, during the high pressure stages of the project.
The joint map file is created automatically, however you do need to configure the linked attributes from your FXL file that identify the x-ray or weld ID name, as well as the names of the joint ahead and joint behind attributes used. This is done from the Pipeline options screen.
The following example shows how the joint map and tally file are linked together:
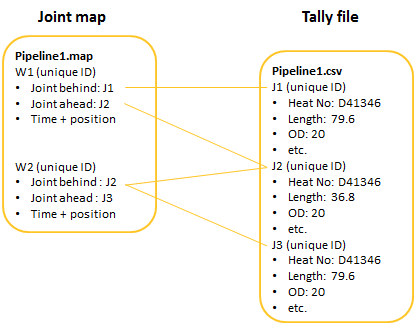
In this example, the weld W1 is linked to the joints J1 and J2. If required, the details for J1 and J2 can be updated during joint mapping and the changes are saved in the tally file.
The following example shows how the job file links to the joint map and then the tally file:
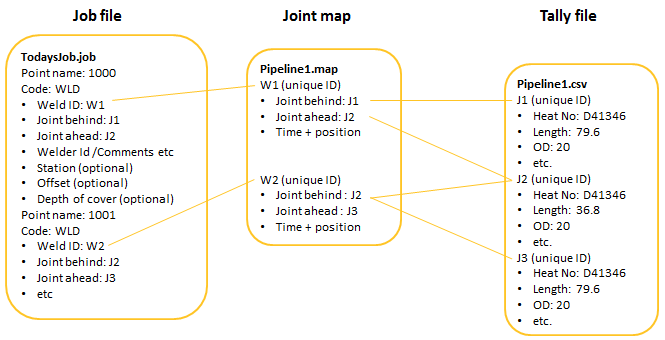
In this example, the WLD code has been created in the feature library file with the following attributes:
- Weld ID
- Joint behind
- Joint ahead
- Welder ID /Comments etc
- Station (optional)
- Offset (optional)
- Depth of cover (optional)
During survey of the as-built pipeline, the position of weld W1 is recorded and named point 1000. When the weld ID W1 is entered in the attribute entry screen for the point, the values J2 and J1 automatically populate the Joint ahead and Joint behind fields. If required, the details for J2 and J1 can then be updated and the changes are saved in the tally file.
When the point is stored, the linked joint IDs and their details are copied into the job file. As a result, every as-built measurement contains all the attributes of the weld as well as the joint ahead and the joint behind details.
NOTE – The examples above discuss welds and how a weld measurement can be linked to the tally file, but any attribute can be set up to link to the tally file, such as a bend or valve.
