To review the tunnel definition
You can review the definition of a tunnel at any time. View the tunnel in 3D to visually confirm the tunnel definition.
- In the map, tap the tunnel.
-
Tap the Review softkey to see a plan view of the tunnel.
The horizontal alignment is shown as a black line and the offset alignment (where applicable) is shown as a green line.
By default the first station is selected.
The selected station appears as a red circle. The station value of the selected station, its rotation value where applicable, and the alignment offset values where applicable, appear at the top of the screen.
- To confirm the definition before surveying the tunnel, tap Calc to calculate the grid and tunnel coordinates.
- To add a unique station, tap and hold on the screen and then select Add station.
-
To select another station to review:
- Tap and hold on the screen and then tap Select a station. Select the station from the list in the Select a station screen.
- Tap an individual station.
- Press an up or down arrow key.
Tap the pan softkey to make it active and then use the left, right, up, or down arrow keys to pan around the screen.
-
To view the cross section for the selected station, tap
 or press the Tab key.
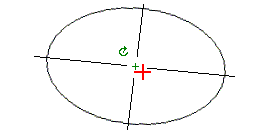
Refer to the following diagram where:
- A red cross indicates the design alignment.
- If the alignment is offset, a small green cross indicates the offset alignment.
- If the tunnel has been rotated and the pivot position for the rotation is offset from the alignment, a green circular icon indicates the pivot position.
- A short green line at the top of the profile indicates the vertex point.
Tap and hold on a position to see its horizontal and vertical offsets, northing, easting, and elevation.
If the design alignment has been offset, the reported offset values are to the offset alignment. If rotation has been applied and the pivot position has been offset, the reported offsets are to the offset position.
To return to the plan view, tap
 .
. -
To view an automated 3D drive through of the tunnel:
- In the plan view of the Review tunnel screen, tap 3D drive.
- Tap
 to start the drive through.
 - To pause the drive through and inspect a particular part of the tunnel, tap
 . To orbit the tunnel while the drive through is paused, tap the screen and swipe in the direction to orbit.
 - To move forward and back along the tunnel, press the up and down arrow keys.
- To exit 3D drive, tap Close.
