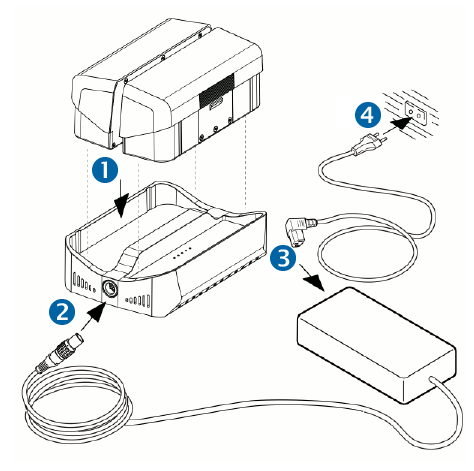
Charging the battery packs
To charge the battery packs with the charger:
-
Place one or two battery pack(s) onto the charger after ensuring the correct alignment.
-
Connect the power supply cable to the charger.
-
Connect the power cable to the power supply.
-
Connect the power cable to the main power supply (100 ... 240 V AC).
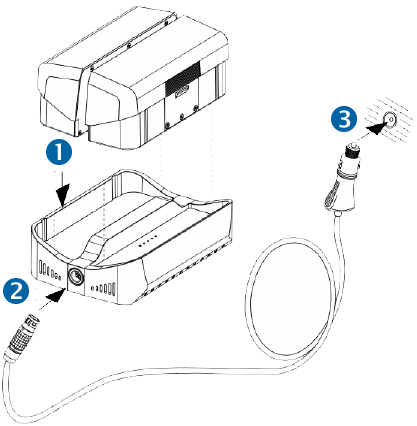
To charge the battery packs with the car charging cable 12 V:
-
Place one or two battery pack(s) into the charger after ensuring the correct alignment.
-
Connect the car charging cable to the charger.
-
Connect the car charging cable 12 V to the car charging supply 12 V.
Charger LED indicators
The charger's LED indicators will display the current status of a battery after an initialization period of approximately 30 seconds.
-
Blue power LED: active, power on
-
 All 5 LED red: X12 Battery is too hot (> 40 °C)
 -
 LED 1 and 5 red; LED 2, 3 and 4 off: X12 battery is too cold (< 5 °C)
 -
 LED 2, 3 and 4 red; LED 1 and 5 off: Power supply is too low (minimum voltage ≥ 11 V)
The overall charging capacity of the battery is divided into five parts. Each LED corresponds to a fifth:
-
 LED 1: 0 < 20 %
 -
 LED 2: 20 < 40 %
 -
 LED 3: 40 < 60 %
 -
 LED 4: 60 < 80 %
 -
 LED 5: 80 < 100 %
During the battery charging, the appropriate charging state LED flashes.
If the appropriate LED is illuminating constantly, the currently charged fifth of the battery has reached the appropriate level of charge.
When all five LEDs are illuminating constantly, the battery is completely charged and can be removed from the charger. Disconnect the power supply from the charger when finished.
The battery will be charged fast to 80 %. The overall charging state 100 % lasts relatively long.
The power supply is intended for indoor use. The power supply and the charger should only be used in dry locations.
