Depth Autos Optimization on Cat NGH mini/micro machines
NOTE – If you want to use Depth and Tilt Autos together, see Depth and Tilt Autos Optimization on Cat NGH mini/micro machines. This chapter is only for using Depth Autos.
TIP – For information on how to use Autos, see Depth Autos Setup on Cat NGH mini/micro machines.
Optimize the Depth Autos performance
NOTE – Check that your technician has calibrated Autos before you try to adjust the values in the Autos Optimization screen.
You may need to adjust the Autos Optimization settings when, for example, you work with a different type of material (such as sand, dirt, or gravel).
Adjusting the settings in the Autos Optimization screen may improve the performance of Autos. For example, if the boom is overshooting above the target design grade when you pull in the stick, you can decrease the Boom Raise speed.
Autos performance is dependent on the speed that you pull in the stick. Experiment with different speeds to find the optimum for your machine and combination of attachment and material. For example:
- A slower or faster speed may produce a better result.
- A smooth take off speed helps.
- Do not vary the speed while optimizing the sliders.
-
Select High Power mode and turn the throttle up to maximum revs.
-
Using Depth Autos, make a test pass in the material you are working, so that you can judge the current performance of Autos.
- Place the attachment on grade at near full reach.
- Engage Autos.
- Watch how quickly or slowly the attachment moves to the on‑grade position.
NOTE – The behavior of Autos when the attachment is not loaded with the same material you will work with does not provide enough information to adjust the values in the Autos Optimization screen. Always use this information in conjunction with the results of a test pass.
- To make any changes, in the Autos Optimization screen, select the appropriate type from the Optimize drop‑down list.
-
Move the slider(s) to increase or decrease the values for the following:
TIP – The apex is where the boom changes from raising to lowering during a pass.
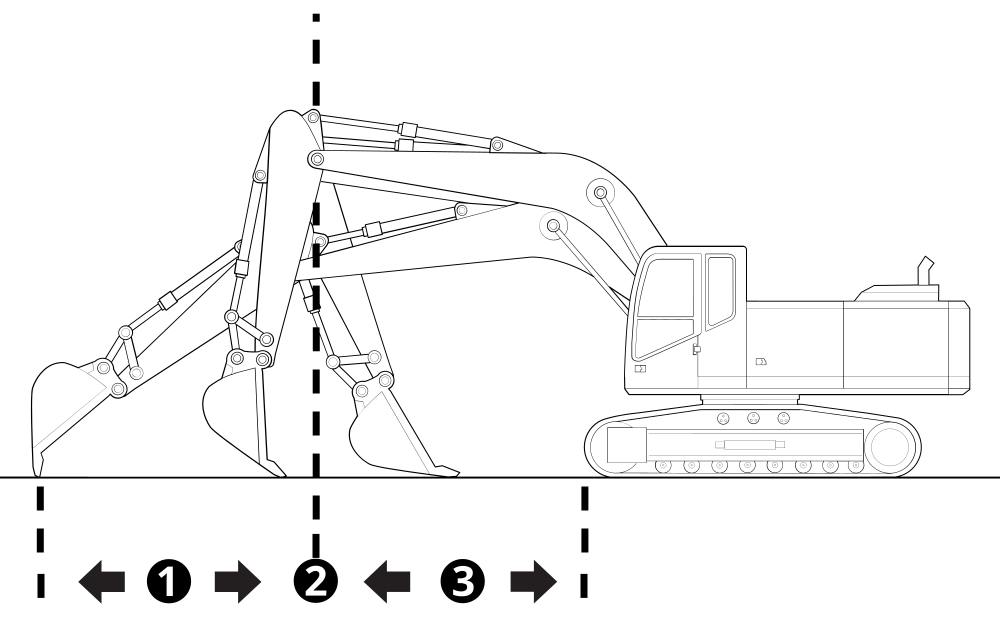
1 Full reach to apex 2 Apex 3 Apex to fully crowded Type Option Description Attack Angle Attack Angle If required, move the Attack Angle slider to change the angle of the bottom of the attachment to the design surface.
Zero is parallel, a negative value will lower the back of the attachment and a positive value will raise the back of the attachment.
Rake Rake In Before Apex If the finished surface is below grade when you perform a Rake In pass from full reach to the apex, increase this value. Rake In After Apex If the finished surface is below grade when you perform a Rake In pass from apex to fully crowded, increase this value. Rake Out Before Apex If the finished surface is below grade when you perform a Rake Out pass from fully crowded to the apex, increase this value. Rake Out After Apex If the finished surface is below grade when you perform a Rake Out pass from the apex to full reach, increase this value. Flat Attachment In Flat Attachment In(Boom) Before Apex
If the finished surface is below grade when you perform a Flat Attachment In pass from full reach to the apex, increase this value. This will control the boom raise and lower commands. Flat Attachment In(Boom) After Apex If the finished surface is below grade when you perform a Flat Attachment In pass from the apex to fully crowded, increase this value. This will control the boom raise and lower commands. Flat Attachment In (Attachment) Before Apex If the attachment changes angle too slowly and does not keep flat on grade when you perform a Flat Attachment In pass from full reach to the apex, increase this value. Flat Attachment In (Attachment) After Apex If the attachment changes angle too slowly and does not keep flat on grade when you perform a Flat Attachment In pass from the apex to fully crowded, increase this value. Flat Attachment Out Flat Attachment Out (Boom) Before Apex If the finished surface is below grade when you perform a Flat Attachment Out pass from fully crowded to the apex, increase this value. This will control the boom raise and lower commands. Flat Attachment Out (Boom) After Apex If the attachment changes angle too slowly and does not keep flat on grade when you perform a Flat Attachment Out pass from the apex to full reach, increase this value. This will control the boom raise and lower commands. Flat Attachment Out (Attachment) Before Apex If the attachment changes angle too slowly and does not keep flat on grade when you perform a Flat Attachment Out pass from fully crowded to the apex, increase this value. Flat Attachment Out (Attachment) After Apex If the attachment changes angle too slowly and does not keep flat on grade when you perform a Flat Attachment Out pass from the apex to full reach, increase this value. Boom Raise Speed Looking at the surface from full reach to the apex, use Boom Raise Speed to make the attachment cut to grade. If the finished surface is consistently below grade, increase this value. Raise Response If the boom is slow to rise, then increase this value. Lower Speed Looking at the surface from the apex to fully crowded, use Boom Lower Speed to make the attachment cut to grade. If the finished surface is consistently above grade, increase this value. Lower Response If the boom is slow to lower, then increase this value. Take Off Speed If the boom is not driving to grade within the first 0.5 m/1.5 ft after the stick is pulled, increase this value. Decreasing this value may reduce oscillations at the very beginning of the pass. Joystick Joystick Response Speed If both the boom and attachment are slow to respond to stick movement, increase this value. Decreasing this value may reduce oscillations at the very beginning of the pass and oscillations observed when the stick movement is slow. Attachment Dump Speed If the attachment is slow to dump for the full duration of the pass, increase this value. Dump Response If the attachment is slow to dump, then increase this value. Curl Speed If the attachment is slow to curl for the full duration of the pass, increase this value. Curl Response If the attachment is slow to curl, then increase this value. - Tap Apply.
-
Make another test pass and compare the results. Repeat the process, if necessary, until you get the results you desire.
You may need to enlist the help of your technician for further fine tuning and a precise check of the machine measure‑up.
Presets
Presets allow you to save Autos Optimization settings so that you can restore them later. This is useful when there is a change in application or material.
NOTE – Presets are not dependent on the Auto mode selected. For example, if you create Preset 1 while in Depth and Tilt mode, the same boom and attachment speeds will appear if you select Preset 1 while in Depth mode and the same tilt speed will appear if you select Preset 1 while in Tilt mode.
Select and Apply a Preset
You can select and apply the active preset via the Autos Setup or Autos Optimization screen. You can access these screens via the Work Settings menu. There is always at least one preset stored which is the Default preset set by your technician in the Web Interface. This cannot be edited or deleted.
Select the active preset that you require and tap Apply.
Add a new preset
NOTE – When you add a new preset the Autos Optimization sliders are set to their default values.
- In the Autos Optimization screen, tap Create. The Add New Preset screen opens.
- Tap inside the Preset Name field and enter a descriptive name for the preset.
- Tap Apply. You are returned to the Autos Optimization screen.
- In the Autos Optimization screen, use the Autos sliders or the arrows to increase (
 ) or decrease (
 ) the values. For more information, see the section on optimizing the Autos performance.
 - The preset changes to a customized or temporary state (as indicated by the * next to the preset name and the italicized text).
-
Tap Apply to save the preset in its customized state.
NOTE – All changes will be discarded if you select the original unmodified preset or a different preset. To save the customized preset permanently, tap Save As. See Save an edited preset with a new name.
Edit a preset
NOTE – If you try to switch to another preset while editing, the Discard All Changes? confirmation message displays. Any unsaved changes you made will be lost if you tap Yes.
- In the Autos Optimization screen, select and apply a preset.
-
Use the Autos sliders or the arrows to increase (
) or decrease () any of the values. Any edit you make to a preset puts it into a customized and temporary state (as indicated by the * next to the preset name and the italicized text) .
- To save the changes, tap Save As. The Save Preset As screen opens.
- Turn on the Replace Existing slider. It will auto populate the Preset Name field with the name of the active preset. Tap Apply. You are returned to the Autos Optimization screen. The Preset Overwritten notification message displays.
TIP – To save the customized preset with a new name, see Save an edited preset with a new name.
Save an edited preset with a new name
Any active preset that is in a customized and temporary state (as indicated by the * next to the preset name and the italicized text) can be permanently saved as a new preset with a different name.
- In the Autos Optimization screen, tap Save As. The Save Preset As screen opens.
- Tap inside the Preset Name field and enter a descriptive name for the preset.
- Tap Apply. You are returned to the Autos Optimization screen. The Preset Saved Successfully notification message displays.
TIP – If you turn on the Replace Existing slider, it will auto populate the Preset Name field with the name of the active preset. Tap Apply. You are returned to the Autos Optimization screen. The Preset Overwritten notification message displays.
Delete a preset
NOTE – You cannot delete the Default preset.
- In the Autos Optimization screen, select a preset and tap the delete icon (
 ) on the right‑hand side of the preset.
 - A Delete confirmation message displays.
- Tap Yes to confirm the deletion.
