Advanced Control Joystick Configuration
NOTE – For machines with levers, see Remote Switches Configuration.
If your machine has a joystick, you can use certain switches on the left and right advanced control joystick to perform common tasks while keeping your hands close to the machine controls. The joystick switches only function when you are in the work screen.
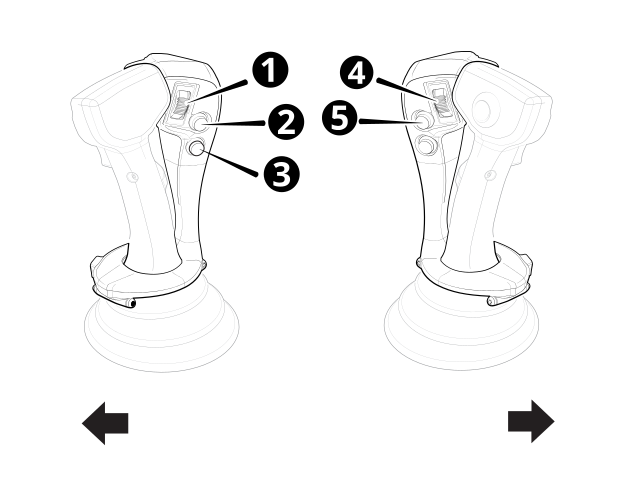
| 1 |
Left increment/decrement switch |
2 |
Left Autos switch |
| 3 |
Sideshift Autos switch Sideshift Autos is not available on Cat 120 14A and 140 13A machines. |
4 |
Right increment/decrement switch |
| 5 | Right Autos switch |
Left Joystick
The left advanced control joystick switches let you:
-
Engage Left Autos (2).
Each press of the auto switch will cycle between Auto and Manual.
-
Increment or decrement (1) the elevation offset or the target cross slope on the left side of the blade. Roll the Increment/Decrement switch up to increase or down to decrease.
Depth and Slope mode or Design mode Cross Slope-only guidance Increase or decrease the elevation offset. Increase or decrease the target cross slope. -
Engage Sideshift Autos (3).
NOTE – You must also engage Left or Right Autos when you use Sideshift Autos.
Each press of the sideshift switch will cycle between Auto and Manual.
Right Joystick
The right advanced control joystick switches let you:
-
Engage Right Autos (5).
Each press of the auto switch will cycle between Auto and Manual.
-
Increment or decrement (4) the elevation offset or the target cross slope on the right side of the blade. Roll the Increment/Decrement switch up to increase or down to decrease.
Depth and Slope mode or Design mode Cross Slope-only guidance Increase or decrease the elevation offset. Increase or decrease the target cross slope. Remote Switches Configuration
NOTE – For machines with joysticks, see Advanced Control Joystick Configuration.
If your machine has levers, you can use the remote switches to perform common tasks while keeping your hands close to the machine controls. The remote switches only function when you are in the work screen.
The remote switches let you:
-
Engage Left Autos (1) and Right Autos (5).
NOTE – You can toggle the switch to the engaged or disengaged position.
-
Engage Sideshift Autos (2).
NOTE – You can toggle the switch to the engaged or disengaged position.
NOTE – You must also engage Left or Right Autos when you use Sideshift Autos.
- Increase or decrease the left elevation offset (3).
- Increase or decrease the right elevation offset (4).
NOTE – Remote switch placement may vary based on manufacturer and lever configuration. The following image shows typical locations for the motor grader
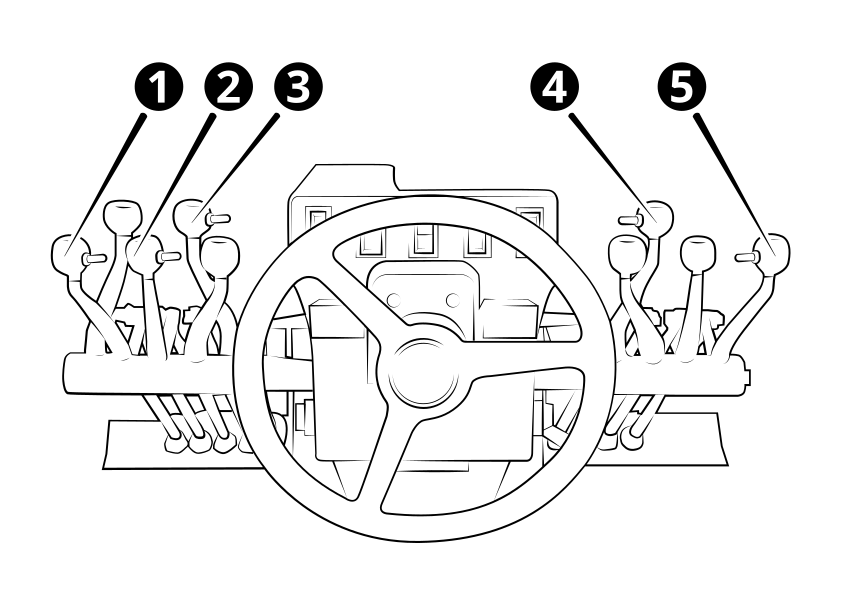
1 Left Auto switch on left blade lift lever. 2 Sideshift Auto switch on sideshift lever.
NOTE – Sideshift Autos is not available on Cat 120 14A and 140 13A machines.
3 Left elevation offset switch on moldboard roll lever. 4 Right elevation offset switch on articulation lever. 5 Right Auto switch on right blade lift lever. -
