Updating the Cutting Edge Length
Update the cutting edge length
To account for blade wear, enter cutting edge lengths for your attachment. The system uses these lengths to calculate accurate guidance.
To enter cutting edge lengths:
- Access the Blade Manager screen.
- Tap the Edit button to open the Cutting Edge Length screen.
- Use a tape measure to measure Length A and Length B and enter the values into the fields.
- Tap Save.
Update the cutting edge lengths regularly, or as you notice blade wear, to enable the system to provide accurate guidance.
Updating curved cutting edge measurements
To account for blade wear on a curved cutting edge, enter the curved cutting edge measurements. The system uses these measurements to calculate the cutting edge lengths that are used to calculate accurate guidance.
How often you update the curved cutting edge measurements depends on the amount of wear, the amount of curve in your cutting edge and the accuracy requirements for the current job.
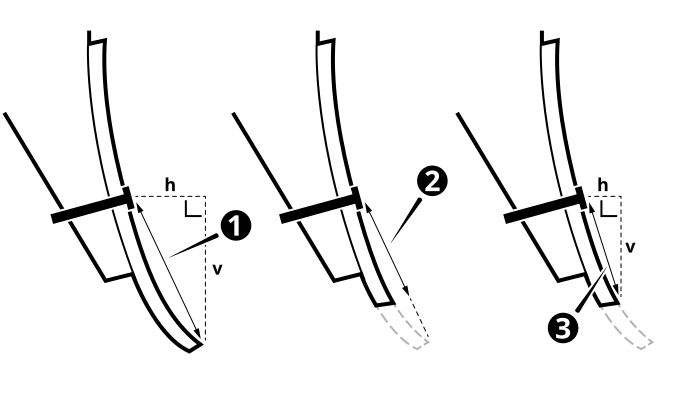
| 1 | Measured curved cutting edge | 2 | Calculated curved cutting edge wear | 3 | Updated curved cutting edge measurements |
NOTE – Measure the cutting edge approximately 0.300 m (1 ft) in from the tips. This avoids errors that can be caused by measuring the tips that can wear unevenly.
NOTE – Replace the cutting edge when it shows significant wear such as a convex or concave shape. A straight cutting edge enables the system to provide accurate guidance.
You will need a tape measure, a level and a combination square.
To update the curved cutting edge lengths:
-
Place the blade on a smooth hard surface.
-
Roll the blade fully back so that the cutting edge is forward of the blade top. This makes the vertical measurement easier to measure.
-
Access the Blade Manager screen.
-
Tap the Edit button to open the Cutting Edge Length screen.
-
Tap the Change Input Method button to open the Input Method - Horizontal and Vertical screen.
-
Use a tape measure and level to measure the horizontal and vertical lengths of the cutting edge on each side of the blade tip. Refer to the image in the app for information on how to take each measurement. The image changes to correspond to the active field. Make sure:
-
The vertical measurement is as vertical as possible.
-
The horizontal measurement is level.
-
The measurements align with the center of the bolt hole.
-
-
Tap OK. Keep the machine and blade stationary while the system takes a sensor reading.
The system uses the horizontal and vertical curved cutting edge measurements to calculate and update Length A and Length B on the Cutting Edge Length screen.
NOTE – Every time you access the Input Type - Horizontal and Vertical screen, all the fields will be blank. Enter new measurements regularly or when you notice cutting edge wear.
