Level a Scanner
Before starting the first scan on the project, it is recommended that you level the scanner. It is not necessary to level every scan but it is a good practice to level the first scan to use as the reference scan for registration.
The LED Leveling Guide Color option (see  Settings > Scanner) helps you level your scanner. It indicates which leg on the tripod needs to be adjusted.
When the scanner is:
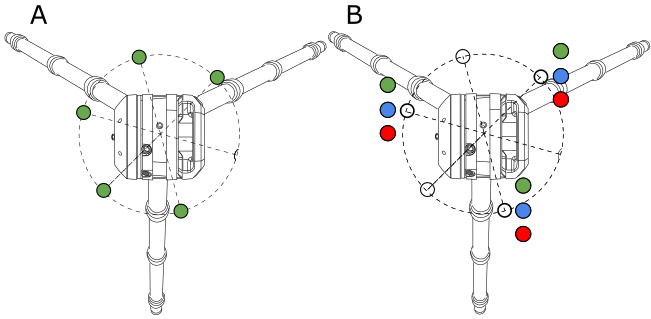
- A - LEVELED: It is within a range of +10° and -10° from either side of its vertical axis. All the five LEDs on its base are solid green.
-
B - NOT LEVELED: It is out of the +/- 10° range. A leveling guide LED (three at all, positions illustrated above) is:
Green Flashing means that the leg near the LED does not need adjusting.
Blue Flashing means that the leg near the LED is too low.
Red Flashing means that the leg near the LED is too high.
Adjust the length of the leg(s) until all the five LEDs turn solid green.
The five LEDs will not light if the LED Color option is off.
Use only the onboard electronic bubble to level the scanner. The tribrach level bubble can differ from the electronic level display and should only be used for coarse leveling > ±0.5°.
Check the level bubble in the status bar on the touch screen display of the scanner to see if the level bubble is green or red.

If the level bubble is:
-
 , the scanner is leveled.
 -
 , the scanner is not leveled.
 -
 , the scanner is out of range.
To level the scanner, first make sure the Compensator is turned on. See Settings > Scanner > Compensator.
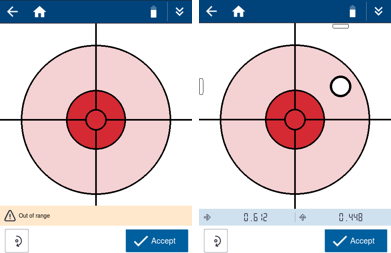
Tap  in the status bar to open the full screen electronic bubble. The electronic bubble will display:
-
Red without the Level Bubble: The scanner is out of range. Manually level the tripod until the white level bubble appears for finer adjustment with the electronic bubble.
-
Red with the Level Bubble Outside of the Red Target Area: The scanner is not leveled.
-
Green with the Level Bubble Inside the Green Target Area: The scanner is leveled within the compensation range of ±0.5°. The target will turn green once the bubble touches the outer edge of the target but it is important to center the bubble on the green target to ensure the scanner remains within the compensation range throughout the full scan.
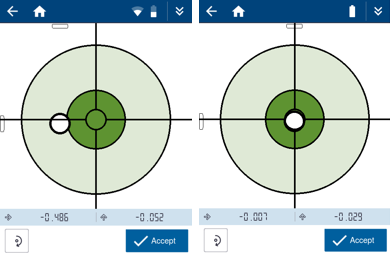
Tap  when you are satisfied.
For more information, refer to the Trimble X12 3D Laser Scanner User Guide.
