View As-Staked Point Data
A specialized type of normal survey point is an "as-staked" point. This is a point that was staked in the field based on a design specification. The as-staked point is typically imported into a project in a JobXML (.jxl) file along with its corresponding design point and computed delta values. Trimble Business Center flags any as-staked points whose horizontal and/or vertical deltas exceed the tolerances you specify in Project Settings.
The following types of as-staked points are supported in Trimble Business Center:
- As-staked point
- As-staked line point
- As-staked alignment point
- As-staked surface point
- As-staked corridor point
- As-staked catch point
Note: For instructions on exporting as-staked point data, see Export Data in a Custom Format.
Prerequisites:
To specify as-staked point tolerances:
- Select Project Settings in the Quick Access Toolbar.
- In the Project Settings dialog, select Computations > As-Staked Points in the navigation pane.
- In the Tolerance of As-Staked Points group, enter horizontal and vertical tolerance values.
These are the designed/as-staked delta values that, if exceeded, will cause an out-of-tolerance flag to display with the as-staked point. In addition, the as-staked point is highlighted in red in the Project Explorer. To see how much each flagged as-staked point exceeds the specified tolerance, select View > Flags pane.
- Optionally, select Yes or No for the Flag vertical out of tolerance option.
You might select No if you are trying to obtain cut/fill information and do not want to flag as-staked points for being out of vertical tolerance. Otherwise, select Yes.
- Click OK.
To view as-staked point data:
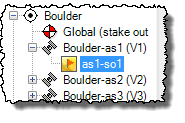
In the Project Explorer, as-staked points and their associated observations are displayed as nested nodes beneath the As-Staked Points node.
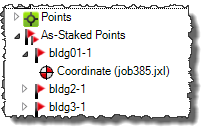
Right-click any as-staked point node in the Project Explorer and select Properties to view complete information about the as-staked point and its corresponding design element in the Properties pane.
As-staked points are also represented in the Project Explorer by note nodes nested beneath their associated observation nodes in the Points and Imported Files lists. Right-click any as-staked note node in this list and select Properties to view information about the as-staked point and its associated design point in the Properties pane.
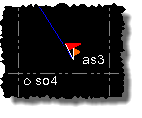
As-staked points are represented in the graphic views by as-staked flag icons.

If the coordinates for an as-staked point and its corresponding design point are not within the tolerances you specify in the Project Settings dialog, the as-staked point includes an out-of-tolerance flag.
To see how much each as-staked point exceeds the specified tolerance, select Flags Pane. You can right-click any flagged point in the Flags pane and select Properties to view its properties in the Properties pane.
As staked-points are also included in the Point Spreadsheet (select Points Spreadsheet).
To view as-staked reports:
Two as-staked reports are available for viewing:
- As-Staked Report - This report shows as-staked point information, including deltas and cut/fill values, grouped according to the various types of as-staked points contained in the project (as-staked points, as-staked line points, as-staked corridor points, and so on). For more information, see Run an As-Staked Report.
- As-Staked-Corridor Report - This report shows complete as-staked corridor point information, including detailed information not contained in the As-Staked Report. For more information, see Run an As-Staked Corridor Report.
