Create an Arc
Use the Create Arc command to create an arc at a constant elevation using various creation options. The positive direction for creating an arc (using any of the options) is clockwise.
Prerequisites:
- None
To access the command:
- Select Create Arc in CAD > Lines.
To create an arc:
- In the Name box, type an identifier for the arc as you want it to appear in the Selection Explorer and graphic views. You can also use the name to select the arc in the Advanced Select command.
- In the Layer drop-down list, select the layer on which you want the arc to reside, or select <<New Layer>> to create a new layer for the arc. Optionally, type any part of the layer name in the field. The function is case insensitive.
- In the Elevation field, specify the elevation to be applied to the entire arc.
- In the Create arc using drop-down list, select the method you want to use to create the arc and complete the required fields.
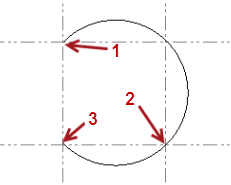
- 3 points - Create an arc based on a start-of-arc point (1 in example below), a middle-of-arc point (that is, a point anywhere along the arc between the start-of-arc point and the end-of-arc point; 2), and an end-of-arc point (3). Click in each of the three displayed fields and then select a location in the Plan View, type a coordinate, or right-click for COGO coordinate options.
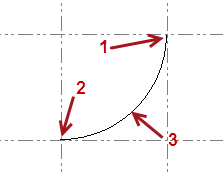
- Start, Center, End - Create an arc based on a start-of-arc point (1), a center-of-arc point (2), and an end-of-arc point (3). Note that the center point must be equal distance between the start and end points. Click in each of the three displayed fields and then select a location in the Plan View, type a coordinate, or right-click for COGO coordinate options.

- Start, Center, Angle - Create an arc based on a start-of-arc point (1), a center-of-arc point (2), and a value for the angle of coverage of the arc (3; 90°00'00" in this example). Click in each of the first two displayed fields and then select a location in the Plan View, type a coordinate, or right-click for COGO coordinate options. In the third field, enter the angle for the arc in degrees, minutes, and seconds.

- Start, End, Angle - Create an arc based on a start-of-arc point (1), an end-of-arc point (2), and a value for the angle of coverage of the arc (3; 45°00'00" in this example). Click in each of the first two displayed fields and then select a location in the Plan View, type a coordinate, or right-click for COGO coordinate options. In the third field, enter the angle for the arc in degrees, minutes, and seconds.
- Start, End, Radius - Create an arc based on a start-of-arc point (1), an end-of-arc point (2), a value for the radius of the arc (3), and an indication of whether to create the arc curving to the left or right side ("right" in this example). Click in each of the first two displayed fields and then select a location in the Plan View, type a coordinate, or right-click for COGO coordinate options. In the third field, enter the length of the radius for the arc. In the Side drop-down, specify whether the arc curves to the right or left from the start point to the end point.

- 3 points - Create an arc based on a start-of-arc point (1 in example below), a middle-of-arc point (that is, a point anywhere along the arc between the start-of-arc point and the end-of-arc point; 2), and an end-of-arc point (3). Click in each of the three displayed fields and then select a location in the Plan View, type a coordinate, or right-click for COGO coordinate options.
- If your project uses Custom fields, enter the required information under Custom Fields.
- When you are done, click Close, or click Apply to create additional arcs.
These commands are available in the command pane and by right-clicking in the graphic view.
Dependencies:
- None
