Create a Linestring from Points
Use the Create Linestring from Points command to create a linestring through a series of points, either by specifying a range of point IDs or by selecting points graphically. The resulting linestring includes only horizontal segments; no VPIs are defined by this command.
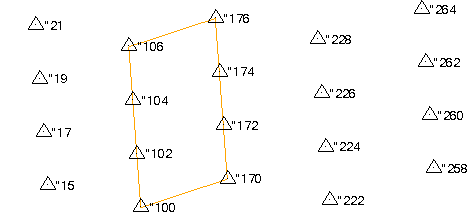
Figure: Linsetring created from point ranges "100-106,"176-170 and Auto-close enabled.
Prerequisites:
- Licensed module; See the Subscription Plans page. For a license matrix by command, see the License page in the TBC Community. Also see View and manage licensed features.
- Points with IDs
To access the command:
- Select Create Linestring from Points in CAD > Lines.
To create a linestring through points:
- Use the View Filter Manager to ensure that all of the points you want to use are visible.
- In the Name box, pick an object in a graphic view to use its name for the linestring or type a unique identifier as you want it to appear in the Project Explorer and Selection Explorer. You can also use the name to select the linestring in the Advanced Select command.
- Select the layer on which you want the new linestring to reside in the Layer list, or select <<New Layer>> to create a new layer for it.
- Check the Auto-close box if you want the last line segment created between points to automatically connect with the start point of the first line segment, creating a closed linestring.
- Select an option in the Defined by group:
- Coordinate - Select this to base the line segment end points on the coordinates of the selected points; this means that a point can subsequently be moved without changing the geometry of the linestring.
- Point ID - Select this to base the line segment end points on named point objects, meaning that if you move one of the points, the linesting's geometry will update.
- Choose an option in the Selection group:
- Selection - Choose this to pick the points to use in a graphic view or by clicking Options. Points with an ID of "?" can be included. The point IDs of the selected points will determine the sequence in which the linestring is formed.
- Point IDs - Select this to enter a range of point IDs using the syntax shown below the box. Points without IDs are ignored. Options include:
- Range start and end point IDs - For example, 112-118, "500-400, or c1-c22
- Ascending range end point ID - For example, -118, -"500, or -c22
- Multiple ranges - For example, 112-118,130-145 or -c22,c30-c40
Tip: You can either increment or decrement the range of points selected. The order in which the points are selected and (thereby used to create the linestring) affects the direction of the linestring.
Note: The delimiter (either comma or period) is determined by the symbol you have set in Microsoft Windows® Regional and Language Options. Spaces are ignored, and regular expressions are not supported.
- Click Apply to create the linestring. Regardless of how many separate ranges are specified in your selection of points, one linestring is created each time you click Apply.
Scenarios:
- If you specify multiple ranges that overlap, the program calculates the appropriate range, e.g., if you enter A2B100, A2B150, the range A2B150 will be selected.
Dependencies:
- If you use the Point ID option, the linestring is dependent upon the point objects used to create it; if the point locations change, the linestring's geometry is updated accordingly.
