Perform a Manual Camera Calibration
The Manual Camera Calibration feature lets you adjust the orientation of the Trimble MX7 Mobile Imaging system's six-camera array by changing the values of its parameters based on the use of one or more control points.
- Heading - The orientation is set to 0° for the front camera in the array to be pointing straight in front of the vehicle. The value is positive to the right and negative to the left. A camera turned laterally to the right has a value of +90°.
- Roll - The value is positive for a counterclockwise camera rotation and negative for clockwise camera rotation.
- Pitch - The value is positive for pointing upwards and negative for pointing downwards. A level camera array has a value of 0°.
To perform a manual camera calibration:
- Import into the project a file containing control points to be used in the calibration.
Note: The mobile mapping import process resulted in a new Mobile Mapping view filter being applied in the project that causes only the mobile mapping run to display in the Plan View. To view additional data (for example, the imported control points) along with the run in the Plan View, make changes as appropriate in the View Filter Manager.
- In the Project Explorer, right-click the Mobile Mapping Run for the camera array you want to calibrate and select Manual Camera Calibration to display the Manual Camera Calibration command pane.
- Enter a value for Heading, Roll, and/or Pitch in order to align the imported control points with feature points in the panorama.
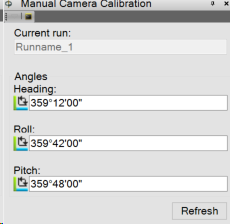
- Click Refresh.
- You can view the changes in the view on the Run View tab.
- When you are done, click Apply.
The newly input values are applied to all stations in the run.
