Export Mobile Mapping Images and Point Cloud to TopoDot
The Export to TopoDot feature lets you convert the data to be used in the TopoDot software, i.e. panoramic images, side camera images, and laser point clouds.
To export images and point cloud to TopoDot:
- Import a mobile mapping database (*.mxdb) into an existing VCE project.
- Select Export in Home > Data Exchange to display the Export command pane.
- Click the Mobile Mapping tab.
A list of available exporters displays.
- Select Export to TopoDot in the list.
- Select a run (or a set of runs) from the Project Explorer (or from the Plan View).
By default, the name in the File Name field is the name of the VCE project. The default location is in the project folder.
- Optionally, in the File Name field, enter a different file name and/or file path.
- Optionally, check the Close Command after export option to close the Export pane once the export completed.
- In the Settings pane, and do one of the following:
- In the Export panorama face - front (or left, or right, or back, or top or bottom) drop down list, select Yes (or No) to export (or not) the recording of the panoramic camera as a set of images.
- In the Export side images drop down list, select Yes (or No) to export the recordings of the side cameras as sets of images.
- In the Export back-facing images drop down list, select Yes (or No) to export the recording of the backward camera as a set of images.
- In the Export scans drop down list, select Yes (or No) to export (or not) the laser point clouds.
- In the Export timestamps drop down list, select Yes (or No) to export (or not) the timestamp information for laser point clouds.
- Optionally, set the Fill image files with GPS attributes option to Yes to export the panoramic and planar image files with the GPS attributes (latitude, longitude and altitude, and timestamp).
- Optionally, blur the images (see Blur Exported Images).
You need to first generate scans from the raw data before exporting them to the TopoDot software. Otherwise, nothing will be exported.
- Click Export to export the data.
Note: You must close all run views prior to export. Otherwise, a warning message will pop up.
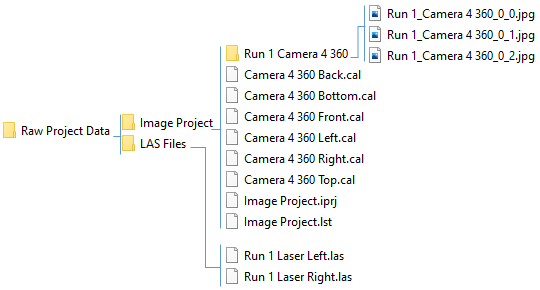
The export generates a Raw Project Data folder as well as two sub-folders called Image Project and LAS Files.
- MX9 and MX90:

- MX50:
- MX60:
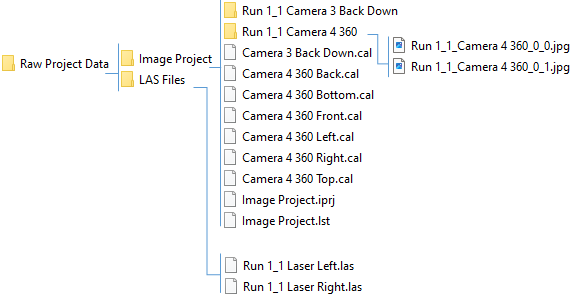
- The Image Project folder contains three main components (IPRJ file for the image project, LST file containing all image position and orientation, and CAL files which are the camera models (one for each camera)) and several sets of cubical images (one set per camera and per run) resulting from the conversion of the panoramic and side camera images.
- The LAS Files folder contains a couple of 1.4 LAS format files, one couple per run.
- The Timestamp is an important attribute of a point in a mobile mapping point. According to the ASPRS LAS 1.4 specification, the Timestamp information refers to the GPS Time in the point records, i.e., standard GPS Time (satellite GPS Time) minus 1 billion of seconds. The origin of standard GPS Time is defined as midnight of the morning of January 6, 1980.
If the Timestamp option has been set to No, the exported scans are the ones processed with the Generate Scans feature, and the color information will be exported if the generated scans have been processed with the color option set to on.
If the Timestamp option has been set to Yes, the exported scans are reprocessed from the raw data and directly written to the LAS format files, the color information will be exported in the LAS format files.
You can use the LAS Exporter from the Point Cloud tab in the Export dialog to export scans processed with the Generate Scans feature, in LAS 1.2 or LAS 1.4 format file (one file for all processed runs). The color information will be exported if the scans have been generated with the color option set to on.
- MX9 and MX90:
Note: Corrupted side camera images are exported as black images.
