Create a Corridor Sub-Template
Use the Create Sub-Template command to make a stand-alone shape (such as for a curb) to insert into a corridor or any other template, such as a corridor side slope template. Simply define a set of instructions for the shape and then reuse them. Using sub-templates can greatly reduce the number of instructions in a corridor template. All related corridor template functions work the same way for sub-templates; they are just a way to group and reuse instructions. You can also share sub-templates with colleagues by exporting them in a VCL file.
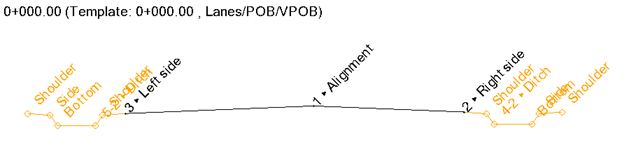
Figure: Sub-template (orange shape applied to either side of corridor template instructions)
Prerequisites:
- License; See the Subscription Plans page. For a license matrix by command, see the License page in the TBC Community. Also see View and manage licensed features.
- Corridor
To access the command:
- Select Create Sub-Template in Corridors > Corridor.
To create a sub-template:
- In the Name box, type a unique identifier for the sub-template as you want it to appear in the Project Explorer and Properties pane.
- Click OK. A new node called Sub-Templates is added under Corridors in the Project Explorer.
- In the Corridor Template Editor, create instructions as you normally do for a corridor template (although you will not see an alignment indicator in the view). For details see Create Corridor Template Instructions.
- To turn off default transition logic that might, for example, connect a node in one corridor template to an incorrect node on the next template, uncheck the Transition allowed box.
Note: The default logic may be incorrect in rare cases in which templates are complex or far apart. Unchecking this box lets you define such transitions manually instead (using a table of values when adding instructions). In TBC versions before 5.70, any value type that was defined over a station range was never interpolated. So tables do not use this checkbox. Only constant values, such as an offset going from 10 units to 20 units between templates, are interpolated.
- Choose an option in the Connect mode list. When creating a sub-template, a closed curb shape for example, this setting lets you control the number of connection points with other instructions. Selecting 2nd Connection, for instance, allows you to specify two nodes to connect, such as the top of curb to the finish surface and the bottom of curb to a subgrade surface. Then you can specify which nodes to connect when you edit the sub-template.
- No connection
- 1st connection - Lets you specify a single node as a connection point.
- 2nd connection - Lets you specify two nodes as connection points.
See this Connection Mode Explained video to understand the setting.
- Click Add to insert the instruction in the editor table.
Insert the sub-template into a corridor template
- Right-click the corridor or side slope and select Edit Corridor Template in the context menu. You will see the Sub-template instruction in the table.
- In the Edit Corridor Template pane, select Sub-Template as the Instruction type.
- In the Attach to list, specify where to add the sub-template shape.
- Select the Sub-template to insert in the list.
- Select a Layout Direction:
- Left/Right - Pick a direction the shape will draw from the Attach to node.
- Auto - Select this if the sub-template is symetrical, so it does not matter which direction it draws.
- Click Add.
Dependencies:
- Once inserted, if you modify a sub-template, the change is made everywhere the sub-template is used (without having to rebuild the corridor).
