Perform a Grant Boundary or Compass COGO Adjustment
Use the Create COGO command to perform a Grant Boundary or Compass (Bowditch) adjustment automatically to re-establish lost boundary corners. To do this, you simply enter one of the new COGO line commands—End Coordinate or End Point—to specify a different end location for the selected boundary linestring based on an imported measured point or coordinate. The adjustment is performed automatically by rotating and scaling the linework that defines the entire boundary based on the new measured corner point, which is fixed during the adjustment. Using the COGO > Adjust tab, you can select the type of adjustment to perform and whether to display the legacy linework on a different layer than the new adjusted linework so it can easily be hidden or displayed in a different color. Information about the adjustment is displayed on the Adjust tab as well, including the legacy and adjusted boundary line lengths, misclosure between the legacy and adjusted end points, applied rotation, and applied scaling factor.
Prerequisites:
- See the Subscription Plans page. For a license matrix by command, see the License page in the TBC Community. Also see View and manage licensed features.
- Line or linestring
To perform a Grant Boundary or Compass COGO adjustment:
- Select Create COGO in Survey > COGO to display the Create COGO command pane.
- On the Options tab, select the Collection name whose boundary you want to adjust.
- Select the COGO tab.
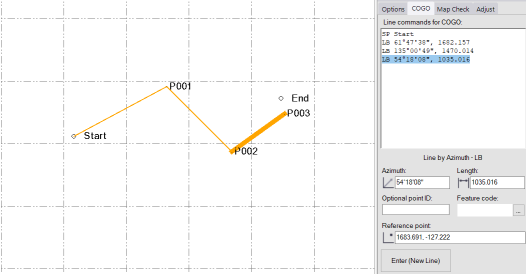
- In the Plan View or the Line commands for COGO list, select the linestring whose end point you want to change to match the new measured corner.
In the following example, the linestring connecting P002 and P003 was selected
- Insert your cursor at the end of the line command and press the Enter key button to move the cursor to a new blank line in the list following the selected line command.
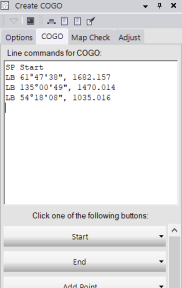
- Do either of the following:
- If the new ending point for the linestring is a measured point, do either of the following.
- Select the End > End Point - EP button, enter the new end point ID or select the point in the Plan View, and click the Enter (New Line) button.
- Type EP (not case sensitive) followed by a space and the new end point ID. Then press the Return key to perform the adjustment.
In the following example, the new End point has been selected using the End Point - EP line command, but the adjustment has not yet been performed.
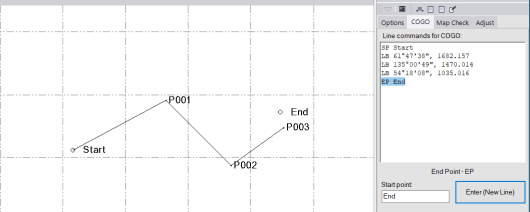
In this next example, the adjustment has been performed after the Enter (New LIne) button was clicked (or the Enter key was pressed).

- If the new ending point for the line is a measured coordinate, do either of the following.
- Select the End > End Coordinate - EC button, enter the new end point coordinate or select it in the Plan View, optionally enter a new point ID and a feature code to assign to the new point, and click the Enter (New Line) button.
- Type EC (not case sensitive) followed by a space and the new coordinates separate by a comma. Optionally, follow this with two commas and a space followed by a point ID, followed by a comma and a space and the feature code. Then press your Return key.
Note: If you are inserting an End command prior to completing a COGO collection, you must enter an existing Start Point/Coordinate before creating additional linework.
- If the new ending point for the linestring is a measured point, do either of the following.
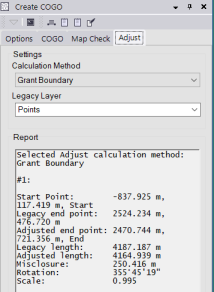
- On the Adjust tab, select the type of adjustment you want to perform (Grant Boundary or Compass), or select None.
Grant Boundary is selected by default. The boundary line is automatically adjusted in the Plan View based on your selection. You can view information about the adjustment in the Report section of the Adjust tab.
- Optionally, in the Legacy layer drop-down list, select a different layer on which to display the legacy boundary linework.
If you want to create a new parcel from the adjusted boundary linework, see Create COGO Collections and Compute Parcels for additional instructions.
If you want to remove the adjusted boundary linework, delete the End Pont or End Coordinate line command from the Line commands for COGO list.
