Train Custom Point Cloud Classification Models
Use the Training tab in the Extract Classified Point Cloud Regions command pane to create custom point cloud classification models you can use to automatically extract new point cloud regions and/or adjust existing automatically extracted point cloud regions to your specific data. You do this by providing manually corrected classified region examples (for example, fire hydrants or electrical boxes) to train and validate the model yourself using deep-learning technology, resulting in an output model with the highest quality possible based on your input sample data. To use the custom model, simply select it in the Classification type drop-down list on the Classification tab in the Extract Classified Point Cloud Regions command pane.
Prerequisites:
- See the Subscription Plans page. For a license matrix by command, see the License page in the TBC Community. Also see View and manage licensed features.
- An NVIDIA GPU with a minimum of 6 GB of VRAM
- One or more LAS (.las) point cloud files containing one or more correctly classified regions (with assigned classification numbers) that represent the classes for which you want to train the new model. (See steps 4 and 5 below.) All files must be stored in the same folder. If multiple regions are created, each one must have a unique classification number. It is recommended that you set the default/unclassified region as classification 0.
For best results, it is important that class objects in the training and validation files be as distinguishable as possible (for example, poles and electrical boxes).
To create custom point cloud classification models:
- Select Extract Classified Point Cloud in Point Clouds > Extraction to display the Extract Classified Point Cloud Regions command pane.
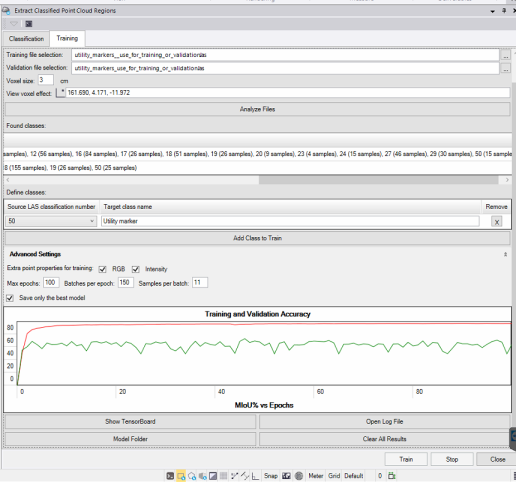
- Click the Training tab to display the controls you will use to create ("train") a new custom point cloud classification model.
- In the Model name field, enter a name for the custom classification model you want to create.
Next, you will select the LAS (.las) point cloud files you want to use for the training and validation process. All files should be stored in the same folder.
- Click the Open button to the right of the Training file selection field and select one or more training files to use to train the new custom model.
A training file is an LAS (.las) point cloud file containing one or more correctly classified regions that represent the classes for which you want to train the model. For example, if you want to train a model that automatically extracts a Fire Hydrant class, you would need to select one or more training point cloud files in which fire hydrants have been correctly classified.
- Click the Open button to the right of the Validation file selection field and select one or more validation files to use to train the new custom model.
A validation file, like a training file, is an LAS (.las) point cloud file containing one or more correctly classified regions that represent the classes for which you want to train the model.
Notes:
- The more training and validation files you select, and the more accurate the classification quality is within the files, the better the resulting classification model will perform.
- If you have a single project with a large number of the type of objects you want to classify, you could use the Keep in/Keep Out command or Create Region command to divide the data into multiple sections, each of which could be exported as a training or validation LAS (.las) file as necessary.
- To avoid "undertraining" the model, ensure that the number of samples in the training file is larger than the number of samples in the validation file.
- To train the model, it is not necessary to have training and validation files where every point is assigned to a certain class. Having classified a single class of interest is sufficient.
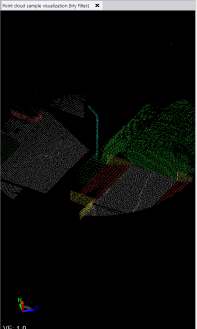
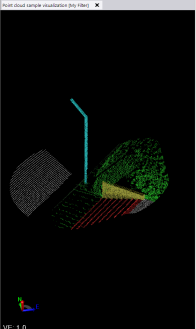
- Optionally, change the Voxel size, a parameter that helps delineate the classified objects and appropriate surrounding context using a simple graphic view.
The voxel must be small enough to delineate the object of interest but large enough to include some context around the object. Context information (correct voxel size) can be an important factor in training the model where to find the object in the point cloud. For example, knowing that the object of interest, say an insulator, is always located on a tower with power lines around it, it would help to include some of the tower and power lines in the voxel. But too much context (too large of a voxel) can make it more difficult for the model to delineate the object of interest.
- To view the effect of the specified Voxel size, click in the View voxel effect field and, in a graphic view, click on an object that is assigned the class you want to train.
Make changes to the size if necessary.
Larger and smaller voxel sizes:
- Click the Analyze Files button.
The progress of the analysis process is displayed in the Status Bar oat the bottom of the TBC window. The analysis detects the classes (identified by class numbers) contained within the selected files and the number of sample objects per class type, as displayed in the Define classes table when the analysis is complete. It also determines the optimal number of epochs to perform during training (which you can change using Advanced Settings).
Any class number included in the table that is not mapped to a class name is excluded from training and not included in the model.
- To map one or more found classes to your new custom classes, do the following using the Found classes table:
- In the first row of the table, select in the Source LAS classification number drop-down list a found class you want to map to a new custom class.
- In the Target class name field, enter a name for the new custom class.
- If necessary, click the Add Class to Train button to add more new classes to the model.
- Optionally, select any Advanced Settings as follows:
- Extra point properties for training - For training, the model uses the position of each point by default, but you can select to include the RGB and/or Intensity value if it helps identify objects of interest. RGB can be useful for consistently colored objects (for example, red fire hydrants)
- Max epochs/Batches per epoch/Samples per batch - The recommended number of epochs and batches is determined automatically when the training and validation files are initially analyzed. However, you can use these controls to edit these values depending on the desired results. Higher values require stronger GPU hardware.
- Save only the best model - Check this check box if you want to save only the most accurate version of the model. This is the typical workflow, but there are times when saving every model might be important. For example, if you are training a model on several classes at once, the model accuracy is based on the average of the sum of the accuracies for each new class. Consider a situation wherein:
- Model 1: Class A has accuracy 95 %, Class B 45 %. Average 75%
- Model 2: Class A has accuracy 70 %, Class B 70 %. Average 70%
If you opted to save the best model, it would be Model 1. However, you might find Model 2 a more reasonable choice as both classes have fairly good accuracy. - Validate using complete files - Check this check box to classify entire validation files. This ensures the most accurate measurement of model classification. If this box is unchecked, TBC uses only a small portion of the validation files that include the class of interest to test the model's accuracy.
- Enabled: Validation is slow but very accurate. All the surroundings are tested to see that the model does not produce false positives.
- Disabled: Fast but less accurate validation. While the validation is still very accurate, it does not test with the entire point cloud, so there is a chance of false positives.
By default, new custom models are saved to the C:\Users\__\Documents\Trimble Business Center\Custom DL models folder. You can change the location using Options > Project Management.
- When you are ready, click the Train button to start the training process.
Progress displays in the Status Bar at the bottom of the TBC window.
The Training and Validation timers indicate how long the training process takes.
Training a new classification model is an iterative process, much like studying for an exam. First the model "studies" the class samples in the training file. Then, it tries to apply what it learned to extract the same types of objects from the validation file (or samples of the training file if no validation file is used). It then compares the objects it found in the validation file with the objects already correctly classified in the validation file to see how accurately it performed. It then takes what it learned from the validation process, re-studies the training file, and again extracts the same types of objects from the validation file to see how it has improved. This cycle, referred to as an epoch, repeats as necessary until the maximum number of epochs has been performed.
Training and Validation Accuracy is displayed graphically during and after the training process.
- Optionally, do any of the following:
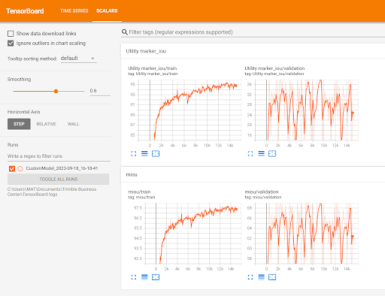
- Click the Show TensorBoard button to display a TensorBoard in a web browser showing quality measurements and visualization during and after the training process.
- Click the Open Log File button to open a log file showing progress and accuracy information during and after training.
- Click the Model Folder button to open the folder in which new model files will be stored.
- Click the Clear Tensorboard Charts button to clear the charts. This does not delete the models.
- Click the Delete all Models button to delete the models. This deletes all results.
- Click the Show TensorBoard button to display a TensorBoard in a web browser showing quality measurements and visualization during and after the training process.
When complete, the new custom model file is stored in the Custom DL modelsfolder (click the Model Folder button to open) and is available in the Classification Type drop-down list on the Classification tab in the Extract Classified Point Cloud Regionscommand pane.
Notes:
- You can stop the training process at any time prior to completion if it appears that quality/accuracy is not improving.
- If you have been provided a custom model file from another source, you can store it in the Custom DL modelsfolder to make it available for selection in the Classification Type drop-down list.
