Extract Classified Point Cloud Regions
Use the Extract Classified Point Cloud Regions command to automatically extract from a selected point cloud region ASPRS (American Society for Photogrammetry and Remote Sensing) classes into individual point cloud regions.
You can select to show or hide (using the View Filter Manager), or export, any point cloud region in your project, including classified point cloud regions.
Notes:
- Optionally, you can use the Training tab in the Extract Classified Point Cloud Regions command pane to create custom point cloud classification models you can use to automatically extract new point cloud regions and/or adjust existing automatically extracted point cloud regions to your specific data. See Train Custom Point Cloud Classification Models for instructions.
- Unlike the Extract Ground Point Cloud Region command, which is intended to be used with any kind of dataset (indoor, outdoor, or both) to extract the lowest and biggest ground area in the datasets, this command with the Ground option selected is intended to be used only with outdoor datasets. Every indoor structure (such as a building or a tunnel) is classified as Buildings.
Prerequisites:
- See the Subscription Plans page. For a license matrix by command, see the License page in the TBC Community. Also see View and manage licensed features.
- Ensure the scans in your project have been registered before performing this procedure.
To extract classified point cloud regions:
- Select Extract Classified Point Cloud in Point Clouds > Extraction to display the Extract Classified Point Cloud Regions command pane.
- In the Classification type drop-down list, select the type of classification you want to perform.
- Click in the selection field. Then select in the Project Explorer the point cloud region(s) from which you want to extract classified regions.
- In the Classes to extract list, check the check box for each class you want to extract.
- If you selected the Indoor classification type, optionally specify that only a single region be created for a classification when multiple features are found (instead of one region per feature) by checking the Create one new region per class check box.
- If you selected the Railway classification type, in the Advanced Settings drop-down section, do any of the following as applicable:
- To use a trajectory to narrow the area to be searched for Railway extraction/classification based on an approximate 2m offset from either side of the trajectory, click in the Limit classification area by trajectory field and then select an existing trajectory or linestring (or create a new one) that aligns with the center of the track. By narrowing the search area to a single track along the trajectory line (regardless of the presence of other tracks in the selected point cloud region), this option can greatly enhance performance and shorten processing time.
- To use offset distances from either side of the trajectory selected in the Limit classification area by trajectory field to determine the area to be searched for Ballast extraction/classification:
- Select the From trajectory option.
- Enter the Ballast distance from either side of the selected trajectory to specify the area to be searched. (The default distance is 2m.)
- To use offset distances from each of the rails to determine the area to be searched for Ballast extraction/classification:
- Select the From rail option.
- Enter the Ballast distance from each of the rails to specify the area to be searched. (The default distance is 2m.)
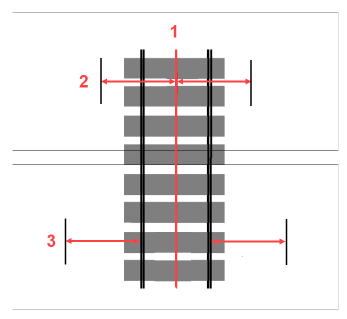
The following illustration shows the selected trajectory (1), how ballast distance is measured from the trajectory (2), and how ballast distance is measured from the rails (3).
- Click the Classify button.
The status of the extraction process is displayed at the bottom of the TBC window. When the process is complete, the newly extracted classified point cloud regions are displayed in the Project Explorer. The regions display in the graphic views in the color defined for the region (for example, Buildings regions are blue by default).
Optionally, if you selected the Outdoor (Terrestrial) or Outdoor (Aerial) classification type, click the Classify and Refine button to perform both the classification and refinement processes. See step 8 for more information
- If you selected the Outdoor (Terrestrial) or Outdoor (Aerial) classification type and you are not satisfied with the classifications that were performed, do the following:
- In the Refine Classification list, check the check box for each extracted class type you want to refine.
Note the following:
- Ground refinement removes points as necessary to flatten and clean up the ground region. (May produce poor results if used on a hill.)
- Poles/signs refinement attempts to fix misclassified bottoms of poles/signs. If pole and sign points are mixed within the same object, one class is selected.
- Buildings refinement attempts to remove small isolated patches of buildings without doing more major cleanup.
- Click the Refine button.
The status of the refinement process is displayed at the bottom of the TBC window.
- In the Refine Classification list, check the check box for each extracted class type you want to refine.
 Classification types...
You can now do any of the following:
- Use the View Filter Manager to hide or show any classified or non-classified point cloud region.
- Edit a classified point cloud region by right-clicking it in the Project Explorer and selecting Properties. You can change the region's name, classification, color, and rendering properties. (For example, change the classification for a region that was misclassified during the automatic classification process.)
- Merge classified point cloud regions. (For example, merge all regions that are classified as Buildings to create a single Buildings region.)
- Export a classified point cloud region by selecting the Point Cloudtab in the Export window and then selecting the appropriate exporter and region you want to export.
