Create Point Cloud Regions
If necessary, you can create additional point cloud regions from the Default point cloud region by drawing fences (selection boundaries) for the new regions in a graphic view. You can also create a point cloud region by combining existing regions.
Note that when you create a new point cloud region from the Default region, the scan points are removed from the Default region and included only in the new region. In this case, if you were to select to export only the Default region, the scan points in the newly created region would not be included in the export. However, you can select to add the points contained in the new region back into the Default region, resulting in the points be duplicated in both regions (see instructions below). In this case, if you were to select to export only the Default region, the scan points in the newly created region would also be in the Default region and, therefore, would be included in the export.
Notes:
- All imported points with an assigned ASPRS (American Society for Photogrammetry and Remote Sensing) classification code are added into a new or existing point cloud region with the same name (for example, "Classification 6"). If an imported point has never been classified (classification code "0"), it is added to the Never Classified point cloud region.
- Although you can delete any point cloud region that was created or imported into your project, you cannot delete the Default point cloud region.
To create a point cloud region by drawing a fence (selection boundary):
- Do one of the following to draw a fence (selection boundary) around the scan points you want to include in the new point cloud region:
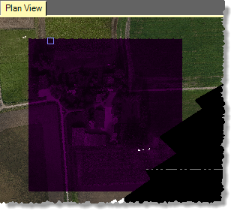
- To draw a rectangular fence, select Rectangle Select in the Status Bar (or press F5). Then click and drag on the graphic view to draw the fence.
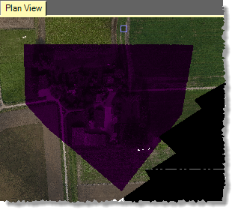
- To draw a polygonal fence, select Polygon Select in the Status Bar (or press F6). Then click and drag on the graphic view, releasing the mouse at each corner you want to define for the polygon. Double-click to close the fence and end your selection.
- To draw a freehand fence, select Polygon Select in the Status Bar (or press F6). Click on the starting point in the graphic view and hold the mouse button down, press and hold the Alt key, drag your mouse slightly, release the mouse key, then drag your mouse to draw the freehand fence. Double-click to close the fence and end your selection.

- To draw a rectangular fence, select Rectangle Select in the Status Bar (or press F5). Then click and drag on the graphic view to draw the fence.
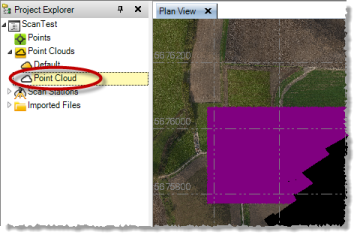
- Select Create Point Cloud Region in Point Clouds > Regions (or press Ctrl + T).
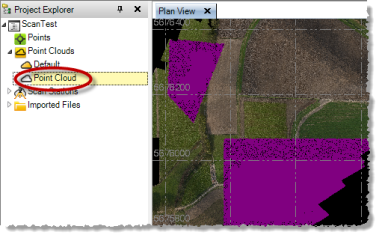
The new region is represented by a new Point Cloud Region node in the Project Explorer.
- To change the name of the new region, its ASPRS (American Society for Photogrammetry and Remote Sensing) classification, its region color, or its rendering, select the region, right-click, and select Properties. Then make your changes in the Properties pane.
When you create a new point cloud region from the Default region, the scan points are removed from the Default region and included only in the new region by default. However, you can select to add the points contained in the new region back into the Default region, resulting in the points be duplicated in both regions.
- To add scan points included in a new point cloud region back into the Default region, right-click the Default point cloud region in the Project Explorer and select Get All Points.
To undo the Get All Points command and remove the duplicate scan points from the Default point cloud region, right-click the Default region and select Get Unused Points.
To create a point cloud region by combining existing regions:
- In the Project Explorer or graphic view, press Ctrl and select the point cloud regions you want to combine.
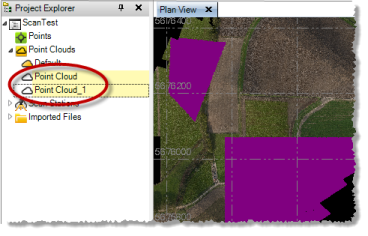
- Select Create Point Cloud Region in Point Clouds > Registration (or press Ctrl + T).
The newly combined regions are represented by a single Point Cloud Region node in the Project Explorer.
- To change the name of the new region, its ASPRS (American Society for Photogrammetry and Remote Sensing) classification, its region color, or its rendering, select the region, right-click, and select Properties. Then make your changes in the Properties pane
