Understanding Point Cloud Data
Note: To ensure the highest performance and most trouble-free point cloud viewing experience, you must ensure your graphics card has been updated with the latest driver (software) available. See Update and Configure Your Graphics/Video Driver for instructions.
A point cloud in Trimble Business Center consists of one or more scans (a collection of scan points recorded with a single station setup) that have been imported into the project. Scans can be captured in the field with survey scan stations (for example, total stations with scanning capabilities) set up on known positions or autonomous scan stations (for example free-standing scanners) set up on unknown positions.
You can import point cloud scans into TBC using either Trimble JobXML (.jxl) files, Trimble point cloud (.tzf and.tdx) files, or non-Trimble files (for example, .las and.e57). JobXML files include, along with scan point data, complete data for each station setup used to capture the scan data. Non-Trimble files include only scan point data; they do not include station setup data.
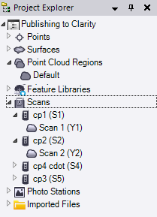
The following image shows the Project Explorer with imported Trimble scan data. Each scan node (for example, Scan 1 (Y1)) is nested beneath its parent station setup node (for example, cp1 (S1)).
Note also that all of the scans belong to the Default point cloud region. When you first import non-LAS classified scan points into your project, a default point cloud region that includes all of the scan points is automatically created and displayed as the Default point cloud region node in the Project Explorer. Any subsequent non-LAS classified scan points you import into the project are added to the Default point cloud region. After import, you can create additional regions as necessary.
Note: Although you can delete any point cloud region that was created or imported into your project, you cannot delete the Default point cloud region.
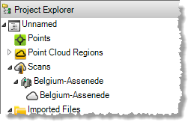
The following image shows the Project Explorer with imported non-Trimble scan data. Each scan node (for example, Belgium-Assende) is nested beneath its parent station setup placeholder node (Belgium-Assende). The placeholder node is intended to ensure consistency in the layout of Trimble and non-Trimble data; it does not include any properties other than its name.
Using the View Filter Manager, you can select to hide or show individual scans within their respective point cloud regions. In addition, you can select to hide or show entire regions.
Using the various commands located on the Point Cloud ribbon tab, you can do any of the following:
- View and edit point cloud regions, including rendering, scan point sizing, and clipping (hiding) scan points
- Create additional point cloud regions from the Default point cloud region.
- Create a ground-level point cloud region.
- Specify point cloud rendering settings.
- Use the 3D Limit Box to view only the scan points you want.
- Perform either random or spatial sampling on an entire point cloud region or a selection of scan points in your project.
- Register scans imported from multiple overlapping station setups to ensure they are correctly aligned.
- Create CAD points from scan points
- Select scan points from any point cloud region or any scan point selection you make in a graphic view to measure volume or create a surface.
- Measure distances and angles on scan points.
Using the Point Clouds tab in the Options dialog, you can specify the following settings, most of which affect precision and performance:
- The maximum number of points to use when creating a surface, measuring a volume, or performing spatial sampling
- Whether to copy point cloud files to the project folder on import
- The reference and moving scan colors (see Register Point Cloud Scans)
- Whether to automatically color scans with station images on import
You can select to export scan points from any point cloud region or any scan point selection you make in a graphic view. For more information, see Export Point Cloud Files.
Additional notes:
- To work with a point cloud created from data collected with an unmanned aircraft system (UAS), such as a Trimble Gatewing X100 aerial mapping and surveying system, you must first create the point cloud as an LAS (.las) file and then import it into Trimble Business Center.
- If the scale for a point cloud scan is not corrected for atmospheric conditions in the field prior to import, TBC performs the correction on import. After import you can, if necessary, manually change the pressure, temperature, and/or PPM precision values used to perform the scale correction to automatically apply a new correction. This helps ensure the highest accuracy for your point cloud data.
Scans previously imported from pre-SX10 Trimble scanning devices were not corrected automatically on import. To perform the scale correction for any scan in an existing project, simply make a minor change to the pressure, temperature, or PPM precision value for the scan to trigger an automatic rescaling.)
- A scale factor is applied to point cloud scans, in addition to the traditional survey data in a project, ensuring that the scans and survey data align correctly.
Important!
When working with point cloud data, it is critical that you keep your graphics driver(s) updated.
Whether your computer has one or multiple graphics cards installed, you must ensure each has been updated with the latest driver provided by the card's manufacturer. The best way to determine if your driver needs to be updated and, if so, perform the update is to visit the card manufacturer's website. For more information, see Update and Configure Your Graphics/Video Driver.
(If instead you decide to update your driver using the Windows Device Manager and the "Search automatically" option, the program may suggest using a Microsoft-approved WHQL version of the driver. However, to ensure you have the latest bug fixes and new features for your graphics card, it is recommended that you use the latest manufacturer version instead.)
