Visualize and Explore your Project Data
The Project Data pane in the 3D Viewer, brings your 3D surveyed surfaces and design surfaces together in a common and context-rich environment to ‘bridge the gap’ between the digital world and the reality on the ground to get a clear visual understanding of your project's progress. This consolidation of terrain data into integrated formats like 3D models and interactive maps provides for a clearer understanding of your project site's topography, aiding in identifying challenges and communicating design intentions. You can drape high-resolution orthoimages from specific dates onto your 3D terrain, allowing for visual verification of as-built conditions and detailed progress tracking. Once you have imported TTM (Trimble Terrain Model) surfaces from drone flights or surveys, you can use tools to help you analyze the data. Also see Project Data.
Click the
Project Data icon on the left side to open the Project Data pane that enables you to:
-
Aggregate data from diverse sources
-
Import any of the supported file types (.ttm, .tiff, .tif, .tfw, .png, .pgw, .jpeg, .jpg, .jgw) to bring surface and terrain data from various collection methods (traditional surveys, LiDAR, photogrammetry), along with design specifications, machine control data, project management information, and environmental monitoring data, together into a unified platform.
-
Import internally georeferenced orthoimages and orthoimages referenced via paired World files. See the table below.
-
Bring data in from associated field devices.
-
Import ttm, .tiff, .tif files directly from Trimble Connect.
-
Import field data from third parties, i.e., drone data
-
-
Visualize and explore these categorized data types:
-
Design surfaces (.ttm)
-
Surveyed surfaces (.ttm)
-
Orthoimages (.tif, tiff), including drone imagery
-
Terrain (data aggregated from surfaces and orthoimages)
-
NOTE: Terrain can be 'flat' under certain circumstances, such as when a project has no 3D survey or machine data.
-
- Enhance visualization - Consolidate terrain data into integrated formats like 3D models and interactive maps for a clearer understanding of your project site's topography, aiding in identifying challenges and communicating design intentions. You can drape high-resolution orthoimages from specific dates onto your 3D terrain, allowing for visual verification of as-built conditions and detailed progress tracking.
-
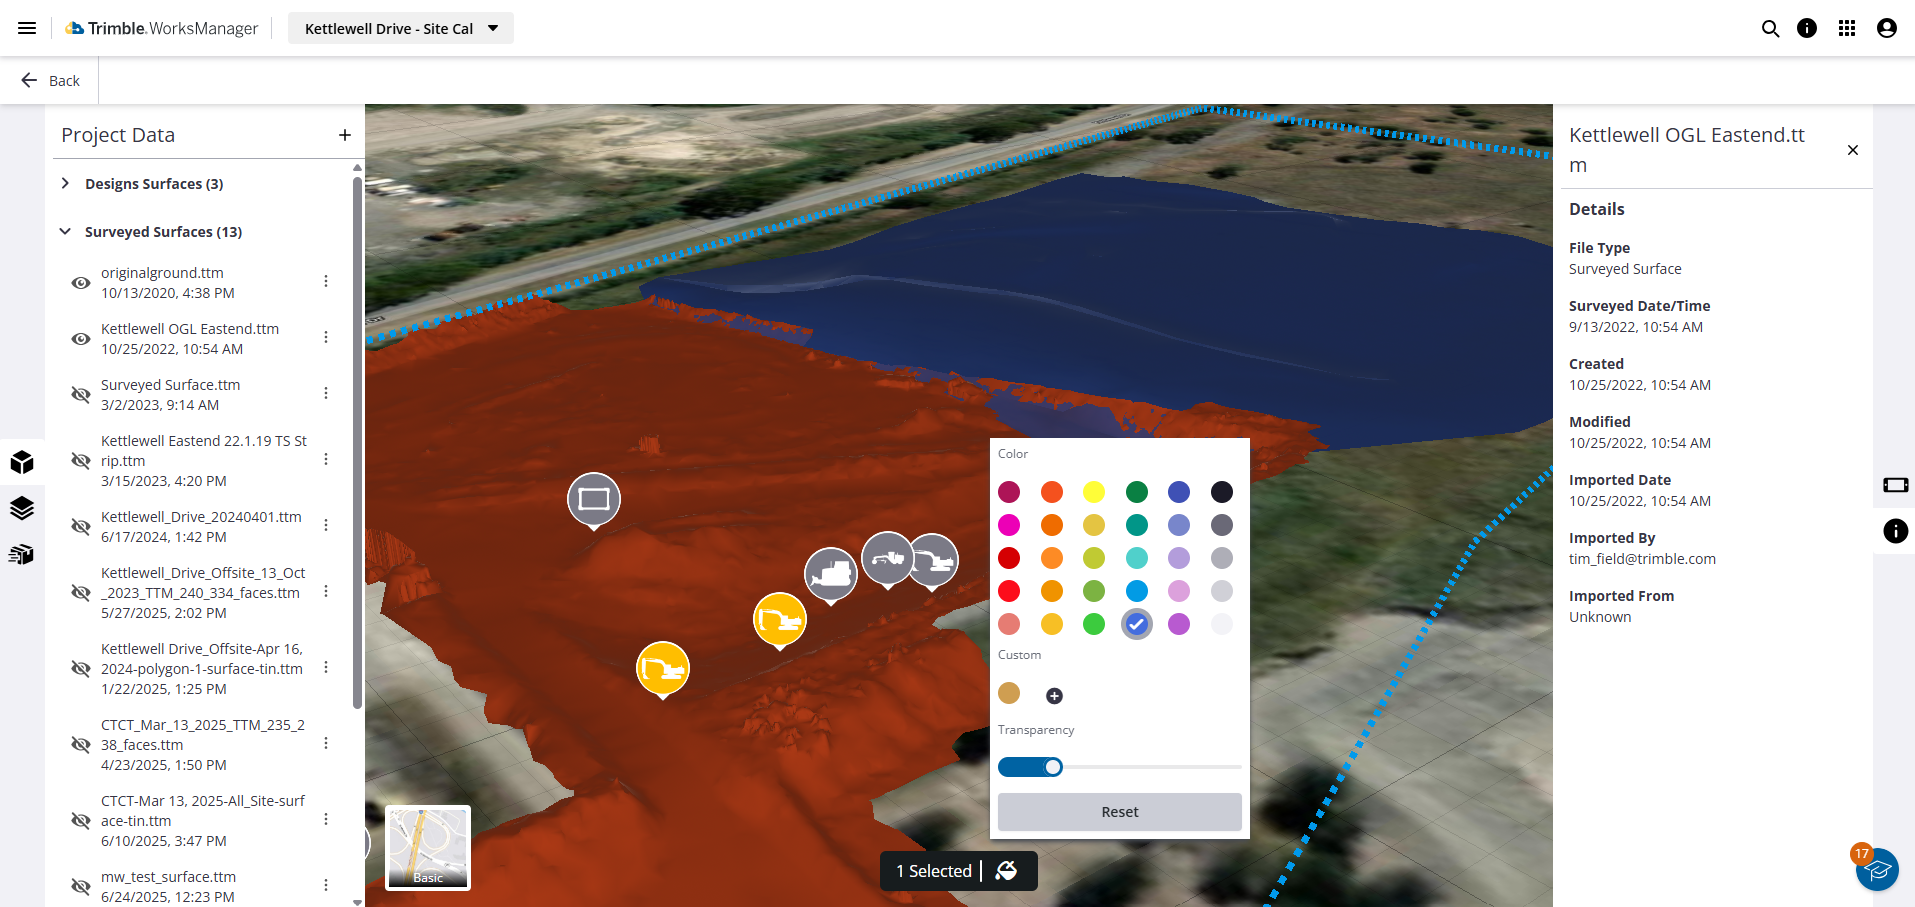
Compare multiple surfaces - Load and simultaneously display multiple surfaces from multiple dates; adjust their color and transparency for visual comparison of overlaps. Change the transparency and base height for any surface.
-
Download - Download surface and terrain data as local files.
-
Review file details - See the file type, creation, modified, and imported dates, and the file owner’s email address.
-
Filter the view and Fit to view - Show only one surface at a time and fit the data to the view.
-
Delete - Remove any surface, imagery, or terrain.
-
Filter terrain by date and time -Display terrain models as they appeared on a specified date and time ('as of date'), providing a snapshot of the site's cumulative state up to that point. Edit and filter terrain by date and time ranges. -
-
Visualize and adjust imported surfaces and terrain data - Surfaces can be configured manually for elevation. This eliminates manual download and upload of surveyed surface data, automates merging of multi-source surfaces and machine data.
-
Toggle visibility - Show/hide surfaces in the view.
-
Customize surface colors - Change the color of each surface to create a clear visual distinction between the as-designed model and the as-built survey.
-
Change surface transparency - Reduce the opacity of surfaces so you can see correlations where multiple surfaces overlap.
-
Compare multiple surfaces - Load and simultaneously display multiple surfaces from multiple dates.
-
Adjust the elevation of the background map - Bring the background map up to meet the elevation of the 3D terrain by changing its base height.
-
WorksOS synchronization - The 3D Viewer is integrated with WorksOS. Any orthoimages imported via the WorksOS platform are automatically available and synchronized in the WorksManager 3D Viewer, creating a unified data environment. When combined with WorksOS, WorksManager is designed to offer a Common Data Environment (CDE), integrating various data types and functionalities to enhance site understanding and decision-making. This CDE can act as your ‘single-source-of-truth’, a place in which you can see all of your data in one place.
Prerequisites
-
WorksManager Pro license
-
Project data (or project data to import)
-
Project editing permissions (if you want to import data)
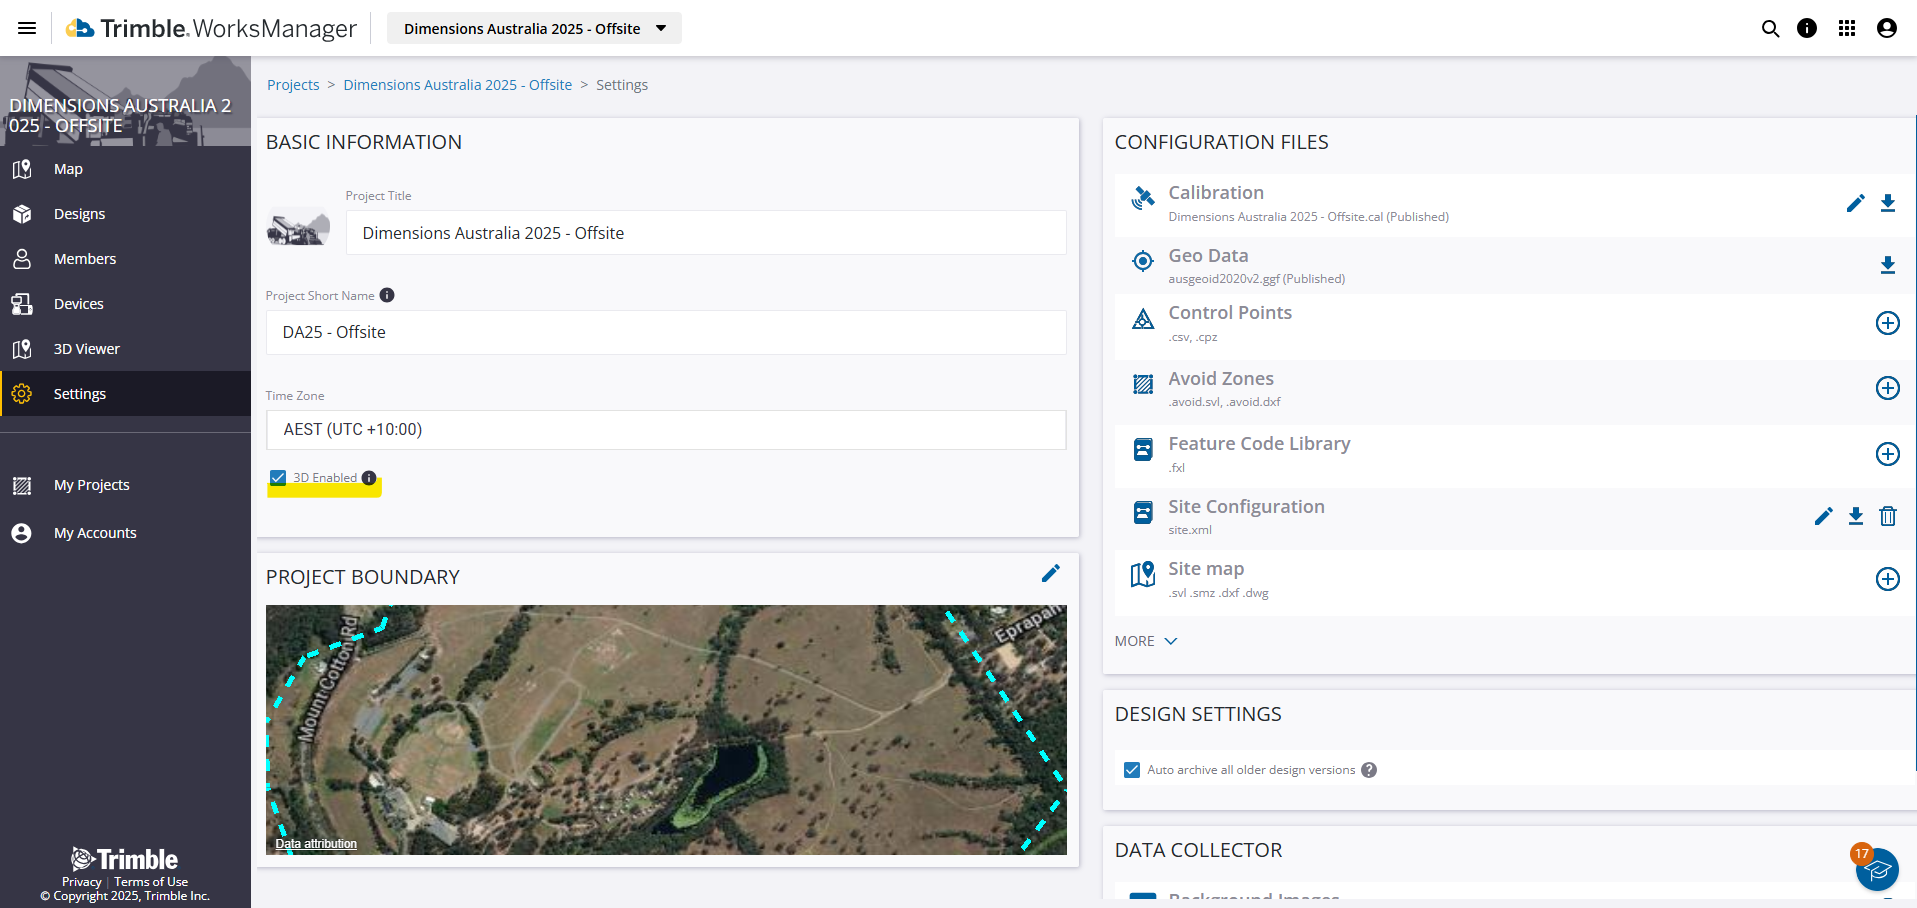
Enable 3D in Your Project
Before you can import and view surfaces, ensure that your project is 3D-enabled:
-
Open your project in WorksManager. Or click the
Menu icon if you are already in a project. -
In the left pane, click Settings > Project Details.
-
In the Basic Information section, check the 3D Enabled box.
Import a Surveyed Surface
To display machine data by importing a surveyed surface, the process typically involves several steps, from file upload to backend processing and visualization within the 3D Viewer. The primary goal is to allow you to request and display aggregated terrain models from WorksOS within the 3D Viewer.
When you import a surveyed surface, you are prompted to enter the survey date and time. This is critical because this timestamp will enable powerful future functionality; it will allow the system to automatically aggregate surfaces from different sources—such as machine pass data—to create a dynamic, chronological timeline of your job site. By entering accurate data now, you can help build a more intelligent and automated progress tracking system.
-
Open your project.
-
On the left side, click the
3D Viewer icon. -
Click the
Project Data icon. -
Expand the surface categories to review the data you have.
-
Click the + Import data icon at the top of the Project Data pane to open the Import dialog.
NOTE: If you do not see the + Import data icon, you likely do not have Manager permissions to edit the project. Contact your WorksManager project Administrator to request higher permissions. -
Click to browse or simply drag-and-drop the files you need into the dialog. If available, you can also import data from Field Devices or Trimble Connect. TTM files are the common format for surveyed surfaces. Formats like LandXML (.xml) and 3D DXF (.dxf) are not yet supported.
-
Click Assign File Types.
-
For each TTM, select Design surface or Surveyed surface as the file type. This distinction is important for how the system aggregates data. You can combine surveyed surfaces, but not design surfaces.
-
For surveyed surfaces, specify the surveyed date, time, and status (rover or drone); this is critical for establishing when the surface was surveyed. This temporal information specifies the state of the site up to that specific point and enables the WorksManager to aggregate the surface with other machine data or additional surfaces, forming a single, unified 3D dataset.
-
Click Upload.
Once processing is complete, the surface is rendered accurately within the 3D Viewer, displaying its geometry, position, and associated date and time. The system also allows for visual enhancements like shading and terrain exaggeration to improve the 3D object visualization.
Import Orthoimages
You can import GeoTIFF georeferenced orthoimages (.tif, .tiff) from WorksOS and drape these high-resolution orthoimages from specific dates onto your 3D terrain, allowing for visual verification of as-built conditions and detailed progress tracking in the 3D Viewer.
Orthoimage Formats and Georeferencing
| Format Type/Pair | Description & Georeferencing Details | Size Limit |
| GeoTIFF (.tif or .tiff) |
Contains internal georeferencing/coordinate reference system (CRS) info, so this pair does not require a separate World file. |
10 GB |
| TIFF (.tif) + TFW (.tfw) | A .tif paired with a .tfw world file | 10 GB |
| PNG + PGW | A .png image paired with a .pgw world file | - |
| JPEG + JGW | A .jpeg or .jpg image paired with a .jgw world file | - |
3D Viewer Supports Local Coordinates and JPEG/PNG Files
If you have an orthophoto in a JPEG or GeoTiff format from a recent drone fly-over, you can bring that visual data into your project with Local coordinate system (CRS) coordinates. This allows you to orient your project using the local coordinate system, which is a common practice on many job sites. Simple, common image file formats like TIFF, TIF, JPEG, PNG, GIF, and BMP (including World files) from drones or other sources that are geo-referenced to your project's local coordinate system (world files) can be used directly.
The system uses chronological layering (the assigned date and time) to manage the display of overlapping orthoimages. When two or more images cover the same area, the image with the most recent timestamp is rendered on top, ensuring that the latest site data is visually prioritized.
Import Georeferenced Orthoimages using World Files
Importing this pairing helps define the orthoimage’s location and scale.
-
On the left side, click the
3D Viewer icon. -
Click the
Project Data icon. -
Expand the Orthoimage category to review the data you have.
-
Click the + Import data icon at the top of the Project Data pane to open the Import dialog. You will see the supported file types listed in the dialog.
NOTE: If you do not see the +, you likely do not have Manager permissions to edit the project. Contact your WorksManager project Administrator to request higher permissions. -
Click to browse or simply drag-and-drop the files you need into the dialog. If available, you can also import data from Field Devices or Trimble Connect. Ensure that your image file (e.g., Site-Phase1.jpeg) and its corresponding JGW world file (e.g., Site-Phase1.jgw) are imported together. Most importantly, they must have the same name.
-
Select both the image file and its world file for upload. Because the orthoimage usually does not contain the metadata needed for the geo-referencing, it needs to be uploaded at the same time with a world file.
NOTE: Both the image file and the world file must have the same name or they cannot be linked. The image must be a GeoTIFF (.tif). -
Click Assign Dates. The file type Orthoimage is assigned automatically as detected.
-
Add a Survey Date and Time. This allows for proper layering of the images in the view (most recent is on top). The system will automatically detect the pair and prompt you to add this, which is a critical step that allows the image to be filtered on your project's timeline.
-
Click Upload. Both files are uploaded and processed (tiled) in the background, which can take minutes. Because JPEGs and PNGs are often much smaller than large TIFs, this processing is significantly faster, getting the image to your team in less time. Processing may take some time, so you will be notified when the image is available.
NOTE: The imagery is not yet draped directly onto the 3D surface surfaces.Once processed, the imported 2D orthoimage is draped onto a flat plane. This plane is automatically set at the lowest elevation point of the project's active surfaces. You can toggle orthoimage visibility on/off to render in the view as a 2D projection on the plane, not on the 3D surface.
NOTE: Images can be imported here or in WorksOS and they will sync to the other application.Orthoimages and PNGs often have a transparent background which will be invisible. JPGs don't have transparency, so they will have a black background.
You can toggle the terrain on/off for any orthoimage. When you toggle an orthoimage’s terrain on it is filtered by the date and range. When you toggle it back off, the data and range filter is ignored.
This functionality extends directly to the field. When you import a JPG with a world file, it is automatically made available to your field applications like Trimble Siteworks. You can upload new site aerials from the office, and your field crews can immediately access them as a background map for their operations.
Imported orthoimages are automatically added to your project settings. To confirm, click Settings in the left pane and select Data Collector > Background Images. These images are also available in the 3D Viewer, but if you do not add a survey data and time, it cannot be aggregated with the orthoimage. Click the
More icon next to the image to see a warning of why the date is not available; you can add a date in the Info pane. Once you click Save, the image is processed and tiled so you can render this image.
By requiring a survey date, these images become an active part of your project's digital timeline. You can toggle the terrain and use the date filter to slide between different surveys, providing powerful visual context for progress tracking and as-built verification.
Toggle the Visibility of Your Project Data
Show/hide any number of design and surveyed surfaces (as well as orthoimages and terrain) in the 3D Viewer.
-
On the left side, click the
3D Viewer icon. -
Click the
Project Data icon. -
Expand the category with data you need to show/hide.
-
Toggle the
Visibility icon for a surface, image, or terrain model so it is visible.
Change Surface Transparency and Color
With surfaces visible, assign colors for differentiation, and adjust the transparency for easy comparison, especially where multiple surfaces overlap.
-
Do the steps above.
-
Pick a surface in the view.
-
At the bottom of the 3D Viewer, click the bucket on the right side of the icon.

-
In the Color dialog, pick a new (or custom) color. This color selection from a standard palette or custom color creator allows for rapid visual identification of distinct design elements, such as existing ground, proposed finished grade, subgrade layers, or utility corridors.
This process can be repeated for all surfaces in the project to create a clear, color-coded, and easily decipherable 3D model.
Adjust the Transparency and Background Elevation of the Terrain Model
This feature helps when terrain data has spikes rising out of the background map. By adjusting the Background Elevation, the background map is raised to meet the surface, making terrain easier to visualize.
-
Click the
More icon next to a terrain model and select Options. -
In the Options pane on the right, adjust the Transparency using the slider.
-
Enter a new Base height. The height adjusts immediately.
-
If needed, click Reset to return the terrain to its original height.
Change the Date and Time Range for a Terrain Model
-
Click the
More icon next to a terrain model and select Edit. -
In the Terrain Filters pane on the right, click the arrow next to Date & Time Range.
-
Modify the values and click Apply.
Exclude Machine Data from Terrain
If you do not exclude machine data, your terrain might look irregular, with unexpectedly elevated 3D data.
Terrain with machine data
Terrain with machine data excluded
-
Click tthe
More icon next to a terrain model and select Edit. -
In the Terrain Filters pane on the right, expand the Machines section.
-
Check the Exclude all machine data box.
-
Click Apply.
Dynamic Draping of Elevations and Orthoimages
By default, background satellite map data is projected onto terrain, giving it immediate real-world context. You can also display the color-coded, elevation heat map, to visualize high points, low points, and gradients across the entire aggregated site.
Your imported orthoimages can also be draped onto the terrain. The system tiles the image to efficiently render even large files, providing a high-resolution, photo-realistic view of your as-built conditions.