Scan and image parameters
After creating a new project or continuing an existing project, the Scan Parameters screen opens where you can set the scan and image parameters for the data to be acquired.
Scan parameters
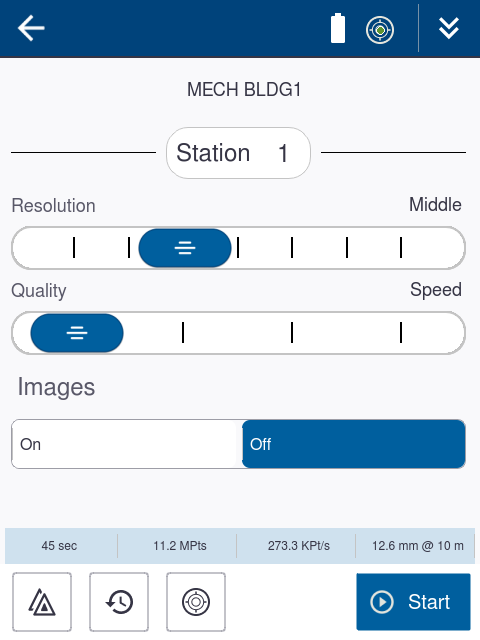
Setting the required scan parameters is done using the slider bars to set the Resolution and Quality parameters for the current station. The following scan properties are updated at the bottom of the screen as the parameters are adjusted so you will know the time required and the level of data that will be captured.
-
Scan Time = min:sec
-
Maximum Points = MPts
-
Acquisition Rate = KPts/s
-
Point Spacing = mm @ 10 m or in @ 33 ft
The units for point spacing can be set to Metric or Imperial. See Settings > General.
The table and tips below will help you select the best scan resolution for your project.
| Scan Mode | Ideal Distance | Spacing mm @ 10 m | Spacing mm @ 35 m | Spacing mm @ 50 m | Spacing mm @ 80 m | Max.
Number of Points |
Max. File Size |
|---|---|---|---|---|---|---|---|
| Preview | -- | 50.3 | 175.9 | 251.3 | 402.1 | 698.3 KPts | 5 MB |
| Low | > 1 m | 25.1 | 88.0 | 125.7 | 201.1 | 2.8 MPts | 21 MB |
| Middle | > 2 m | 12.6 | 44.0 | 62.8 | 100.5 | 11.2 MPts | 85 MB |
| High | > 5 m | 6.3 | 22.0 | 31.4 | 50.3 | 44.7 MPts | 341 MB |
| High ×2 | > 20 m | 3.1 | 11.0 | 15.7 | 25.1 | 178.8 MPts | 1.3 GB |
| High ×4 | > 40 m | 1.6 | 5.5 | 7.9 | 12.6 | 715.0 MPts | 5.3 GB |
| High ×10 | > 100 m | 0.6 | 2.2 | 3.1 | 5.0 | 45.0 BPts | 33.3 GB |
Scanning at short range can result in overlapping scan points and lower resolution scans are often sufficient. Higher resolution scans are most suitable for scanning long range objects.
-
A greater number of lower resolution scans will often give you better overall coverage than a fewer number of high resolution scans because you will capture data from more viewpoints and have more overlap for registration.
-
The Preview scan resolution is not recommended for scans where you will want to take exact measurements due to the low resolution and is only intended for the location of high resolution area scans.
-
The Low and Middle scan modes are good for quickly scanning simple structures at shorter range and for locating higher resolution area scans.
-
The High scan resolution is optimally suited for most applications.
-
The High x2 and High x4 scan resolutions are recommended to capture more distant objects or to capture fine details on complex objects, but the scan size will be greater and the scan time will be longer. Consider area scans to save time in the field.
-
The High x10 scan resolution should only be chosen for small area scans or very long range objects. A complete scan with this resolution requires significantly more time, an enormous amount of storage capacity (> 33 GB) likely exceeding a computer’s memory.
The table and tips below will help you select the right quality setting while taking into account the time required to capture a specific scan.
| Scan Mode | Quality Setting / Scan Time | |||
|---|---|---|---|---|
| Speed | Balanced | Good | Best | |
|
Preview |
-- | 0:23 | -- | -- |
| Low | 0:23 | 0:46 | 1:34 | -- |
| Middle | 0:46 | 1:34 | 3:07 | 6:14 |
| High | 1:33 | 3:07 | 6:14 | 12:29 |
| High ×2 | 3:06 | 6:14 | 12:28 | 24:59 |
| High ×4 | 6:13 | 12:28 | 24:57 | 49:59 |
| High ×10 | -- | 38:58 | 78:00 | 156:18 |
-
The higher the quality level, the longer it takes to complete a scan, but the range noise is reduced. With each quality level scan times will be doubled and the range noise will be reduced by a factor of 1.4.
-
Consider using higher quality settings in area scans and for special applications where premium data quality is required.
-
The Speed and Balanced quality settings are suitable for most applications because the range noise is still low.
-
The Good and Best quality settings will help reduce noise in more difficult outdoor environments.
-
Range noise reduction may not be as noticeable on short range scans.
-
Depending on the roughness of the surface the reduction in range noise may be smaller, particularly when scanning on bright surfaces at short distances.
Image parameters
When the Images mode is turned on, the scanner captures images after completing the scan. The camera will produce an impressive 80 MP panorama with parallax free HDR images to complement your scan data.
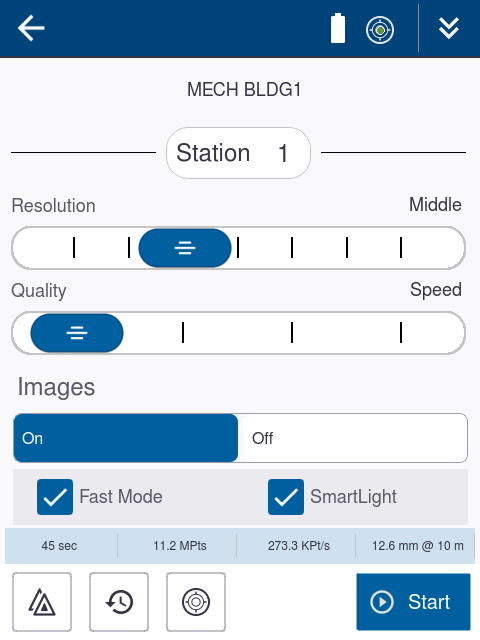
The scanner always takes HDR images and the HDR algorithm determines the number of images required for HDR exposure based on the current lighting conditions.
-
Fast Mode:
-
Activate the Fast Mode for most lighting conditions to save time. The Fast Mode will capture 2-5 images from each position depending on the lighting conditions. The image acquisition is approximately 2 minutes.
-
When the Fast Mode is deactivated, 3-11 images will be taken from each position, increasing the image acquisition time to approximately 2 minutes 30 seconds. In extremely bright or dark ambient conditions you may consider deactivating the Fast Mode if getting the highest quality panorama is more important than saving time.
-
-
SmartLight:
-
The integrated SmartLight mode should be activated to improve color quality in poor lighting conditions and completely dark environments.
-
The SmartLight mode can also be activated in all lighting conditions for general overall improvements and to speed up image acquisition time.
-
