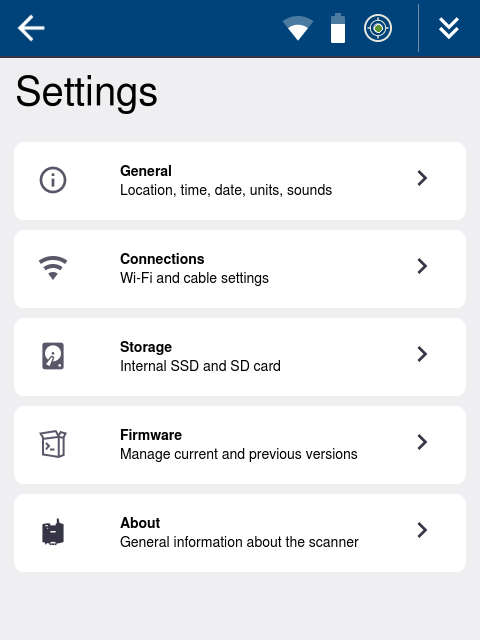
Settings
The Settings screen provides access to the general system settings, Wi-Fi and cable connections, storage and firmware management and other scanner information.
Tap the Settings icon in the upper left corner of the status bar to access the Settings screen.

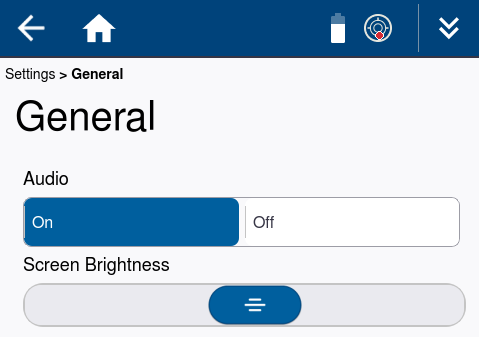
Settings > General
Tap General > to access the General settings.

At the top of the General screen, you can turn On/Off the audio for sound notifications and adjust the brightness of the screen.
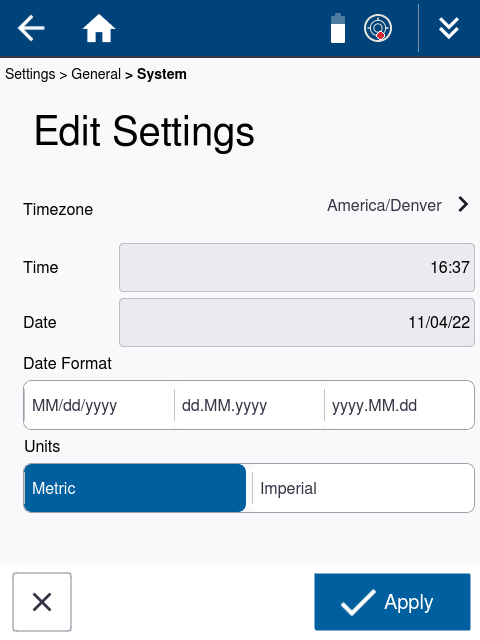
1. Scroll down to see the System section.
2. Tap Edit Settings to set the Timezone, Time, Date and Units to Metric or Imperial.
3. Tap Apply to save or X to exit.
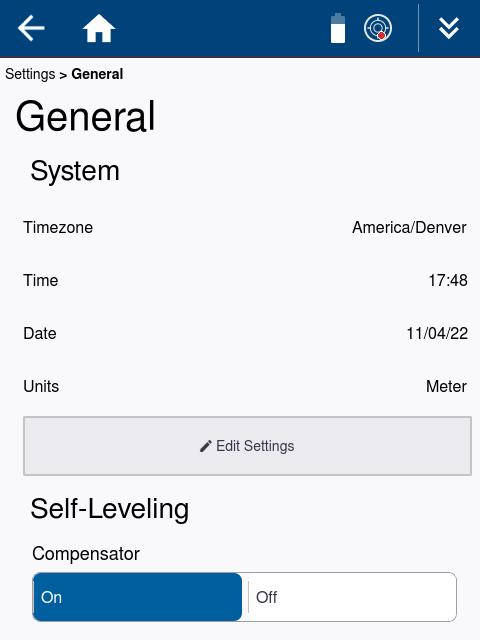
Self-Leveling is where you can turn On/Off the Compensator. It is recommended that you leave the compensator on for the Tilt compensation when within a range of ±0.5°. The Compensator can be left on when scanning upside down or tilted at any angle but the Compensator will be out of range and the scans will be unleveled. The Compensator should be turned off when scanning on a fluctuating surface like a ship.
Use only the onboard electronic bubble to level. The tribrach level bubble can differ from the electronic level display and should only be used for coarse leveling > ±0.5°.
In Perspective, scans that are taken upside down will be oriented correctly. However when they are tilted towards 90°, there is less accurate IMU information on the rotation and the Z angle of scans. Scans can be oriented at 90° or even flipped to 180°. Manual registration techniques will be required to correctly orient and register tilted scans.
Tap  in the upper left corner to go back to the main Settings screen.
Settings > Connections
Tap Connections > to access the Connections settings.

From the Connections screen, you can edit the Wi-Fi and Cable settings:
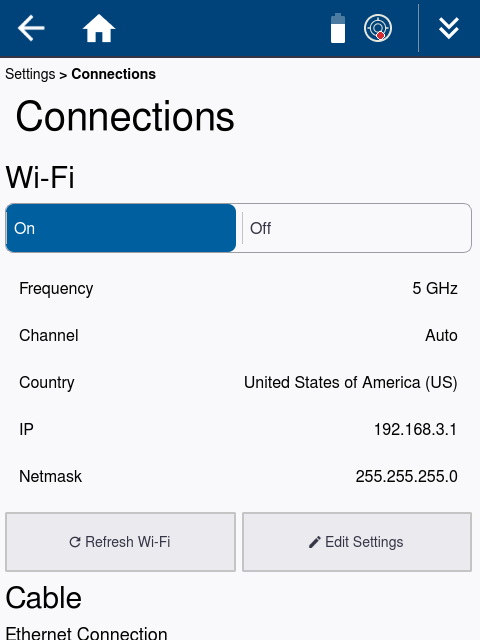
In the Wi-Fi section:
-
Turn the Wi-Fi option On to enable the Wi-Fi connection from the tablet running Perspective. Otherwise turn the Wi-Fi option Off.
-
Tap the Refresh Wi-Fi button to restart the Wi-Fi module.
-
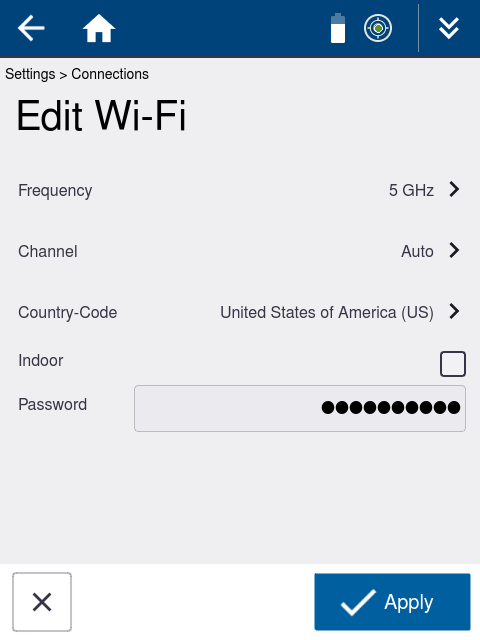
Tap the Edit Settings button to set the Frequency, Channel, Country Code, option for the Indoor use and reset the Wi-Fi Password.
-
Tap Apply to save or X to exit.
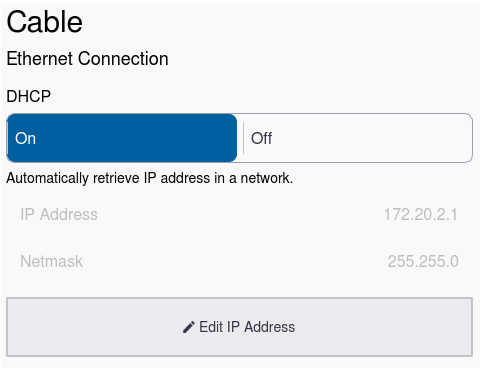
In the Cable section:
-
Turn On/Off DHCP for the Ethernet connection.
-
Tap Edit IP Address to change the IP Address and Netmask.
-
Or simply use the default settings.
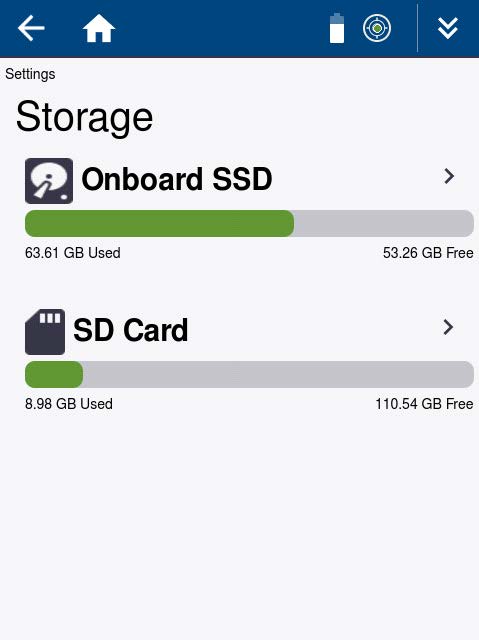
Settings > Storage
Tap Storage > to access the Storage screen.

The Storage screen displays the status of the Onboard Solid State Drive (SSD) and SD Card. Tap > on either storage device to access the disk and file management features.
Settings > Storage > Onboard SSD
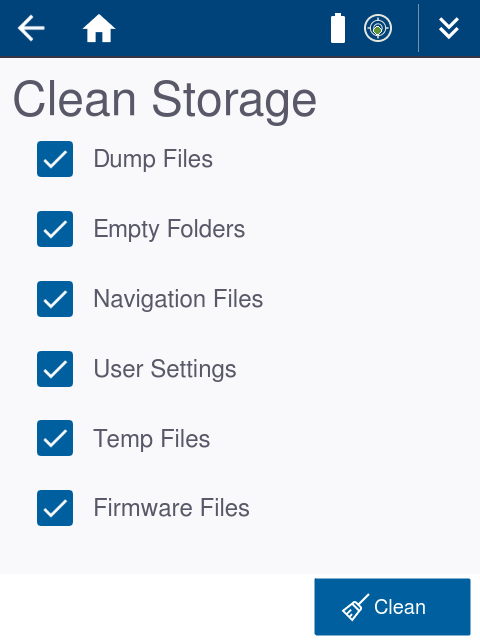
From the Onboard SSD screen, you can manage projects, firmware and clean files to free space when needed.
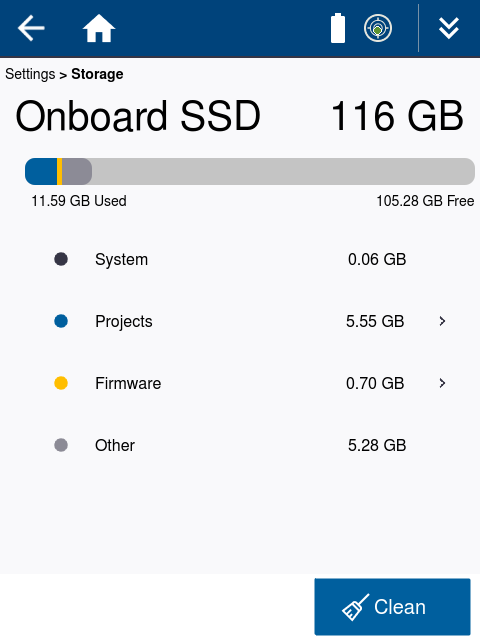
Tap:
-
Clean to selectively remove files that are no longer required.
-
Projects > to selectively copy or delete projects or individual scan files.
-
Firmware > to manage firmware files. Settings > Firmware.
Before deleting a project from the onboard SSD, you should backup the project folder to the SD card or another computer. The fastest way to transfer data from the onboard SSD is by using the X12 Ethernet cable. See Mapping Trimble X12 Drive to Windows PC for information on establishing a network connection with the scanner to transfer files.
Settings > Storage > SD card
From the SD Card screen, you can manage firmware files, format and eject the SD card. The format function will erase everything on the SD card so make sure you have a backup.
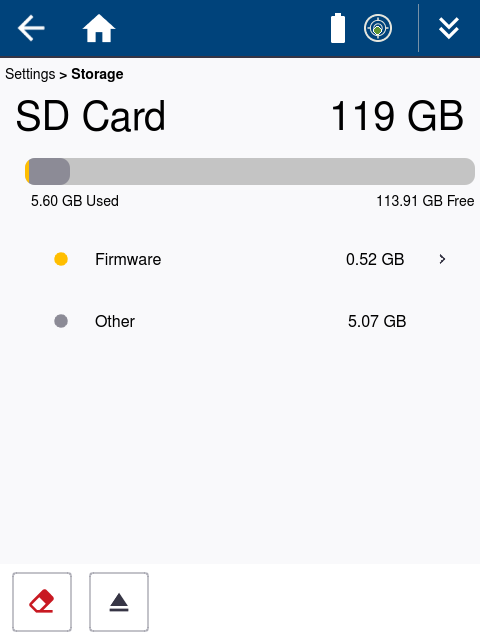

Tap:
-
Firmware > to manage the firmware files. See Settings > Firmware
-
 to format the SD card.
 -
 to eject the SD card prior to removal.
Before deleting files from the SD card, it is recommended that you back up the data to another computer especially if project files have been copied from the onboard SSD.
Settings > Firmware
Tap Firmware > to access the Firmware screen.

The firmware updates are done from the SD card. Firmware will be distributed via the Trimble Installation Manager and must be downloaded and placed in the root of the SD card.
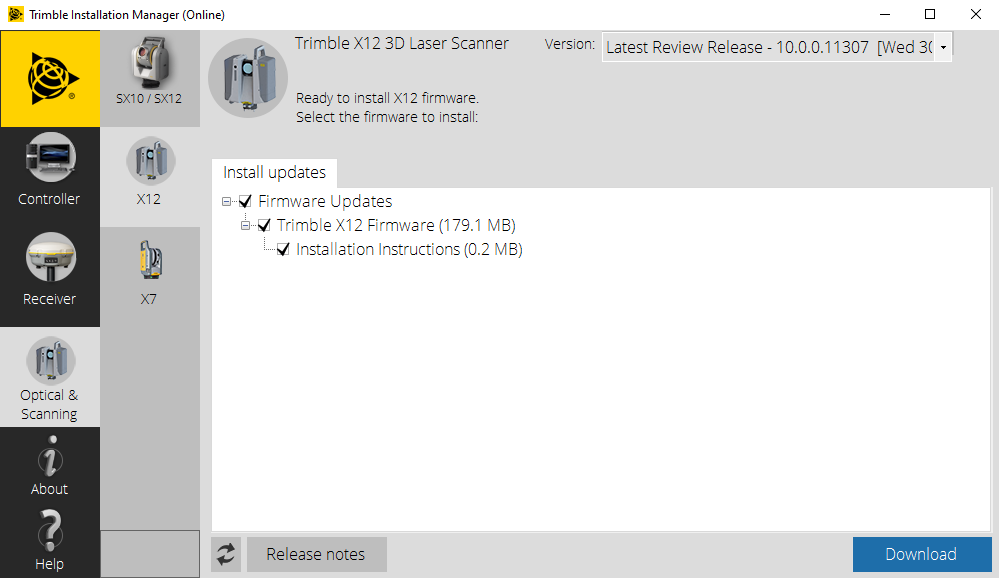
When a new firmware is on the SD card, it will appear in the list of firmware as New.
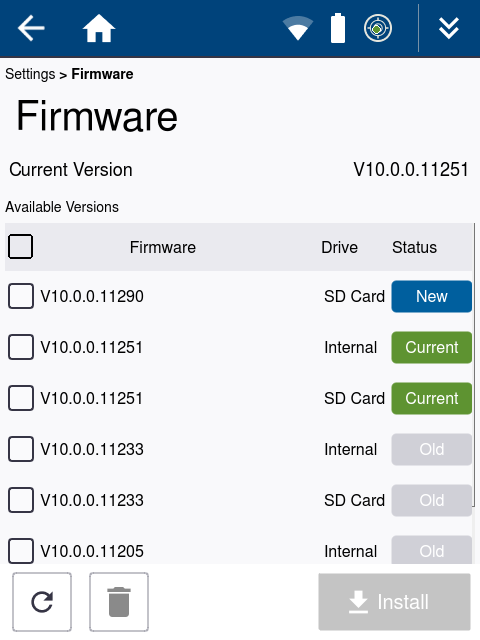
To install a new firmware version:
-
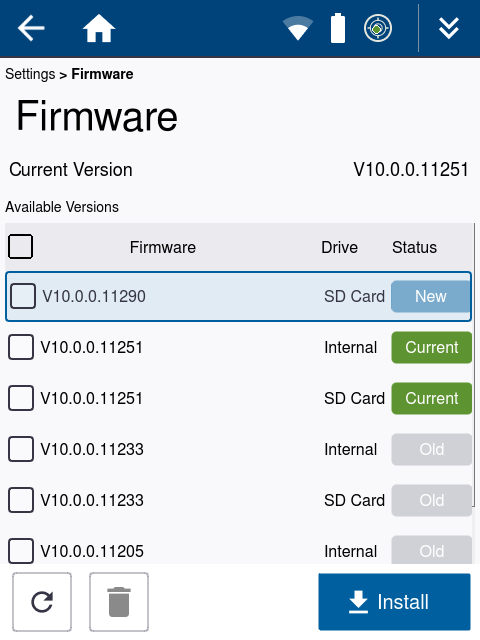
Tap the new firmware version so it is highlighted.
-
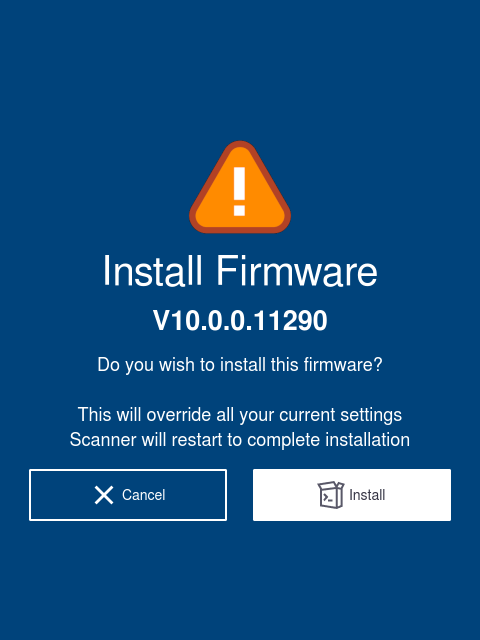
Tap the Install button. The Install Firmware screen appears.
-
Tap the Install button again. This will override your current settings and the scanner will restart to complete the installation.
To delete an older firmware version from the SD card and the onboard SSD:
-
Tap the check box of the version you want to delete.
-
Tap
 to delete.
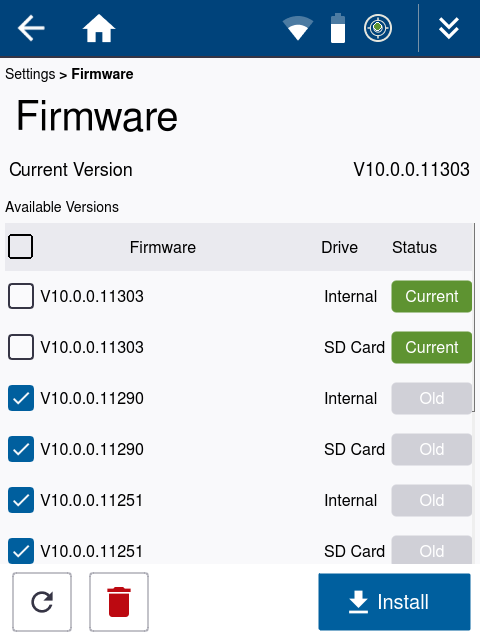
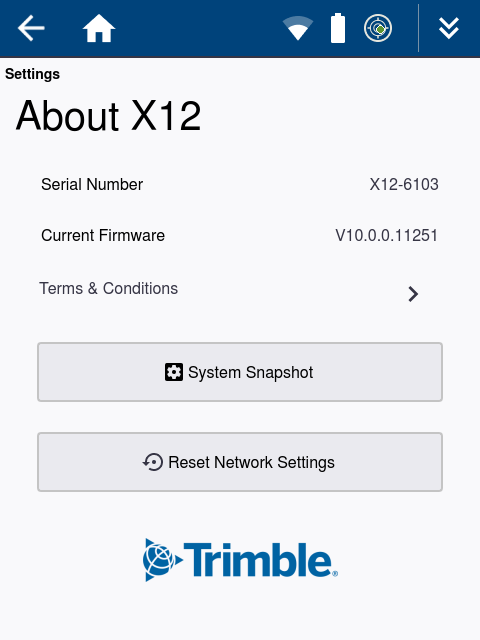
Settings > About
Tap About > to access the About screen.

This screen provides the X12 serial number, current firmware, terms & conditions and buttons to capture system log files and reset network settings to the default settings.
Tap:
-
System Snapshot to generate a log file for support purposes. A file with a *.report extension will be saved to the root of the SD card. The file name will include the X12 serial number and date.
-
Reset Network Settings to reset the Wi-Fi and network settings to the defaults (Frequency to 2.4 GHz, Channel to 5, Country to Germany (De) and Wi-Fi Password to the factory default value).
You can capture any screen by touching the screen in an open area until you see a white flash around the edge of the screen. An image file with a *.png extension will be saved to a screenshots folder on the SD card. Screen shots can be helpful for support and training purposes.
