Depth Autos Setup, Tilt Autos Setup, or Both
This section describes the use of Depth Autos and VM510 Tilt Autos for tilt attachments and couplers.
Autos performs best when grading a finish surface. After you finish bulk excavating and approach final grade, engage Autos.
| Autos mode | What the system automatically controls |
|---|---|
| Depth Autos | The system automatically controls movement of the boom and attachment curl, while you manually control movement of the stick. |
| Tilt Autos | The system automatically controls movement of the attachment tilt, while you manually control movement of the rest of the front linkage. |
| Depth and Tilt Autos | The system automatically controls movement of the boom and attachment tilt and curl, while you manually control movement of the stick. |
NOTE – Use Autos with a bucket, do not use it with any other type of attachment.
NOTE – For machines with a two-piece boom, do not move the upper boom while in Autos mode.
TIP – For information on best practices, see Best Practices When Using Depth Autos and Best Practices When Using Tilt Autos.
TIP – For optimum performance when using Autos features, avoid connecting the Operator App device to the system via Wi-Fi. Ensure that you use a wired connection.
Autos status indicators
The Autos status indicators at the bottom left (Tilt) and right–hand corner (Depth) of the work screen show you what state Autos are currently in.
NOTE – If you use Tilt Autos without Depth Autos, the system will not have any pilot pressure information and will not be able to detect a hydraulic lockout. The Tilt Autos status indicator will not change to Manual Interlock as a result of the hydraulic lockout being engaged.
| Status indicator | Status |
|---|---|
|

|
Manual Autos is enabled, but not engaged. |
|

|
Manual interlock Autos is enabled but cannot be engaged. Possible reasons: Hydraulic lockout engaged, other menus or apps are obscuring the Autos icon. |
|

|
Autos ready Autos is enabled and engaged, but is not active because the attachment is outside the control range. |
|

|
Autos engaged Autos is enabled, engaged and active with the attachment inside the control range. In this state the system controls movement of the boom and attachment. |
|
|
Autos not ready Autos is enabled and engaged but cannot be active so Autos is temporarily suspended. Possible reason: GNSS precision is outside tolerance. |






Enable and Engage Autos
WARNING – When Depth and Tilt Autos is engaged, the system will control movement of the boom and attachment. These movements could cause injury to anyone near the attachment, or damage to the machine. Always put the attachment on the ground and engage the hydraulic lockout before you leave the machine.
Do not use Depth and Tilt Autos when somebody is working near the attachment or if the ground conditions are unstable. Only use Depth and Tilt Autos to grade a finish surface. Disarm Depth and Tilt Autos when you perform other applications, such as lifting.
To use Depth Autos, Tilt Autos or both:
TIP – If you change the tilt control roller speed, the left/right direction mapping, or any other workflow settings on the machine display after the Tilt Control Calibration has been performed in the Web Interface, you must repeat the Tilt Control Calibration and the Tilt Valve Calibration. Workflow settings include changes like pilot pressure limits or flow settings.
-
If you are in Depth and Slope mode, bench the machine before you use Autos.
If you are in Design mode, load a design before you use Autos.
- Position the machine on solid, stable ground to prevent rocking.
-
Make sure the machine’s hydraulic oil reaches its normal operating temperature (55°C/130°F ).
-
Select High Power mode and turn the throttle up to maximum revs.
NOTE – It is okay to use the auto idle function on your machine.
-
Position the attachment within the control range. Be aware that the Autos limits are different for depth and tilt. Tilt Autos will engage when the focus point is within 1 m (3.3 ft) from design or bench, but Depth Autos will not engage until the focus point is within 0.4 m (1.3 ft).
TIP – Use the lightbars, cut/fills and buzzer to guide the attachment.
- Access the Autos Setup screen via the Work Settings menu.
-
Arm Autos:
-
In the Autos Setup screen, select the auto mode you require.
-
Toggle Arm Autos on and tap Apply.
-
-
Confirm Autos:
-
Step 1, Move the tilt control roller to raise the left bucket tip.
NOTE – Does not apply to Depth Autos only.
-
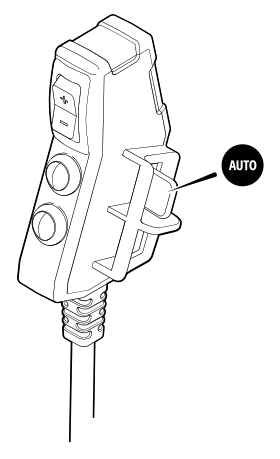
Step 2, Press and hold the auto switch for more than one second, and then release it.
-
-
Engage Autos: Press and hold the auto switch as the attachment cutting edge approaches the design elevation. Autos engage and the system controls movement of the boom and attachment.
To temporarily disengage Autos, let go of the auto switch. Be aware that while Autos is disengaged you can cut beneath the design. Sometimes you may purposefully want to dig below design, however if this is not the case make sure that you monitor your cut/fills and lightbars. Press the auto switch again to re‑engage Autos.
Select and Apply a Preset
You can select and apply the active preset via the Autos Setup or Autos Optimization screen. You can access these screens via the Work Settings menu. There is always at least one preset stored which is the Default preset set by your technician in the Web Interface. This cannot be edited or deleted.
Select the active preset that you require and tap Apply.
You can create, edit or delete a preset via the Autos Optimization screen. For more information, see Depth and Tilt Autos Optimization.
Troubleshooting
The table below lists some of the error messages that may appear when you use Autos. You may need to enlist the help of your technician to resolve the error states.
TIP – There is additional troubleshooting information in the Configuration Guide contained in the technician's commissioning manuals.
| Error Message | Possible cause(s) |
|---|---|
| Auto State Not Visible | Suspect that other menus or apps are obscuring the Autos icon. |
| Machine Control System Error | Check the machine display for faults. |
| Tilt controls configured do not match tilt control calibration. Check if the tilt control roller is connected to the Tilt Autos harness. | System detects a mismatch between configuration and the expected direction of the tilt control roller output. Tilt control roller may not be connected to the system cabling. |
| No movement detected. Raise the left bucket tip. | No movement detected from the bucket. |
| Tilt controls configured do not match the tilt control calibration. Redo the Tilt Control Calibration in the Web Interface, or change the machine side tilt control roller settings so the bucket tilts in the opposite direction. | System detects a mismatch between configuration and expected direction of the tilt control roller output. The direction of the tilt control roller changed after the tilt control calibration was done. |
| Auto controls will use your default configuration. Any changes will affect machine performance. View current configuration at machine display. |
Suspect that the medium flow circuit is not being used. |
