Capture Images
Stay clear of the scanner during the image acquisition to avoid obstruction of the camera.
The captured images can be used to colorize scans, and optionally create panoramas.
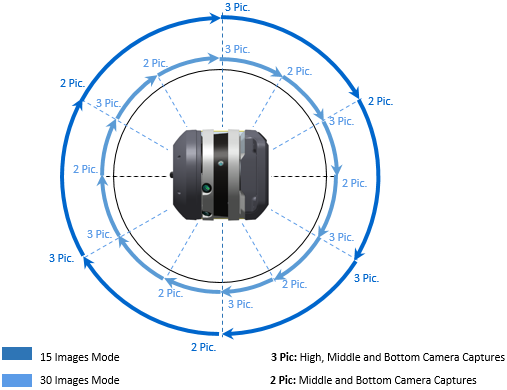
The scanner captures either fifteen images or thirty images for a full dome scan, depending on the number of images chosen in the  Settings > Images. Each image has a resolution of 3840 x 2748 pixels, and the exposure automatically adjusted.
An images acquisition follows the steps below:
-
DATA COLLECTION: The scanner captures a set of images every 60° (or 30°).
To pause and resume the step, tap Pause and Resume.
To interrupt the step completely, tap Stop and Stop.
-
DATA DOWNLOAD: Once the acquisition is complete, the images are saved to the memory card as a TCF format file under the ScanData folder and uploaded to the software database.

-
WHITE BALANCE AUTO-CORRECTION: This step applies a White Balance correction in the Auto mode or with a chosen preset.
Only the Auto mode can be interrupted. Tap
 from the Stations List panel.
-
PANORAMA CREATION: The step is optional. It automatically creates a preview quality panorama based on the captured images. See Process Images. Once the creation is complete, a file in TPF format is created and saved, only to the software database.
To interrupt the step, tap
from the Stations List panel.
No TCF format file is created if you stop acquiring the images.
Do not move the scanner to capture the next scan while it is capturing the images.
The multi-color LEDs on the scanner blink white during the whole image acquisition step.
The scanner captures the images after completing the scan when the Images mode is turned On. The 80 MP camera produces impressive parallax free HDR images to complement your scan data.
For a full dome scan, the scanner takes forty-two images. Each image has a resolution of 1200 x 1600 pixels, and the exposure automatically adjusted.
An images acquisition follows the steps below:
-
INITIALIZATION: The HDR algorithm determines the number of images required for the HDR exposure based on the current lighting.
To pause and resume the step, tap Pause and Resume.
To interrupt the step completely, tap Stop and Stop.
-
DATA COLLECTION: The scanner captures a set of images at predefined angles.
To pause and resume the step, tap Pause and Resume.
To interrupt the step completely, tap Stop and Stop.
If the Smart Light option has been enabled, the four LEDs around the build-in camera will flash while it captures the images.
-
DATA DOWNLOAD: Once the acquisition is complete, the images are saved to the scanner internal memory as a TOI format file and uploaded to the software database.
-
PANORAMA CREATION: The step is optional. It automatically creates a preview quality panorama based on the captured images. See Process Images. Once the creation is complete, a file in TPF format is created and saved, only to the software database.
To interrupt the step, tap
from the Stations List panel.
For an area scan, the scanner will not take the same number of images as for a full dome scan, but only the images covering the defined area.
If the Automatic Panorama Creation (Preview) option has been checked, a preview quality panorama will be created for each scan with images (full dome or area) and if the full dome scan does not already have a high quality panorama.
