Laser Pointer
![]() &
& ![]() - The scanner contains visible source and invisible laser source, respectively a class 1 laser for the distance measuring function and a class 2 laser for the laser pointer function. The laser pointer is a visible laser that is emitted from the telescope. It is used to visibly indicate the point being measured.
- The scanner contains visible source and invisible laser source, respectively a class 1 laser for the distance measuring function and a class 2 laser for the laser pointer function. The laser pointer is a visible laser that is emitted from the telescope. It is used to visibly indicate the point being measured.
- Connect your scanner to a controller.
- To enable the laser pointer:
- Capture a scan.
- Display the captured scan in the Station View, by tapping the thumbnail at the bottom left corner in the Map View or
 in the Station View.
- To turn the laser pointer on, tap
 . The laser pointer lights on, pointing downwards (Stop position) inside the Blind Zone. A Reticle appears in the middle of the Station View.
 - To turn the laser pointer off, tap
 .
.
In the Points tool, the laser pointer can be used to visually locate points for precision point measurement. See Points Tool.
The laser pointer is:
-
Disabled in the
 Preview Panorama mode.
 -
Enabled in the
High Quality Panorama mode.
With the Indoor mode, the laser pointer is:
-
Enabled with an X9.
-
Disabled with an X7.
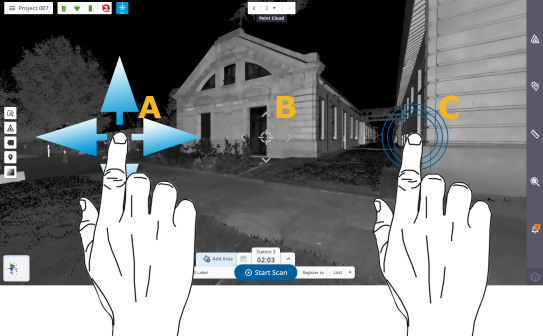
To move the laser spot over a position within the station, do one of the following in the Station View:
-
A - Turn the station around its position (in any direction) to position the Reticle over a desired position.
- B - Tap in the Reticle and
 ,
,  , ,
, ,  to move the Reticle with a small increment in the corresponding direction.
 - C - Tap a position within the station to move the Reticle over the position.
The laser pointer will be turned off, if you:
-
Move the scanner after completing a scan. To enable the laser pointer again, capture a new scan.
-
Press the Start Scan button.
-
Use the One Scan button.
