Points Tool
An annotation is a picked location in the Station View while a precision point is measured as a single point by the scanner indicated by the laser pointer (see Laser Pointer). Both can be matched with a control point for georeferencing the project. Once created, an annotation and a precision point can be edited.
- Tap
 Points Tool. With the Points panel opened, tap
  Create New.
 - Choose one of the following:
 Annotation
No connection to the scanner but only a scan in your project is required to create an annotation.
Input a name in the Name field.
Optionally, input a comment in the Description field.
Optionally, take a picture with your controller to illustrate the annotation to create (see Illustrate With a Picture) or choose an existing picture.
Optionally, check the Use For Georeferencing option to set the annotation to create as a georeferencing point. See Georeference a Project.
- Tap a point and if required, drag and drop the tapped point to a new location.
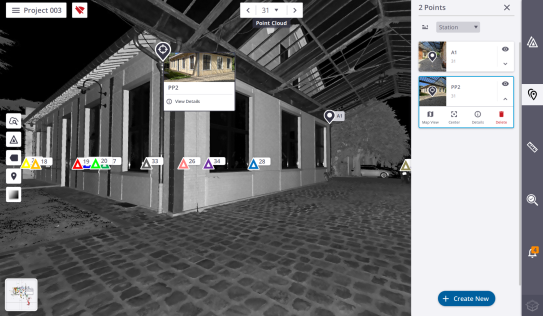
Tap Create Point. Once created, an annotation displays as:
A pin in the Station View, with a label (annotation's name).
A card in the Points panel, with the annotation name, the name of the station it belongs to, and the illustrated picture.

In the Preview Panorama (or High Quality Panorama)
 mode, you cannot tap a point to create an annotation.Precision Point
A connection to the scanner and a scan are required to create a precision point.
With the Indoor mode, the Precision Point type is:
Enabled with a scan acquired with an X9.
Disabled with a scan acquired with an X7.
Input a name in the Name field.
Optionally, input a comment in the Description field.
Optionally, take a picture with your controller to illustrate the precision point to create (see Illustrate With a Picture) or choose an existing picture.
Optionally, check the Use For Georeferencing option to use the precision point to create as a point for georeferencing the project. See Georeference a Project.
And input a height in the Target Height field. The position on the ground of the measured point is displayed.
The Target Height field is only available for leveled scans, and when the Use For Georeferencing option has been checked.
- If required, turn on the laser pointer to aim the point to measure (see Laser Pointer).
- If required, zoom in and tap Scan Point. Perspective displays the distance to the precision point once the measurement is done.
Tap Create Point. Once created, a precision point displays as:
A pin in the Station View, with a label (precision point's name).
If a Target Height has been input, the precision point is created on the projected position on the ground. Otherwise, no.
A card in the Points panel, with the precision point name, the name of the station it belongs to, and the illustrated picture.
A measurement will fail when it is done inside a none-scanned area.
The scanner may execute a field calibration process before each measure.
In the
Preview Panorama mode, you cannot create a precision point while in the High Quality Panorama) you can.
Below are the different representations of a point once created:
 annotation.
 annotation, set for georeferencing use.
 annotation, set for georeferencing use and matched with a control point and the distance to the control point is under the defined Georeference Error Tolerance.
 annotation, set for georeferencing use and matched with a control point and the distance to the control point exceeds the defined Georeference Error Tolerance.
 precision point.
 precision point, set for georeferencing use.
 precision point, set for georeferencing use and matched with a control point and the distance to the control point is under the defined Georeference Error Tolerance.
 precision point, set for georeferencing use and matched with a control point and the distance to the control point exceeds the defined Georeference Error Tolerance.
For matched points,
 is displayed in the card with the Control Point name and the distance to the Control Point.
To display (or hide) a point from all views (Map View, Station View and 3D View), select it from any view (or from the Points panel):
-
In the current view, the selected point is displayed bigger than the others, and a panel pops up showing its name, the thumbnail of the attached picture and the View Details command.
-
In the Points panel, the selected point is surrounded by a blue frame, and its card expands showing hidden commands.
-
Tap:
 to hide the selected point from all views.
 to display the selected point in all views.
 to center the selected point in the current view.
 to switch from the Station View display to the Map View (or 3D View) display.
  to switch from the Map View (or 3D View) display to the Station View display.
-
Select only appears when the Points panel is opened in the Georeferencing tool. It enables you to select a point to match (or unmatch) with a control point.
-
In the
Preview Panorama mode, all created annotations stay displayed and all created precision points are hidden (in the Points panel, and are grayed-out). -
In the
High Quality Panorama mode, all created points whether annotations or precision points are displayed.
To keep annotation and precision points visible, even if the associated station(s) are hidden, enable the option Show Points of Hidden Stations on the  Settings > General page.
Select a point from any view (or from the Points panel) and tap Details (or View Details) to display its properties.

Tap Edit. From the Edit Point panel:
- Turn the Use For Georeferencing option on or off.
- Change the Target Height value (only for precision points for which the Use For Georeferencing option has been turned on, and the scan leveled).
- Change the name.
- Change the description.
- Replace the attached picture with a new one. First, remove the previous picture by tapping Remove Image and then attach a new one.
- Not modify the position.
Once done, tap Save.
To unmatch a pair of control point and annotation (or precision point), turn the Use For Georeferencing option off. See Edit the Matches.
To delete a point from all views, select it from any view (or from the Points panel) and tap Delete (or Details or View Details to display its properties. Once opened, tap Delete.
Deleting a matched annotation (or precision point) does unmatch it from its matched control point. See Edit the Matches. Consider to georeference the project again after deleting.
Created points can be sorted by Point Name or Station Name in Ascending Order (or Descending Order).

To export the annotations and precision points into a .csv file:
-
From a project: Tap
 >
>  to open the Finalize & Export Project dialog and check the Export Points (.csv) option.
 -
From a station:
-
Tap
 Station List to open the panel.
 -
Tap
 Select to open the Stations Selection tool.
 -
Tap a station card to select the station.
-
Tap
Export to open the dialog and check the Export Points (.csv) option. The project must contain either annotations or precision points. Otherwise, the option will be grayed-out.
-
Choose
 Device to export locally on your device.
Annotations and precision points cannot be sent alone to TRCPS; they must be sent within the project they belong to. Therefore, choosing the Cloud option will deselect the Export Points (.csv) option (see Upload to TRCPS).
The .csv file includes the following details: Name, Coordinates, Description (if provided), whether it is used for georeferencing, Target height (for precision points, if available), and Image name (if applicable). The exported images are stored in a specific folder.
