Georeference a Project
Georeferencing is the process of defining the absolute location and orientation of your project in the world. This is done by matching some locally observed points with some control points, whose coordinates are known in a given coordinate system.
Control points' coordinates have to be in ground coordinates with a scale factor 1.
- Create, register and refine a project. See Refine a Project.
Refining a georeferenced project may break the georeferencing itself. If your project is not refined yet, the application will prompt you to do so.
- Create at least three points (annotations, or precision points, or targets) and set them for georeferencing use. See Points Tool.
Annotations or precision points should cover the whole project, and should be measured at different elevations.
- From the Menu panel, tap
 . The created annotations
  or precision points
  are in the Select Point list with the Unmatched status.
 Only annotations and precision points with the Use for Georeferencing preference selected are displayed, and the others hidden.
- If you have no control points, do one of the following:
 Import Control Points
To import a control network surveyed by traditional surveying scanners, do:
- Tap Import and import a text file in CSV format. File may have TXT, CSV, CRD, CR5, etc. extensions.
- In the Import Control Points dialog, customize the following:
File Unit Type - Select between the (X,Y,Z) coordinates system and the (N,E,El) coordinates system.
Separator Type - Select a separator between the attributes of a point.
Units - Select whether to work in Metric or imperial units. If Feet, specify whether they are US Survey Feet or International Feet.
Lines to Skip - Select the number of lines to skip. These lines can be headers, comments, or coordinates that you don't want to keep.
Lines are numbered, so it is easy for you to count them.
Columns to skip - Select the number of columns to skip.
- Tap Import.
Create Control PointsTap Key In to create a control point manually.
Code refers to a description of the point to create.
- If you have less than three unmatched control points. The software does only shift the project to the location of the control point(s).
Import or create other points.
Or consider matching the control points manually.
- If you have less than three matched control points. The software prompts you to import (or create) additional control points.
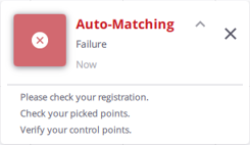
- If you have three unmatched control points or more. The software first tries to match them automatically with the annotations or precision points (AUTO):
- If succeeded (at least three pairs successfully paired), it computes the matches (see Compute the Matches).
- If failed (less than three pairs successfully paired), it displays a red notification. Consider checking:
- Your project, if it has been correctly registered.
- Your points (annotations or precision points and/or control points). If required, delete or add some news.
- If you have three matched control points or more. The software does nothing, as these points have been already paired and the errors computed. You can edit these matches (see Edit the Matches).
Use
 or
or  to import or create additional control points.
Control points already imported (same name, description and coordinates) will not be imported again.
A control point displays as a pin
 in all views, a card in the Control Points panel, and a popped-up panel when selected.
In the Control Points panel, select a point. Its card is surrounded by a blue frame and expands showing hidden commands. Tap:
 to hide the selected point from all views.
 to display the selected point in all views.
 to center the selected point in the current view.
 to switch from the Station View display to the Map View (or 3D View) display.
 to switch from the Map View (or 3D View) display to the Station View display.
 to select the point to match (or unmatch).
Control Points can be removed from the project all at once (by tapping
 and
and  ) or individually (by tapping
  >).Compute the Matches
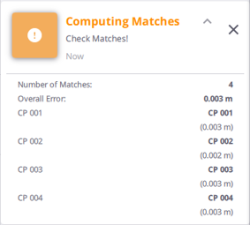
After pairing successfully the control points with the annotations or precision points, the software computes the georeferencing transformation and displays:
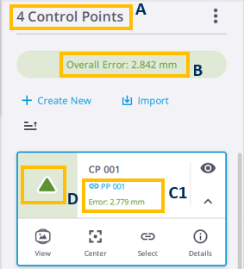
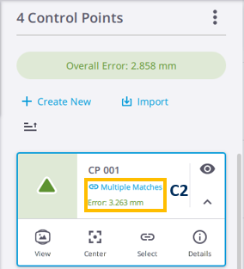
- A - The number of control points (matched or unmatched).
- B - The Overall Error which refers to as the average of all georeferencing errors, in green or orange.
- The Error in green or orange, which refers to as:
C1 - The distance between the control point and the annotation (or precision point), in case of Single Match.
C2 - The distance between the control point and the barycenter of all annotations (or precision points), in case of Multiple Matches.
- D -
 or
or  for matched control points.
  or
or  for a pair of matches.
Green color means that the georeferencing error is under the defined Georeference Error Tolerance, and Orange color if it exceeded the defined Georeference Error Tolerance).
The default value for the Georeference Error Tolerance is 10 mm. You can change the value by tapping
 Settings > Units or Report > Edit.
- A notification:
Green to notify that the Compute Matches has succeeded. All georeferencing errors must be under the defined Georeference Error Tolerance to turn the notification green.
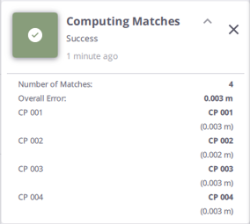
Orange to notify that the matches must be checked. One georeferencing error under the defined Georeference Error Tolerance is enough to turn the notification orange.
Edit the MatchesIf you are unsatisfied with the matches, edit them:
Unmatch a pair of MatchesDo one of the following:
- In the toolbar, select a control point from the Select Control Point list, the corresponding annotation (or precision point) is automatically selected and displayed, and vice versa.

- In the Control Points and Points panels, tap Select from a card.
A control point can be also selected from the popped-up panel in the Map View.
The selected points flash in the toolbar.
Tap
 Unmatch. The software reruns automatically the Compute Matches step and updates the errors.
Deleting a matched point (control point, or annotation or precision point) is similar to unmatching the point from its matches.
Turning the Use for Georeferencing preference off (see Edit a Point) is similar to unmatching the point from its matches.
Unmatch all pairsTap
and All. Add New Points to MatchYou can add additional points to the existing matches, by:
- Importing (or creating) a new control point.
- Creating an annotation (or precision point). This new point is by default set for a georeferencing use. See Add Points.
- Enabling the Use for Georeferencing preference of an annotation (or precision point).
The
Auto button flashes to notify that the number of points to consider has changed. Tap to rerun the Auto-Match and Compute Matches steps.Match Points ManuallySelect a control point and an annotation (or precision point):
- From the toolbar, by dropping down respectively the Select Control Point list and the Select Point list.

- From the Control Points and Points panels, by tapping Select from a card.
A control point can be also selected from the popped-up panel in the Map View.
The selected points flash in the toolbar.
Tap
Match. The software reruns automatically the Compute Matches step and updates the errors.To match a matched control point with several annotations (or precisions) (Multiple Matches), tap
from a card to select the control point, and select the annotations (or precision points) one-by-one from the toolbar.Change the Target Height ValueTo modify the Target Height value of a precision point, see Edit a Point. If this point is:
- Already Matched: The software recomputes the errors based on this change, and the Auto button flashes to prompt you to rerun the Auto-Match and Compute Matches steps.
- Unmatched: Only the Auto button flashes to prompt you to rerun the Auto-Match and Compute Matches steps.
A precision point which has not been set for the georeferencing use is hidden in all views. In the Points panel,
, and are all grayed-out. When the  Preview Panorama mode is on, all precision points are hidden.Apply the Georeferencing
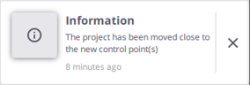
Once all matches are computed, tap Apply to apply the transformation to the project.
is displayed on the thumbnail of the project.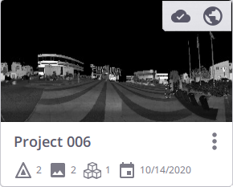
Or tap Close and choose Apply to apply the transformation to the project, or Close to not apply the transformation to the project (the matches and the transformations (rotation and translation) from the last Apply are restored). The next time you reopen the Georeferencing tool:
- Control points:
Added points remain added.
Deleted points remain deleted. The matches associated with the deleted points are not restored.
- Annotations or precision points:
Added points remain added.
Deleted points remain deleted. The matches associated with the deleted points are not restored.
Unchecked Use For Georeferencing preference remains unchecked. The matches associated with the point are not restored.
Modified Target Height value remains modified.
Or tap Cancel to abort the operation.
To export the georeferencing results in a report, run the refine report. See Refine a Project.
If a report has been generated before starting the Georeferencing tool, you DO NOT NEED to re-run the refinement. You simply open the report again. It will have the newest georeferencing changes applied.
- If you have no control points, do one of the following:
