Measure Points Using Photogrammetry
To create a point using photogrammetry measurements, you must make observations to the object on which the point is located in photos taken from two or more photo stations.
After making a photogrammetry observation to the point from the first photo station, you can either (1) manually make subsequent observations from one or more additional photo stations, or (2) allow the software to automatically make subsequent observations from one or more additional photo stations. Both of these methods are described in the following procedure.
To measure points using photogrammetry:
Note: Before beginning this procedure, you should:
- Configure display settings for your photogrammetry measurements as described in Photogrammetry Options.
- Verify that tolerances are set appropriately as described in Photogrammetry Project Settings.
- Select Measure Photo Point in Photogrammetry > Data.
The Measure Photo Point command pane displays. Each of the photo stations in the project is displayed in the Photo stations list.
- In the Point ID field, enter an ID for the new point, or select an existing point in the Plan View or Project Explorer.
If you select an existing point, the layer and feature code (if applicable) assigned to the point are displayed in editable fields. If photogrammetry observations have already been made to the point from any of the photo stations, those stations include a Delete icon in the Photo stations list. You can click the Delete icon to remove the observation before proceeding with the new measurement.
- Optionally, select a different layer for the point in the Layer field.
- Optionally, enter a feature code for the point in the Feature code field, or click the Browse button
 and select a feature code in the Feature Code Editor dialog.
 - Do one of the following:
- If you prefer to manually make observations from other photo stations to the point, ensure the Automatically search for observations check box is deselected.
- If you want to allow the software to automatically make subsequent observations from other photo stations to the point after you make the first observation, ensure the Automatically search for observations check box is selected.
Note:The success of the Automatically search for observations option is dependent on the image quality, the adjustment quality, and how well the feature can be discerned from different stations.
- In the Photo stations list, select the photo station you want to use to make your first photogrammetry observation.
The Station View tab for the selected station displays showing the photo(s) taken from the station.
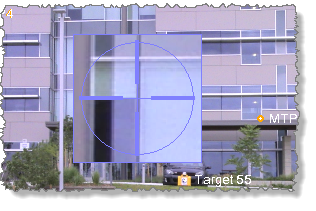
- Click in the Pixel Picker field. Then, using the Pixel Picker control, click the object on which you want to create the point on the Station View tab.
 More about using the Pixel Picker...
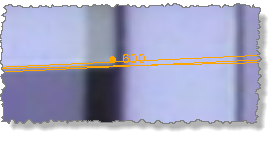
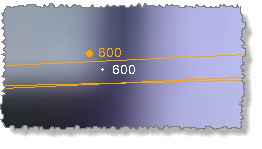
- If the Automatically search for observations check box is not selected and the Automatically advance on select check box is selected (see note below), the Station View tab for the next station in the list is displayed, allowing you to make a second observation to the same object. (At least two observations are required to compute a point.) You can use the Distance from slider bar to scan along the newly created epipolar line from the first station until it intersects (or nearly intersects) the same object in a photo taken from the second station, making it easier to identify the general location of the object. However, you must carefully select the precise location of the object with the Pixel Picker, regardless of the location of the epipolar line.
After you make the second observation, any remaining stations in the list are sorted so that the stations most likely to include the targeted object are at the top of the list. The Station View tab for the next station in the list is displayed, allowing you to make a third observation (if applicable).
Repeat this procedure for each additional station from which you want to make an observation to the new point.
Note: The Automatically advance on select check box is selected by default. If it is not selected, you will need to select each subsequent station in the list for which you want to make a manual observation.
- If the Automatically search for observations check box is selected, the software attempts to make observations to the same object from each of the remaining photo stations. The status of the automatic observation process is displayed in a pop-up status bar. When the process is complete, each of the stations from which an observation was made includes a Delete icon in the Photo stations list. A point cannot be computed unless a minimum of two stations include a Delete icon. If only one station includes a Delete icon, you can attempt to make additional observations by deselecting the Automatically search for observations check box and selecting the next station from which you want to make an observation (see previous bullet).
Each photo station from which an observation is made includes a Delete icon in the Photo stations list. (To remove a station's observation from the list, click the Delete icon.) Each of the corresponding station photos shows a dot and the point ID at the location selected for the new point, along with epipolar lines from the other stations used in the measurement.
- If the Automatically search for observations check box is not selected and the Automatically advance on select check box is selected (see note below), the Station View tab for the next station in the list is displayed, allowing you to make a second observation to the same object. (At least two observations are required to compute a point.) You can use the Distance from slider bar to scan along the newly created epipolar line from the first station until it intersects (or nearly intersects) the same object in a photo taken from the second station, making it easier to identify the general location of the object. However, you must carefully select the precise location of the object with the Pixel Picker, regardless of the location of the epipolar line.
- When you are done making photogrammetry observations to the point, either automatically or manually, you can create additional photogrammetry points as necessary using the same procedure.
- When you are done creating points using photogrammetry, click the Compute button to re-compute the project.
Note: After you re-compute the project, the point ID is incremented by 1 in the Point ID field. This ensures subsequent points will be named the same, but incremented by 1. For example, if the first point you create is "1000", the second point will be "1001", the third point will be "1002", and so on. If the first point is "Aardvark", the second point will be "Aardvark1", the third point will be "Aardvark2", and so on. You can change the automatically incremented point ID by editing it in the Point ID field.
On the Station View tabs, each computed photogrammetry point is displayed as a dot with a point ID label. If you zoom in, you can see that the computed point dot is displayed in close proximity to the observation dot.
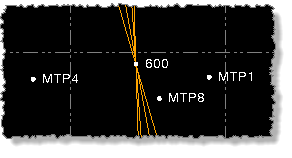
Each newly computed photogrammetry point is also displayed, along with its observations, in the Plan View and 3D View.
In the Project Explorer, a new photogrammetry Observation node
 is displayed beneath each of the stations used in the measurement, which in turn are nested beneath the Photo Stations node
  . The new Point node
  is displayed beneath Points node
  .
.If any of the photogrammetry points include an error flag, display the Flags Pane to view messages about the error(s). If the Measure Photo Point pane is still open, when you click a point in the Flags Pane, the point is selected in the Measure Photo Point pane, allowing you to delete or make additional observations as necessary.
- A yellow flag indicates the photogrammetry point was computed but exceeds the angle tolerances and/or strength-of-figure values specified in Photogrammetry Project Settings. In this case, you might try adding observations from additional photo stations.
- A red flag indicates the photogrammetry point could not be computed because less than two observations were made to the point. In this case, you must make at least one more observation to the point.
To view angle intersection information for a photogrammetry point (azimuth, horizontal/vertical distances and residuals, and strength-of-figure), right-click the point in the Project Explorer and select Point Derivation Report.
To view all photogrammetry point and observation data in a spreadsheet format, select Photo Point Spreadsheet in Home > Data or click the Photo Point Spreadsheet icon
 located at the top of the Measure Photo Point command pane.
For additional instructions on viewing existing photogrammetry data in Trimble Business Center, see View Photogrammetry Data. For instructions on changing a photogrammetry point or observation, see Modify a Photogrammetry Point.
