Create Aerial Photogrammetry Deliverables
Use the Create Deliverables command to create point clouds, elevation rasters, orthomosaics, and/or 3D mesh surfaces from aerial survey data. The command includes two basic workflows: one for aerial mapping-related deliverables and one for 3D modeling-related deliverables, which are used for aerial inspections.
Prerequisites:
- See the Subscription Plans page. For a license matrix by command, see the License page in the TBC Community. Also see View and manage licensed features.
- Aerial photo stations must be adjusted prior to creating deliverables.
To create aerial survey deliverables:
- Select Create Deliverables in Photogrammetry > Deliverables to display the Create Deliverables command pane.
- In the Mission drop-down list, select the flight mission from which you want to create deliverables.
- Optionally, in the Output folder field, change the default path and folder name for the deliverable files you want to create. Or, click the Browse button to select a different folder.
The default output folder is your project folder.
- Optionally, in the Name field, change the default name to be used for all of the deliverable files you want to create.
The default file name is the name of your selected flight mission.
Warning! To avoid unexpected results, do not create files that have the same name as a files that have already been imported into your project.
- Select the appropriate Deliverables quality option, which controls the density of any point cloud deliverables you select to create.
A high-density point cloud contains four times more points than a low-density point cloud, but takes longer to create. Feel free to experiment with different options to achieve the highest quality deliverable.
- Select the appropriate Deliverables type option.
- Mapping - This option enables you to create either a 2.5D point cloud, true orthomosaic, and/or 2.5D mesh for a digital surface model (DSM), or a DTM point cloud, elevation raster, and/or DTM orthomosaic for a digital terrain model (DTM). Advanced options are available to specify the file formats for deliverables, select output resolutions, select orthomosaic background transparency, and specify the oblique angle threshold to use (Digital Surface Model only) to generate mapping deliverables. This option is ideal for various aerial mapping workflows. Continue with step 7.
- 3D Modeling - This option enables you to quickly and easily create a 3D point cloud and/or a 3D mesh. Advanced options are available to specify the file formats for deliverables. This option is ideal for aerial inspection work. Proceed to step 8.
- If you selected Mapping for the Deliverables type, do the following (otherwise proceed to step 8):
- In the Elevation type drop-down list, select the elevation type you want to use to create mapping deliverables.
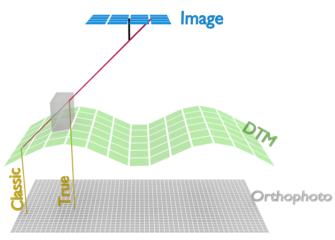
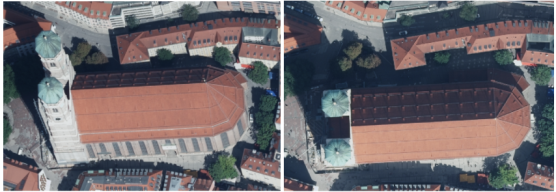
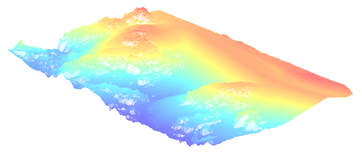
- Digital Terrain Model - Select this elevation type if you need to quickly represent the "true" terrain by creating an elevation point cloud, an elevation raster, and/or an orthomosaic as your deliverables. Since the terrain is often covered by vegetation and artificial structures, TBC will deduce the terrain model from the surface observed in the aerial images. Note that this works fine for smaller artificial image content and when there is a light coverage of vegetation and/or structures, as long as there is enough image content around these objects providing real ground information. Otherwise, point filtering will be required to extract the terrain model using this option.
The DTM creation process uses a feature-based matching method in order to create the point cloud quickly.
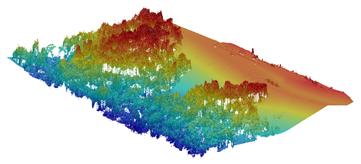
- Digital Surface Model - Select this elevation type if you intend to create a colorized point cloud of the highest quality, a true orthomosaic, and/or an elevation mesh as your deliverables. DSM uses Semi Global Matching (SGM) to obtain high-quality deliverables that are closer to the observed surface of the earth than DTMs.
- Digital Terrain Model - Select this elevation type if you need to quickly represent the "true" terrain by creating an elevation point cloud, an elevation raster, and/or an orthomosaic as your deliverables. Since the terrain is often covered by vegetation and artificial structures, TBC will deduce the terrain model from the surface observed in the aerial images. Note that this works fine for smaller artificial image content and when there is a light coverage of vegetation and/or structures, as long as there is enough image content around these objects providing real ground information. Otherwise, point filtering will be required to extract the terrain model using this option.
- In the Elevation type options group, check the deliverables you want to create.
Note the following:
- Elevation mesh is available only if the Elevation type is Digital Surface Model.
- Elevation raster is available only if the Elevation type is Digital Terrain Model.
- The size of the orthomosaic deliverable, which is determined by the number of aerial photo stations and the resolution you select in the Resolution drop-down list, is limited to 4 GB. If necessary, Trimble Business Center will automatically break the orthomosaic deliverable into multiple files so as not to exceed the 4 GB limit. If multiple orthomosaic files are created and you click the Import button on the Process View tab (see below), all of the orthomosaic files will be imported into your project.
- Optionally, click in the Boundary field and then select in a graphic view an existing boundary to define the area to be used for creating Mapping deliverables.
To create a new boundary to use, click the Create Boundary button located in the command pane toolbar. For more information, see Create a Boundary.
- Optionally, in the Advanced group, do any of the following:
- Change any of the default file Output formats for the various deliverables.
If the Elevation type is Digital Surface Model, you can select
 any of these mesh file formats...
 - Change the default Output resolution for elevation rasters and orthomosaics...
- If you selected the TIFF (*.tif) Orthomosaic output file format, check the Orthomosaic: Transparent background check box to specify that orthomosaic background pixels (pixels not covered by any of the ortho images) be rendered transparent.
- Change any of the default file Output formats for the various deliverables.
- If you selected Digital Surface Model for the Elevation type, optionally change the degrees specified for the Oblique angle threshold.
Only images with an oblique angle less than or equal to the threshold you specify will be used to create deliverables. The number of images that can be used based on this threshold is displayed in parenthesis to the right of the field automatically.
- Optionally (but highly recommended, especially for large projects), use the Processing folder field to enter or select a different file location (for example, on an external drive) for the possibly large volume of temporary files created during the deliverables creation process.
- In the Elevation type drop-down list, select the elevation type you want to use to create mapping deliverables.
- If you selected 3D Modeling for the Deliverables type, do the following:
- In the 3D Modeling options group, check the deliverables you want to create.
- Optionally, in the Advanced group, do either or both of the following:
- Change the default file Output formats for the deliverables.
You can select
any of these mesh file formats... - Optionally (but highly recommended, especially for large projects), use the Processing folder field to enter or select a different file location (for example, on an external drive) for the possibly large volume of temporary files created during the deliverables creation process.
- Change the default file Output formats for the deliverables.
- When you are done, click the Create button.
The Process View tab displays showing the progress of the deliverables creation process. When the process is complete, all newly created files are located in the file path specified in the Output folder field.
- On the Processing View tab, do either of the following:
- Click Import to import the newly created files into your project.
Nodes representing the newly created and imported files are displayed nested beneath the Imported Files node in the Project Explorer. As applicable, a new point cloud displays in the Plan View and 3D View and a new orthomosaic displays in the Plan View.
Note: Unlike other deliverables created with the Create Deliverables command, mesh files are not automatically imported back into the TBC project. They are intended for visualization in other software.
- Click Discard, if you do not want to import the new files into your current project.
The files are not deleted from the specified Output folder and are available to share as necessary
- Click Import to import the newly created files into your project.
- Click to close the Process View tab.