View Point Cloud Annotations
TBC fully supports the import and post-processing of scan data captured with the Trimble X7 Laser Scanner and Trimble Perspective field software. This includes support for the "annotation" feature in Perspective, which enables users in the field to assign a name to a scan point on a feature of interest, add a description, and, optionally, attach one or more photographs of the feature. After the data is imported into TBC, you can easily see the annotated point in a graphic view and the Project Explorer, view its description in the point's Properties pane, and view attached photos in the point's Media Folder. If necessary, you can make changes to the annotation or its associated point properties.
Prerequisites:
- See the Subscription Plans page. For a license matrix by command, see the License page in the TBC Community. Also see View and manage licensed features.
- You must import into your project a TDX (.tdx) file that includes one or more annotations and the associated TZF (.tzf) scan files.
To view a point cloud annotation:
- To view an annotation description, right-click the annotated point in a graphic view or the Project Explorer and select Properties. In the Properties pane, view the Description 1 field.
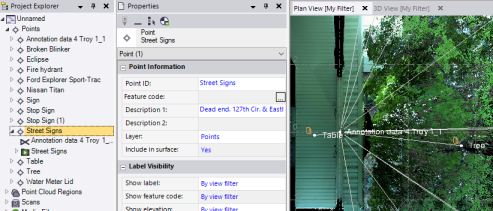
You can edit any of the editable Properties fields for the annotated point, and you can, optionally, add a feature code.
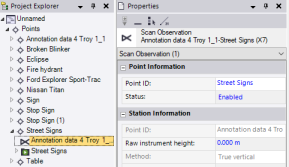
A Scan Observation node is nested beneath the Point node. Each scan observation is represented in the graphic views by a white line connecting the station and the point. You can, if necessary, change the Status of the observation (Enabled, Disabled, Enabled as check) in the observation's Properties pane.
A Media Folder node is also nested beneath the Point node. And, a Media Folder icon is displayed with each of the annotated points in the graphic views.
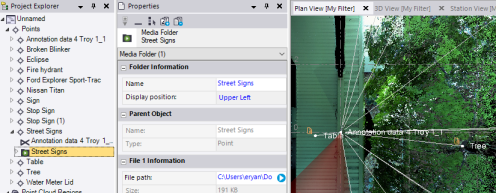
- To view an annotation photo, right-click the annotated point's associated Media Folder in a graphic view or the Project Explorer and select Properties. In the Properties pane, view the photo by clicking the View button in the File path field.
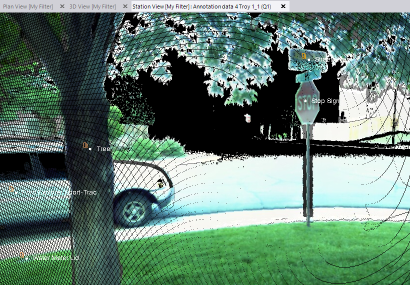
- To view an annotated point from the perspective of the scan station, right-click the station in the Project Explorer and select Station View. This view is very similar to the view displayed in the Perspective software in the field.
Note the following:
- If multiple stations are imported in a single TDX file and they each include an observation to the same annotated point, all applicable observations will be used to calculate the point's position. (If the stations have been registered prior to import, the position difference between the observation is likely to be small. Otherwise, the difference is likely to be large.)
- If multiple stations are imported from multiple TDX files and they each include an observation to the same annotated point, the Merge Points dialog can display, based on your Project Settings, allowing you to select to merge the two observations into one point or import them as separate points.
To select the rule you want to apply when merging points with the same name on import, select Project Settings in the Quick Access Toolbar and select Computations > Point Tolerances > Merge on Import.
- If an annotated point's associated scan station (the station from which it is observed) moves in the project (for example, as a result of scan registration), the annotated point changes its position accordingly.
- The position for each annotated point is computed geodetically to ensure better alignment with the real world, while sacrificing some alignment accuracy with neighboring point clouds.
